
 MONA OS 2.0
 Partner with MONA


 Tự động hoá doanh nghiệp
 Cẩm nang SEO
 Digital Marketing
 Kinh nghiệm thiết kế website
 Hạ Tầng Server
 Giáo dục


 VI
 EN













Message us on
Zalo Official


 ProductsNew

 ProductsProducts
 Mới ra mắtKHA AI 2027App tự edit video, tự đăng mọi mạng xã hội, 2 phút mỗi ngày










 Website designLooks good and wins customers over.
SEO servicesBrings in customers searching for exactly what you sell.
 Tư vấn digital marketingKéo khách từ nhiều kênh, đo bằng số thật.
Corporate video productionVideos introducing your company, factory and team.
 NewAI video productionCompany story films made with AI.
 Custom software developmentCRM, ERP and HRM built for your business.
 Viết AI Agent theo yêu cầuĐặt riêng một trợ lý AI cho đúng việc của mình.
 Tư vấn chuyển đổi AIĐưa AI vào vận hành của cả công ty.
NewMONA LMSManagement for centers and schools.
MONA SkillHubInternal training for company staff.
 NHTQ systemEnd-to-end China–Vietnam shipping operations.
MONA JMSManagement for gold, diamond and pawn shops.
 MONA E-LearningA website with every feature you need to sell courses.
 How to sell online courses (course)More than 30 free lessons on selling courses on autopilot.
 MONA Cloudmonacloud.vnServers to get your apps and websites running.
 MONA Basemonabase.vnPostgres database, sign-in and file storage.
 MONA Mailmonamail.vnSend OTP, order and invoice emails from your software.
 MONA Paymonapay.vnAccept bank transfers via VietQR and notify your software when the money arrives.
 MONA eInvoiceComing soonIssue e-invoices that meet tax standards.
Gấu CườiTrả lời khách 24/7 trên web, Fanpage, Zalo và thu lead cho sale.
 Gấu TeleSalesGọi điện tư vấn, chăm khách như tổng đài viên thật.
Dê CườiTư vấn và chốt đơn cho shop ngay trong khung chat.
Gấu WebmasterNhắn nhóm Zalo là website được sửa xong.
 Gấu Pháp ChếSoạn hợp đồng, rà điều khoản trong vài phút.
 Gấu Báo GiáLên báo giá đúng mẫu và gửi khách ngay.
 AI chăm sóc khách hàngTheo dõi và giữ chân khách hàng cũ.
 Gấu Tuyển DụngLọc hồ sơ, hẹn lịch, phỏng vấn ứng viên.
 Mới ra mắt
KHA AI 2027
Xây kênh chuyên gia 2 phút mỗi ngày
Quay bằng điện thoại, AI tự edit video, tự đăng lên 16 nền tảng và tự trả lời bình luận, tin nhắn.
895.025lượt xem trên kênh CEO MONA sau 37 ngày
 Anh Khánh HùngCEO MONA đang dùng mỗi ngày
Xem app làm được gì
 AI
Gấu Cười MONA ĐANG TỰ XÀITrả lời khách 24/7 trên website, Zalo OA, Messenger và thu lead về cho sale.
Dê CườiChốt đơn bán lẻ và sàn: Shopee, TikTok Shop, web. Chăm cả khách sỉ, đại lý.
Gấu WebmasterCập nhật nội dung, tối ưu SEO website mỗi ngày.
Gấu TeleSalesGọi điện tư vấn, chăm khách như tổng đài viên thật.
Gấu Tuyển DụngLọc hồ sơ, hẹn lịch, phỏng vấn ứng viên tự động.
AI chăm sóc khách hàngGiữ khách cũ, cứu lead đã rớt cho phòng kinh doanh.
Gấu Pháp ChếSoạn hợp đồng, rà điều khoản trong vài phút.
Gấu Báo GiáLên báo giá đúng mẫu, gửi khách ngay khi có yêu cầu.
 Chuyển đổi AI toàn phầnGiải pháp tổng cho doanh nghiệp, 3 lớp triển khai.
 Viết AI Agent theo yêu cầuĐặt riêng một con AI gánh đúng nghiệp vụ của bạn.
 Custom softwareCRM, ERP and HRM with built-in AI automation.
 SEO & AEO thời đại AIĐược Google lẫn AI trích dẫn, không chỉ xếp hạng.
 Kiến thức AI cho doanh nghiệpBài phân tích, hướng dẫn ứng dụng AI vào vận hành.
 Free AI courses
 AI tools at work
App mới · KHA AI 2027
Xây kênh 2 phút mỗi ngày
AI tự edit video, tự đăng mọi mạng xã hội
Free consultation, 8am–10pm every day

18 March, 2023

Interactive Maps are becoming more and more popular with Internet users. When you can add an Interactive Map to your site, your business gains more competitive advantages. So what is an interactive map? And how do you add an interactive map to a WordPress website? You will find the answer in this article from Mona Media. Let's find out!
An interactive map (also called an Interactive Map) is a map that uses GIS – Geographic Information Systems. So the data on an interactive map is updated accurately in real time.
With an Interactive Map, users can navigate and do things like zoom in and out, tilt, rotate, find routes and pinpoint specific locations. In some cases you can also query data or view statistical reports (for example traffic jams, economic or social conditions) through the Interactive Map.

See more: professional website design services, reputable
Adding an Interactive Map to your website gives your business many competitive advantages. It is especially useful for travel agency sites and retail sites.
Here are some key benefits of interactive maps you should know:
There is more than one way to add an Interactive Map to your site. One of the simplest and most popular is Google My Maps. You can also use other free or paid tools to create your own map.
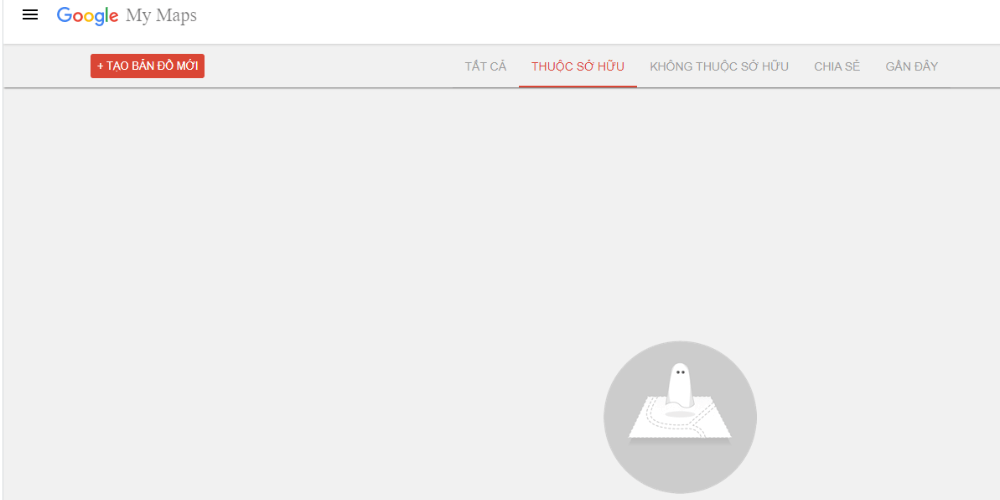
Step 1: Go to the website Google My Maps with your Google account.
Step 2: Click the “Create a new map”.
Step 3: The system takes you to the map editing page. Here you can create your own map by choosing a base map (for example, a map of Ho Chi Minh City) and adding the location of your store or company.
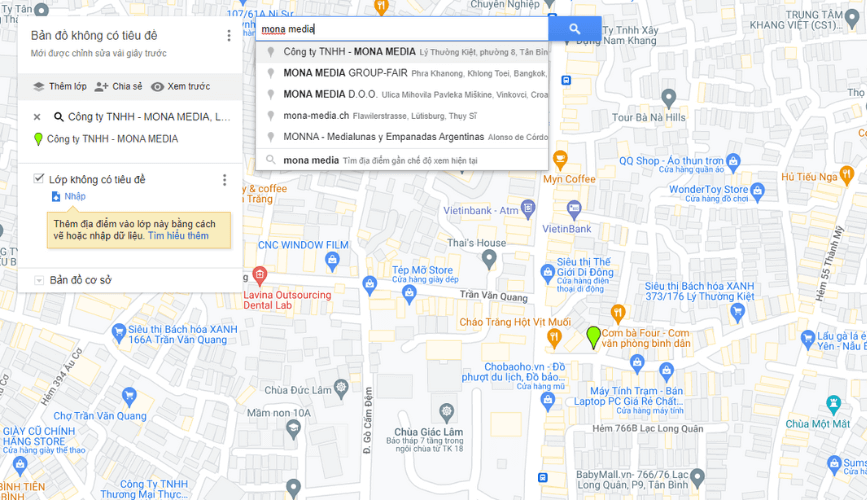
Every marked place is saved as a layer. You can edit, add, delete, write descriptions, add photos or videos, or rename places however you like.
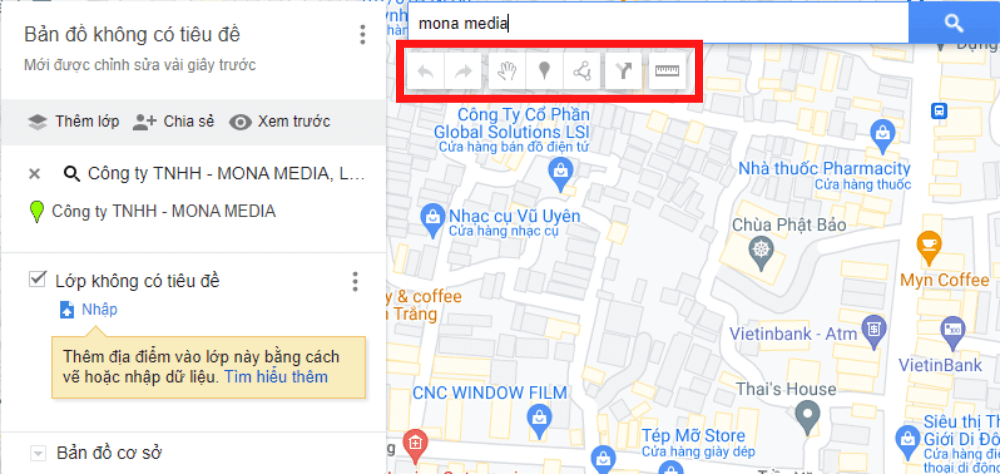
(*) Google My Maps also provides a toolbar so you can add routes, markers, measure distances and more.
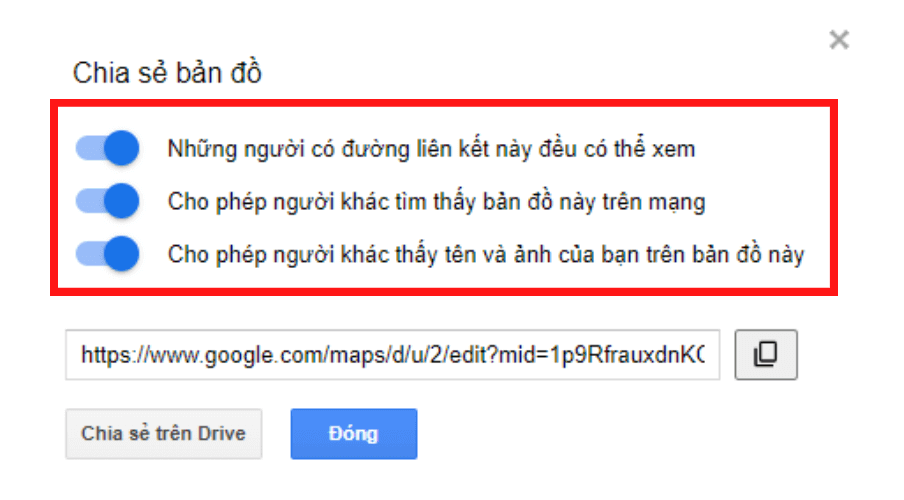
Step 4: When you finish editing the map, go to “Share” -> Turn on “Enable link sharing” and “Public: everyone on the internet can find and access”. Only then can you share the map with everyone on your website.
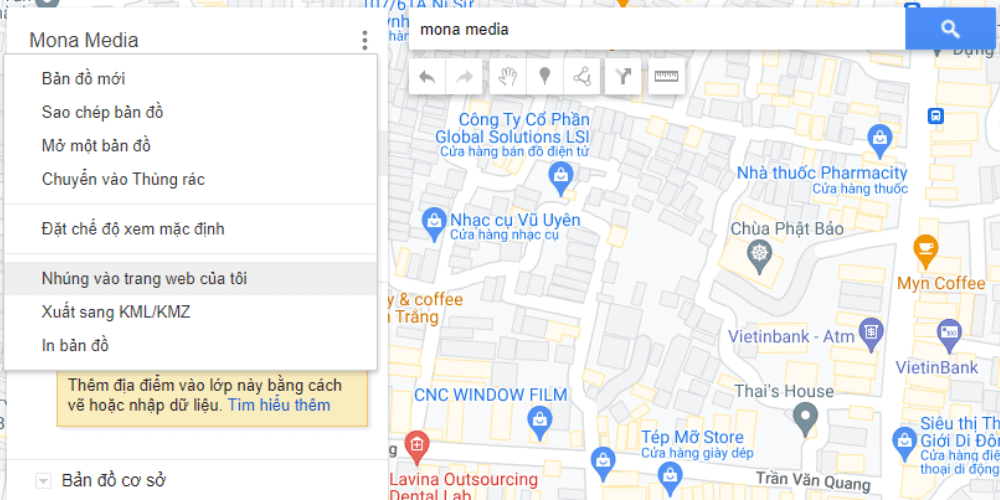
Step 5: In the map editing menu, click the 3-dot icon and choose “Embed on my site” to get the Google Map embed code.
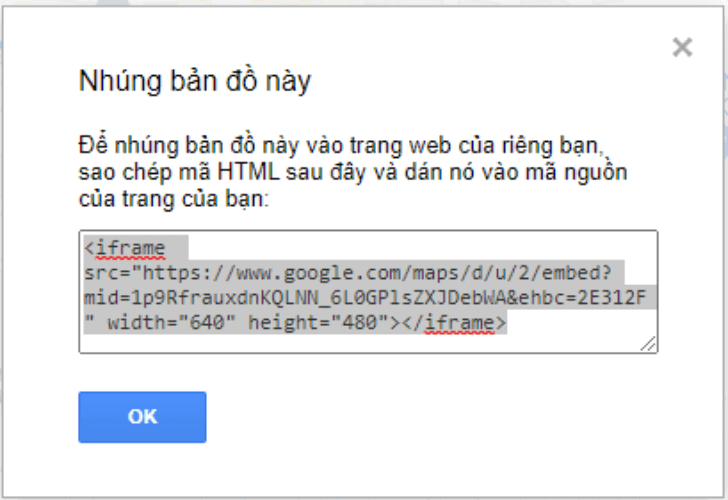
A dialog box will appear. Just copy the code.
Step 6: Go to the WordPress site where you want to add the Interactive Map. Then, in the Text tab, paste the map embed code and you are done.

Once done, the interactive map will show as in the image below:
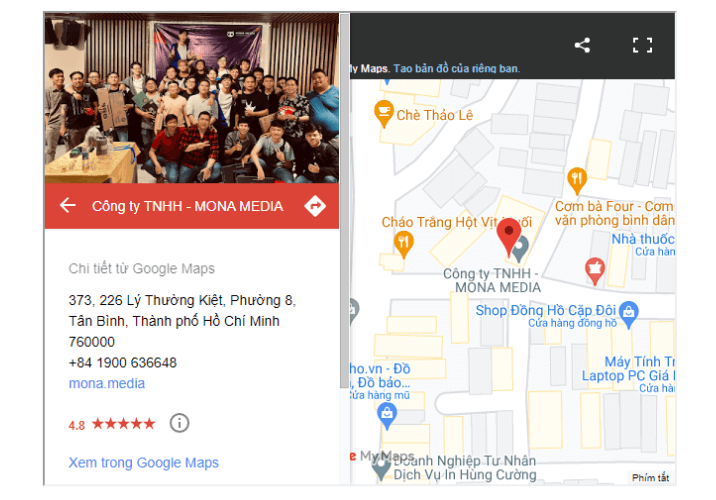
Embedding Google My Maps takes little effort and is very easy. However, adding an interactive map this way has some drawbacks: limited features and fairly plain, limited map designs.
So for more customization, consider other interactive map tools. In this article, MONA introduces how to create a map with Snazzy Maps, a completely free and easy-to-use tool.
You can see the detailed guide below:
First you need to create a Google Maps API Key. If you already have one, skip this section and go to the next.
Step 1: Go to Google Cloud Platform with your Google account.
Step 2: In the left menu bar, choose “API & Services” -> “Library”.
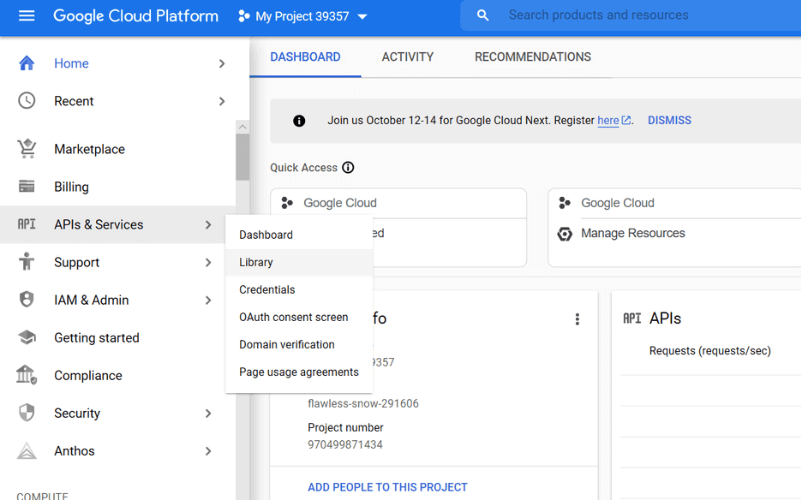
Step 3: The system opens the API library page. Find “Maps JavaScript API”, then click “Enable” to enable it.
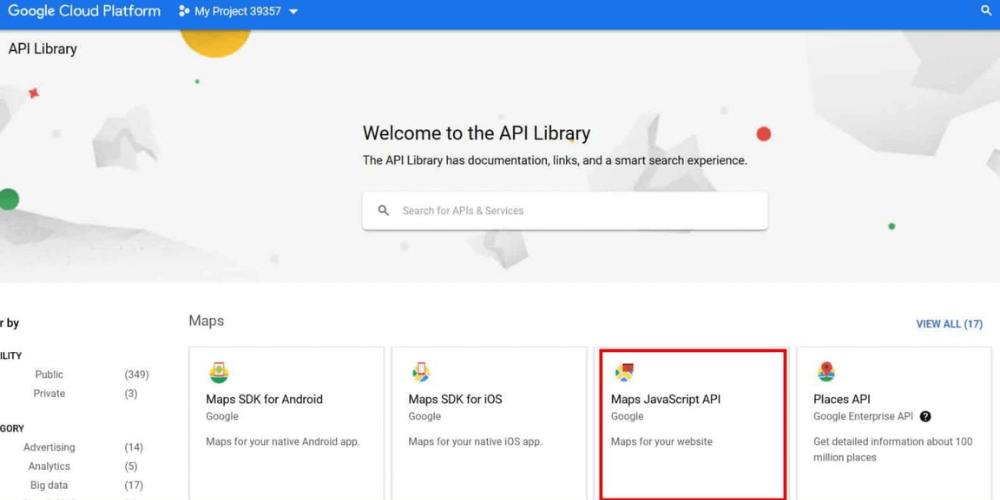
Choose Maps JavaScript API
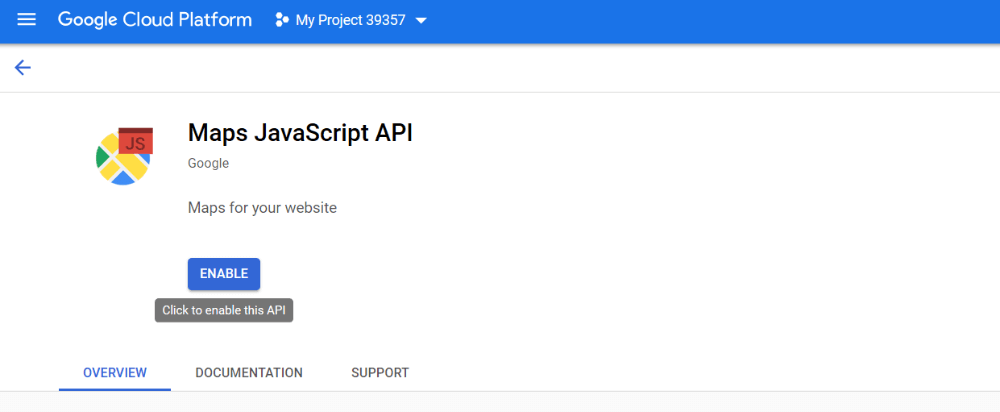
Click “Enable” to enable Maps JavaScript API
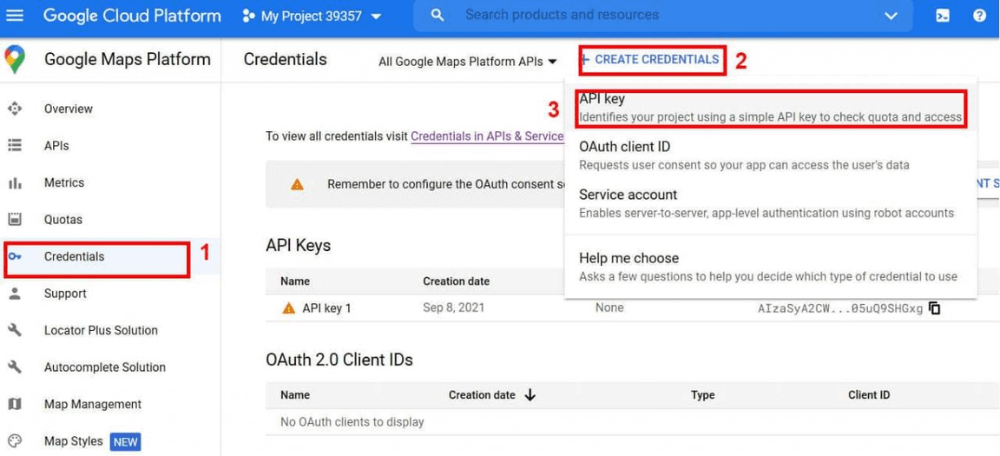
Step 4: After enabling, the system automatically goes to the “Google Maps Platform”page. Then choose “Credentials” -> “Create Credentials” -> “API Key” to create a new API Key.
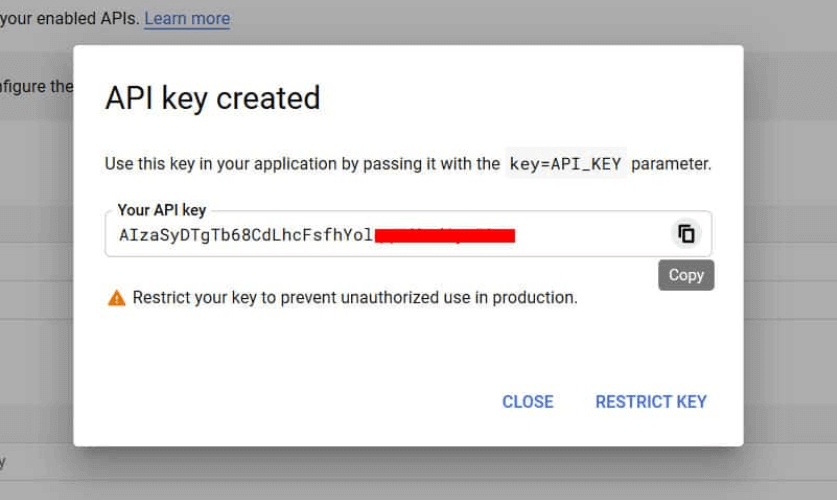
Google will create the API Key automatically. Copy the API key it gives you to use.
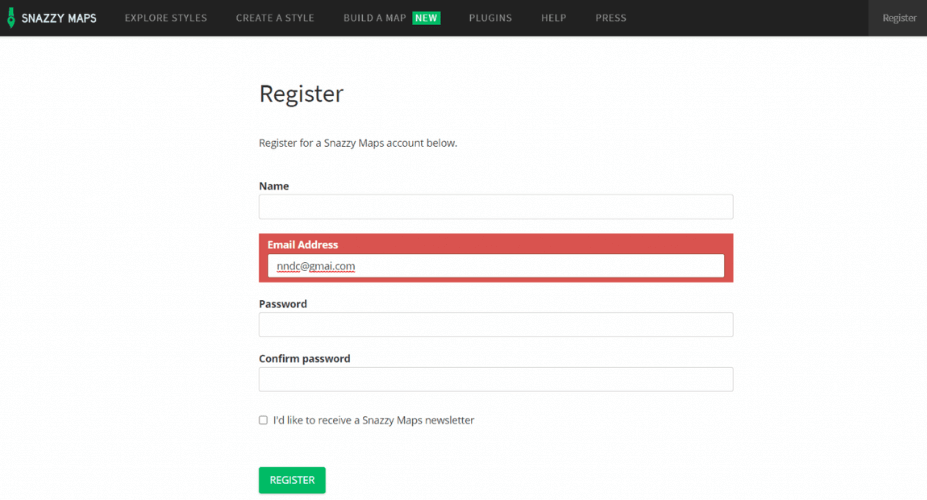
Step 1: Go to the Snazzy Maps homepage at snazzymaps.com to sign up for an account.
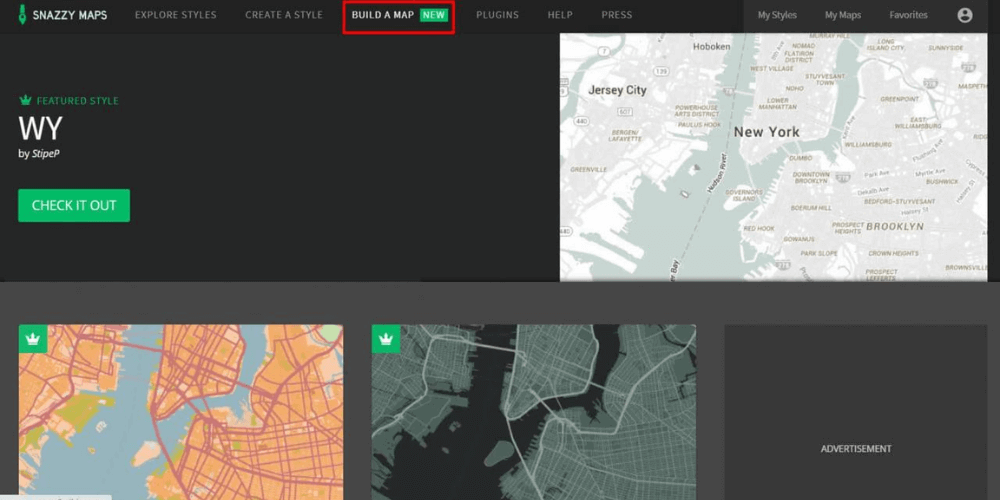
Step 2: Log in, then choose “Build a map” to start creating a map.
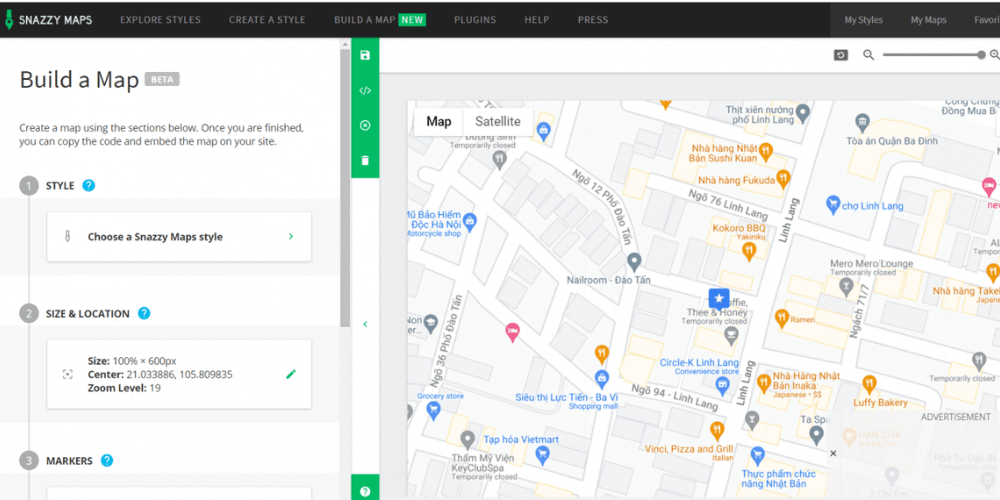
Step 3: The system shows the map editing page. Here you can freely edit everything you want, such as:
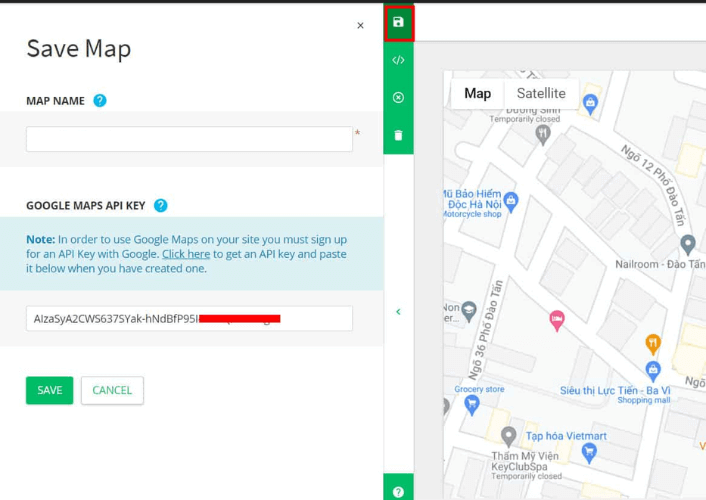
Step 4: When you finish editing, choose the “Save” button to save the map. Then type a name for the map, paste the API Key you created earlier and save.
Step 5: Click the code symbol </> and copy the embed code Snazzy Maps provides.
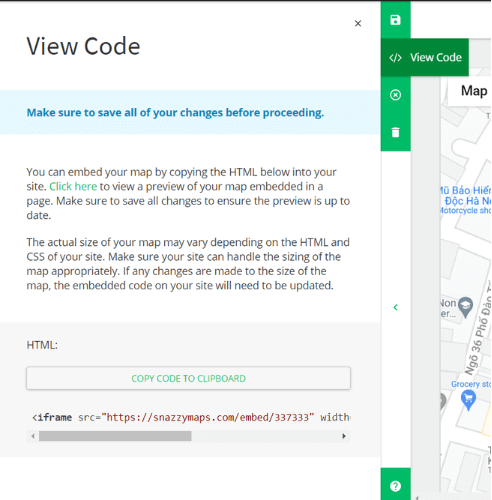
Step 6: Finally, paste the embed code into the website where you want the interactive map, and you are done.
Besides Snazzy Maps, there are many other free tools that can help you create interactive maps quickly and effectively. MONA lists them below for you to explore:
After reading this article, have you got the answers you need about interactive maps? MONA Media hopes it gives you a clearer view of the Interactive Map and helps you create one for your own website with ease. With the benefits that interactive map brings to business websites, MONA wishes you the best in using it and getting the results you want!

CEO & Founder · The MONA
Founder of The MONA, who built a services company of 60+ staff with 14,000+ projects delivered. Khánh Hùng shares how he thinks about building systems that run themselves, automating a business, and the real lessons from delivering projects at MONA.
 1,5K



Professional website
design services
Own a website with a beautiful, 100% exclusive design and a lifetime warranty, with the ability
to expand features flexibly as your business grows, starting today!






 MONA will never sell your information or send you spam


 MONA will never sell your information or send you spam
