
 MONA OS 2.0
 Partner with MONA


 Tự động hoá doanh nghiệp
 Cẩm nang SEO
 Digital Marketing
 Kinh nghiệm thiết kế website
 Hạ Tầng Server
 Giáo dục


 VI
 EN














Message us on
Zalo Official


 ProductsNew

 ProductsProducts
 Mới ra mắtKHA AI 2027App tự edit video, tự đăng mọi mạng xã hội, 2 phút mỗi ngày










 Website designLooks good and wins customers over.
SEO servicesBrings in customers searching for exactly what you sell.
 Tư vấn digital marketingKéo khách từ nhiều kênh, đo bằng số thật.
Corporate video productionVideos introducing your company, factory and team.
 NewAI video productionCompany story films made with AI.
 Custom software developmentCRM, ERP and HRM built for your business.
 Viết AI Agent theo yêu cầuĐặt riêng một trợ lý AI cho đúng việc của mình.
 Tư vấn chuyển đổi AIĐưa AI vào vận hành của cả công ty.
NewMONA LMSManagement for centers and schools.
MONA SkillHubInternal training for company staff.
 NHTQ systemEnd-to-end China–Vietnam shipping operations.
MONA JMSManagement for gold, diamond and pawn shops.
 MONA E-LearningA website with every feature you need to sell courses.
 How to sell online courses (course)More than 30 free lessons on selling courses on autopilot.
 MONA Cloudmonacloud.vnServers to get your apps and websites running.
 MONA Basemonabase.vnPostgres database, sign-in and file storage.
 MONA Mailmonamail.vnSend OTP, order and invoice emails from your software.
 MONA Paymonapay.vnAccept bank transfers via VietQR and notify your software when the money arrives.
 MONA eInvoiceComing soonIssue e-invoices that meet tax standards.
Gấu CườiTrả lời khách 24/7 trên web, Fanpage, Zalo và thu lead cho sale.
 Gấu TeleSalesGọi điện tư vấn, chăm khách như tổng đài viên thật.
Dê CườiTư vấn và chốt đơn cho shop ngay trong khung chat.
Gấu WebmasterNhắn nhóm Zalo là website được sửa xong.
 Gấu Pháp ChếSoạn hợp đồng, rà điều khoản trong vài phút.
 Gấu Báo GiáLên báo giá đúng mẫu và gửi khách ngay.
 AI chăm sóc khách hàngTheo dõi và giữ chân khách hàng cũ.
 Gấu Tuyển DụngLọc hồ sơ, hẹn lịch, phỏng vấn ứng viên.
 Mới ra mắt
KHA AI 2027
Xây kênh chuyên gia 2 phút mỗi ngày
Quay bằng điện thoại, AI tự edit video, tự đăng lên 16 nền tảng và tự trả lời bình luận, tin nhắn.
883.362lượt xem trên kênh CEO MONA sau 36 ngày
 Anh Khánh HùngCEO MONA đang dùng mỗi ngày
Xem app làm được gì
 AI
Gấu Cười MONA ĐANG TỰ XÀITrả lời khách 24/7 trên website, Zalo OA, Messenger và thu lead về cho sale.
Dê CườiChốt đơn bán lẻ và sàn: Shopee, TikTok Shop, web. Chăm cả khách sỉ, đại lý.
Gấu WebmasterCập nhật nội dung, tối ưu SEO website mỗi ngày.
Gấu TeleSalesGọi điện tư vấn, chăm khách như tổng đài viên thật.
Gấu Tuyển DụngLọc hồ sơ, hẹn lịch, phỏng vấn ứng viên tự động.
AI chăm sóc khách hàngGiữ khách cũ, cứu lead đã rớt cho phòng kinh doanh.
Gấu Pháp ChếSoạn hợp đồng, rà điều khoản trong vài phút.
Gấu Báo GiáLên báo giá đúng mẫu, gửi khách ngay khi có yêu cầu.
 Chuyển đổi AI toàn phầnGiải pháp tổng cho doanh nghiệp, 3 lớp triển khai.
 Viết AI Agent theo yêu cầuĐặt riêng một con AI gánh đúng nghiệp vụ của bạn.
 Custom softwareCRM, ERP and HRM with built-in AI automation.
 SEO & AEO thời đại AIĐược Google lẫn AI trích dẫn, không chỉ xếp hạng.
 Kiến thức AI cho doanh nghiệpBài phân tích, hướng dẫn ứng dụng AI vào vận hành.
 Free AI courses
 AI tools at work
App mới · KHA AI 2027
Xây kênh 2 phút mỗi ngày
AI tự edit video, tự đăng mọi mạng xã hội
Free consultation, 8am–10pm every day

25 July, 2026

📚 Are you a manager with no plan to learn code? This series also has a separate Claude course for business owners and Claude Cowork course: hand tasks to AI to do on its own, with not a single command line needed.
This is the complete free Claude Code course written by MONA: 10 parts that take you from zero (never having opened a terminal) to building a real working app with login and payments, and knowing how to put it on the internet. The curriculum is written for business people, with no technical background needed, and every picture in the article is a real action we captured on our own machine. The article is long, so follow the table of contents, and finish each part with the list of things to do by hand before moving on.
Course contents
After this article, you will be able to do three things: understand what Claude Code is and why business people (not just programmers) are rushing to use it, install it on your own machine, and read its first screen without feeling overwhelmed. That's all, but this is the foundation for the whole Claude Code learning stretch ahead, so we advise you not to skip ahead.
Claude Code is an AI assistant that runs right on your computer, instead of on a website like the ChatGPT or Claude.ai you're used to. It sounds like a small difference, but it changes the whole nature of the thing.
A web AI chat is like an adviser on the phone: it answers whatever you ask, but it can't touch your actual work. Claude Code is more like an assistant you've sat down at your own desk: it can see your folders, open files, edit documents, write programs and tidy up the messy pile of files on your machine. You give orders in plain language, and it does the whole chain of work itself, start to finish.
So don't let the word “Code” in the name put you off. Programmers do use it a lot, but what's valuable for a business owner lies elsewhere: it can do office work and operations work directly on your own real data. It's also the tool MONA engineers use every day to deliver projects faster, so we teach this course from real hands-on use, not from reading documentation and retelling it.
One thing to know up front: AI tools change their interface constantly, and within a few months a button can sit somewhere else. So what you need to remember isn't “which colored button is in which corner” but the official place to look things up: the official documentation at code.claude.com/docs. Stuck somewhere? Open it.

Claude Code is not included in the free plan. You need at least the Pro plan from Claude (sign up at claude.com; the list price depends on when you read this, around a few hundred thousand dong a month). For beginners, Pro is enough to use all day. We'll be honest: compared with having an extra assistant who can do all kinds of work on your machine, this fee is one of the best-value software fees a business person pays each month.
Once your account is registered, the paid part is over. Everything from here on is free.

The cleanest way to install Claude Code is through the terminal. Many of you may shudder at the word terminal, but relax: the terminal is just a window for typing commands to your computer, and you only need one command.
Open the terminal:
Terminal, Enter.PowerShell, Enter.Then paste the install command (the latest one is always in the code.claude.com/docs installation section):
curl -fsSL https://claude.ai/install.sh | bashirm https://claude.ai/install.ps1 | iexYour machine will print a stream of text that looks very “dark and arcane”. Ignore it, that's perfectly normal. When it finishes, check with the command claude --version. If the machine returns a version number, the install worked.
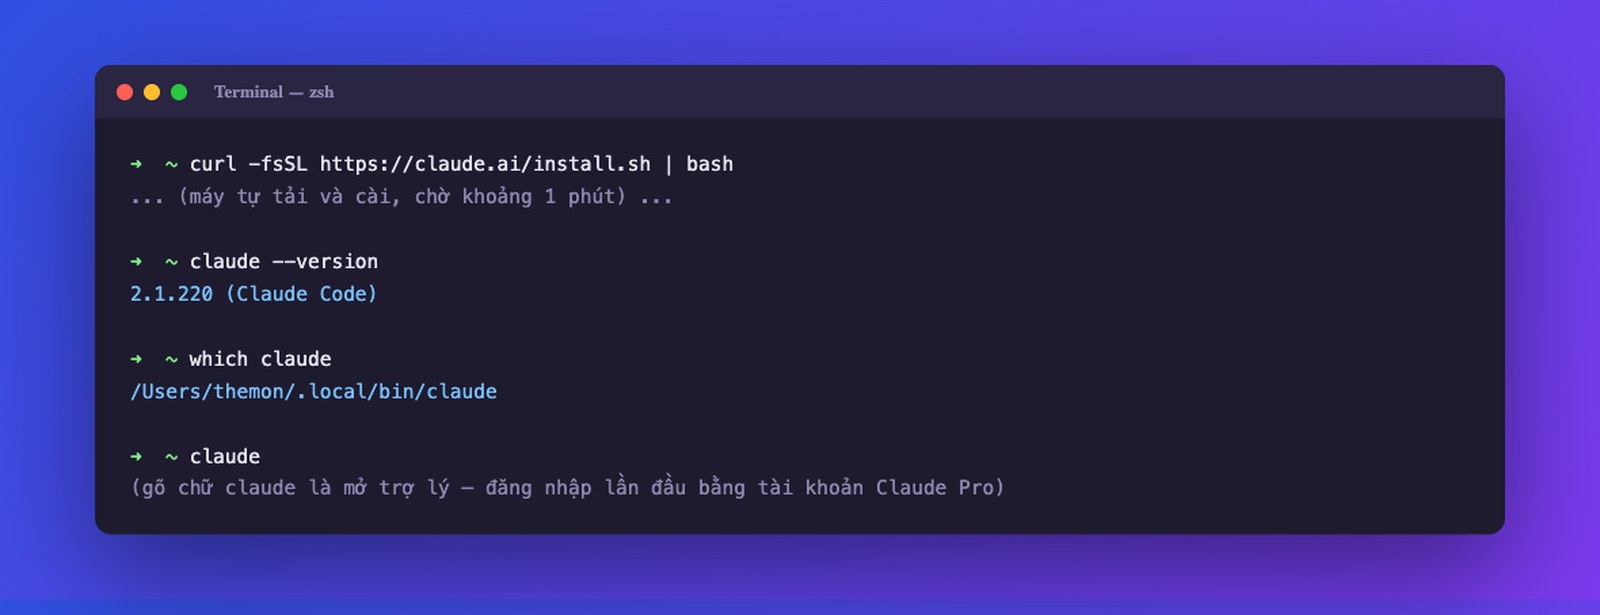
claude --version. The whole install takes under 2 minutes.From now on, to call the assistant, type just one word: claude. The first time you open it, it will ask you to log in. Choose to sign in with the Claude account with the Pro/Max plan you just registered (don't choose pay-per-use API billing, which is both more complicated and more likely to cost you extra as a beginner). The browser pops up, you click confirm, go back to the terminal, and you're done. If you accidentally closed the login screen, type /login inside Claude Code to log in again.
Open claude up, you'll see a screen packed with text. Only a few things on it deserve your attention:
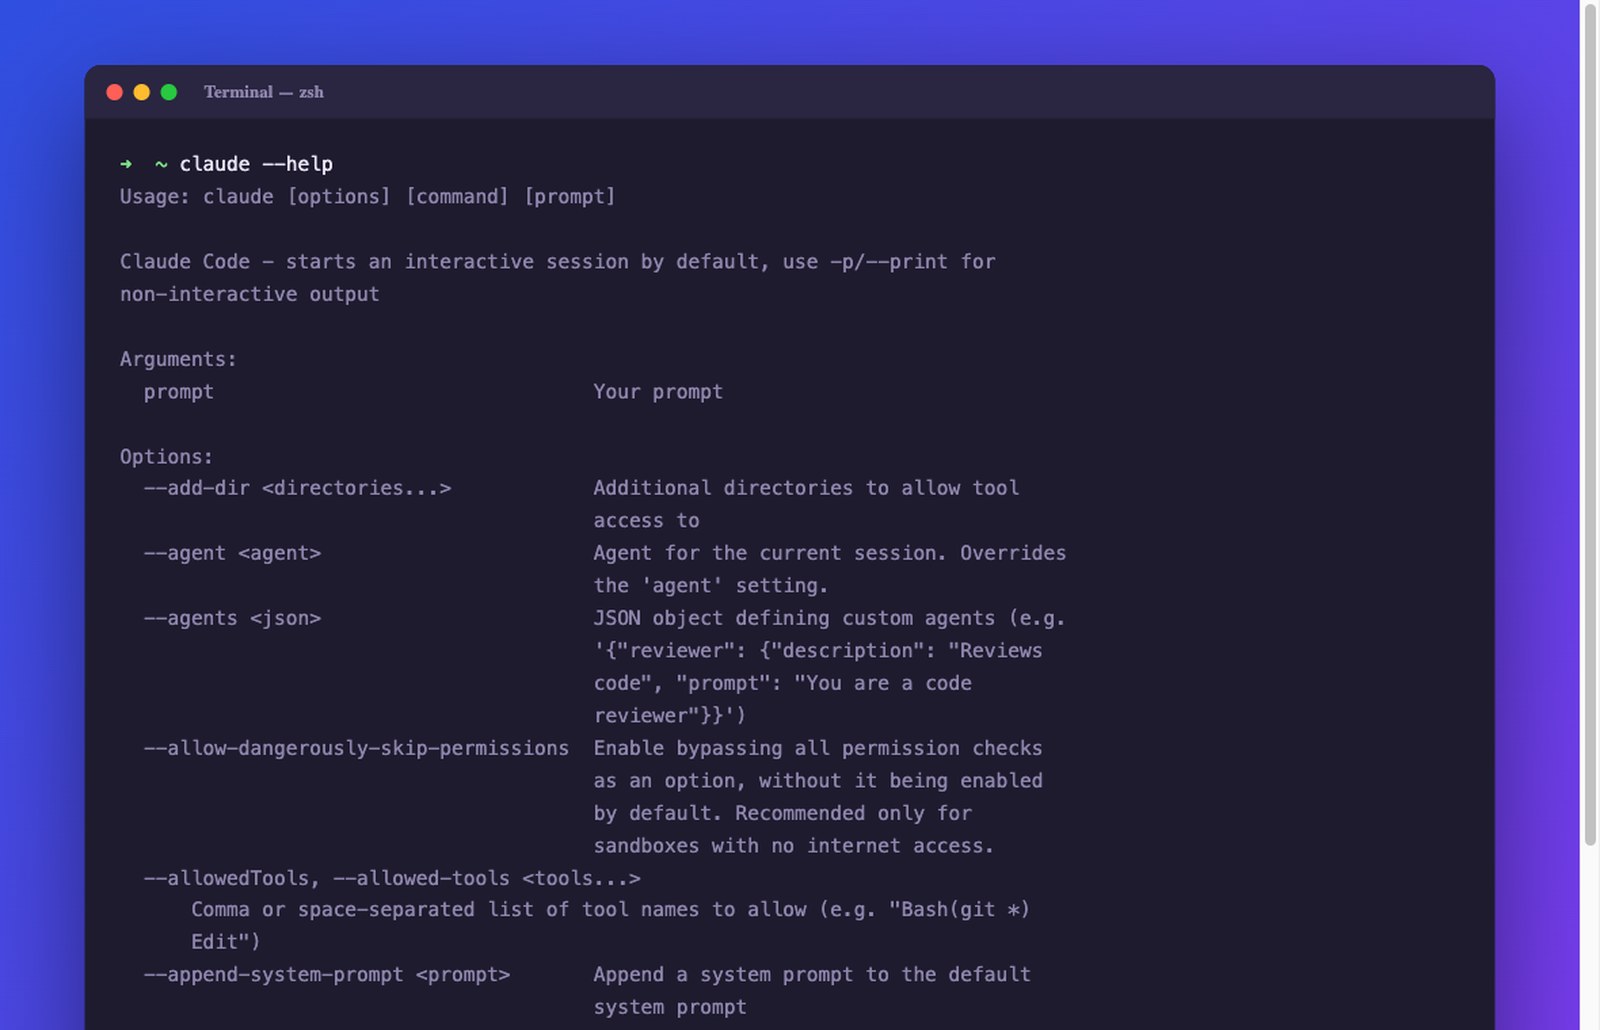
claude --help brings up the full list of “tools”. You don't need to memorize it, just know where to look.
Try your first sentence to get the feel: type “hi, which folder are you in, and what's inside it?” and press Enter. It will look at the folder and tell you. That feeling of “it can see my machine” is exactly what web chat never gives you.
Besides the terminal, Claude Code also works inside an IDE. An IDE sounds fancy, but it's really three things combined: a folder manager, a file editor and an AI chat panel, all in one window. Two popular IDEs today are Visual Studio Code (long-established, made by Microsoft) and Antigravity (newer, built on top of VS Code and strongly focused on AI).
With VS Code: download it from the Visual Studio Code home page, open it, go to the extensions section (the icon of squares on the left edge), type “Claude Code” and install the version from Anthropic with the verified checkmark. This matters: only install extensions from the official developer, since shady ones have been caught installing malware. Once installed, you get a Claude Code chat panel right inside VS Code, so you don't have to stare at the terminal.
Our honest advice: the graphical interface is easy to get used to, but you should practice with the terminal version. The terminal can run many sessions in parallel, it's faster, and later every great technique (Parts 9 and 10) works at full strength in the terminal. From Part 2 onward, this course works mainly in the terminal, and we'll say so separately wherever an IDE is more convenient.
claude --version and see the version number.claude, log in, and ask it your first question about the folder it's standing in.code.claude.com/docs and save it as your reference.In Part 2, we'll have you do something most beginners don't believe they can do: build a working web app just by describing it in words, and learn the most important concept of the whole course: the CLAUDE.md file, the “project brain” that helps the machine understand your work like a trained employee.
After this lesson, you'll be able to build a complete website with Claude Code without writing a single line of code, understand what the CLAUDE.md file is and why it decides whether the machine works well or badly, and know the three ways of briefing a design that professionals use. This is the first “for real” lesson, so open your machine and follow along as you read.
In Part 1 we installed Claude Code in the terminal and in VS Code. There is one more option worth knowing: Antigravity (download at antigravity.google, choosing the version for your operating system). It's made by Google and built on VS Code, so the layout is identical: folder tree on the left, file editor in the middle, AI chat panel on the right. The difference: a newer interface that leans heavily toward AI.

A small note when using Claude Code in Antigravity: since it's a Google product, the chat panel defaults to their Gemini. To use Claude Code, install the Claude Code extension (as you did with VS Code in Part 1), then click the Claude icon to open the Claude Code chat panel in place of the default one. Which IDE you use matters less than how well you know it; in this course we work mainly in the terminal, and open an IDE where we need to see files visually.
Before building anything, you need to understand the most important concept in the whole course: the CLAUDE.md file placed in your project folder.
The mechanism is simple but powerful: every time you open a Claude Code session in that folder, the contents of this file are automatically placed at the start of the conversation, even before the first sentence you type. That means the machine always “reads the instructions” before it hears you. You no longer have to repeat the rules, your tastes and the project background in every command.
Why does that matter so much? Picture a ship leaving port in the Americas bound for Africa, sailing tens of thousands of kilometers. If it's off by just a few degrees at departure, it ends up a thousand kilometers from its destination. AI is the same: a small deviation at the starting point balloons over each step of the work. CLAUDE.md is the course correction at departure: it narrows the zone where the machine could “misunderstand” right from the start, so even if the machine drifts a little, the result still lands close to what you meant.
What should go in CLAUDE.md? Keep it short: what the project is, who it's for, the mandatory rules (for example “Vietnamese website, fonts with full diacritics, the brand color tone is X”), and how you want the machine to work. At MONA every project has a file like this, and we treat it like a job description handed to a new employee: the clearer you write it, the fewer questions they ask back.

Claude Code now web design looks good enough that most samples on high-end design showcase sites can be rebuilt in about ten minutes. The question is no longer “can the machine make it look good” but how you brief it. There are three common ways:
Way 1: give a reference + let the machine check itself in the mirror (the strongest). You give a screenshot of a website you like as the reference, then let the machine screenshot its own result to compare against it. The loop runs automatically: the first version matches the reference about 80%, the machine screenshots, compares, lists the differences, fixes it up to 90%, then 95%, then near-exact. You don't copy anyone's content, you only borrow the aesthetic frame: font sizes, colors, button styles. The content is replaced with your own business.
Tip for capturing a full long page: open the reference page in Chrome, right-click and choose Inspect, then open the command bar (Command + Shift + P on Mac, Ctrl + Shift + P on Windows), type “screenshot” and choose capture full size screenshot. The browser scrolls and captures the whole page top to bottom. The image is usually heavy, so compress it to under about 4-5 MB (any online image compressor works) before giving it to the machine, to save tokens.
Way 2: unload it all by voice. People type 50-70 words a minute, but speak up to 200. Using a speech-to-text tool, you describe in one go everything you want on the page: what you sell, who your customers are, how many content blocks you need, what tone you like. This doesn't produce a beautiful version right away because there's no aesthetic reference, but a few rounds back and forth gets you there, and it's much faster than sitting down to write a description.
Way 3: assemble ready-made components. There are “interface component” libraries (like 21st.dev) where designers share individual blocks: buttons, login frames, animated backgrounds. Each block has a copy-prompt button; you paste it into Claude Code and say “put this at the top of the page”. It suits picking up a few standout details. But from our own experience, Way 1 is still the shortest path for beginners.
A simple process for your first time:
claude.
While the machine runs, you'll see it show a task list it set for itself and tick off items one by one. If you want to step in midway, hit stop, add instructions, then let it continue. That's the normal rhythm of working with an agent: you set the brief and approve, the machine runs the work.
What you just built is sitting on your own computer, and outsiders can't see it yet. To let the whole world access it, you have to put it online (people in the trade call this deploying), through services like Netlify or Vercel. There's a separate lesson on this at the end of the course; for now just tell two concepts apart: building is making the product on your machine, and of work is putting it on the internet for others to use. And when that website is going to be your long-term business face, needing to be done properly from security to load speed, that's when to talk to a professional (we analyzed this in detail in our article on agentic vibe coding for businesses on mona.media).
Part 3 is about the thing that separates great AI users from mediocre ones, and also the vital habit when letting a machine do real work: verification. Why “looks done” isn't the same as done, and how to make the machine prove it did it right.
After this lesson, you'll grasp the philosophy that separates great AI users from mediocre ones: when you hand off work, attach a way to verify it. Along with it come two practical skills: giving feedback so the machine fixes the result accurately, and running several Claude Code sessions in parallel without getting confused.
Let's state plainly a truth that people selling AI courses like to hide: AI almost never gives a perfect result on the very first try. The first version usually reaches about 80%. Beginners see that, get disappointed, conclude “AI is useless”, and quit.
But look at how people work: a skilled craftsman might get it 100% right the first time, at the cost of 5 hours. The machine gives an 80% version in 2 minutes, and what pays off is that it can retry hundreds of times faster than a human: fix, check, fix again, each round taking just a few dozen seconds. Let it loop four or five rounds, 5 minutes in total, and the quality reaches what the craftsman took 5 hours to make. AI's value lies in iteration speed, not in the first shot.
To get that, the way you hand off work needs all three beats: hand off the work, let the machine do it, then make the machine verify its own result. A mediocre user has only the first two beats: hand off, receive the result, hand off the next. Missing the verification beat throws away most of the tool's value.
What verification means depends on the type of work:
At MONA we have a catchphrase for this: “looks done” isn't done. When the machine says it's done, it has to come with evidence: screenshots, test run results, a comparison table. Demand proof the way you'd demand a numbers report from an employee, and don't accept a bare report.

Once you have the 80% version, your part is giving feedback. Hard-won experience: gather all your comments into one go, pointing at each exact spot, instead of dribbling out one sentence at a time. For example, a good round of feedback for the website you just built:
“The logo in the left corner is too big, shrink it. The main headline is too bold, try a serif font and see. The portrait photo is cropped across the forehead, move it down and shrink it so the whole face fits in the frame. The button in the middle of the photo does nothing, either make it open the video or remove it. The customer review block is shifted left, center it. Change the copyright year in the footer to 2026.”
Six points in one round, and the machine fixes them in one pass. A tip that makes it three times faster: speak instead of typing. People type 50-70 words a minute and speak almost 200. Using a speech-to-text tool, you “unload” the whole stream of comments as if you were standing next to the craftsman's desk, and the machine understands it all.
This is where the advice to “practice with the terminal” from Part 1 pays off. Claude Code isn't limited to one session: you open two or three terminal windows, each with a session working on a different task. Building a website in Part 2 took a few minutes, so opening three sessions means building three options at once, then putting them side by side to pick your favorite. This flips the traditional habit of buying design: instead of waiting for one version and then revising back and forth, you have the machine produce three versions and choose.
But running in parallel has its price, and we want you to know it upfront so you aren't disillusioned:

A mistake beginners building websites often make: only admiring the result on a computer screen. Yet in Vietnam, most of your customers open websites on their phones. Your command needs one more verification beat: “check the phone display, take a portrait screenshot for me to look at, and fix any text that overflows or any image that's distorted.” The machine can do all of it, as long as you remember to ask.
Part 4 opens a door that most Claude Code users have never opened: the .claude folder with settings, hooks, rules, plus the working modes (plan mode, the skip-permissions mode) and the slash-command set. Once you understand Part 4, you're among the 10% of users who know this tool's deep toolkit.
After this lesson, you'll understand how Claude Code organizes its “brain” through the .claude folder, know how the three layers of instructions (machine-wide, per-project, per-company) stack up, know how the /init command produces CLAUDE.md in one go, and master the rules for writing CLAUDE.md smartly. Frankly, most people using Claude Code out there haven't grasped this content.
In programming there's a convention: a folder with a dot before its name (like .claude) is a hidden folder, which the file manager doesn't show so as not to clutter the view. Claude Code keeps its whole advanced toolkit in a folder like this, placed right in your project folder.
A fully equipped .claude folder looks like this:
settings.json: permission settings + hooks (hooks are scripts that run automatically before or after each action the machine takes, for example ringing a bell when the machine finishes a job; there's a separate lesson on this later).settings.local.json: a configuration that exists only on your machine. The word “local” in the file name means this does not get pushed to the shared code repository (GitHub), meant for sensitive things like access keys.rules/: a folder holding the rule files, split out from CLAUDE.md.agents/: where you define the “sub-employees” (Part 9).skills/: where the “trades” taught to the machine live (Part 7).You don't need to build the full set right away. Our daily experience at MONA is the same: most projects need only CLAUDE.md, and skills and agents get added when the work calls for them. What you need today is to know these buttons exist, so when the work comes you know which drawer to open.

As a project grows, the CLAUDE.md file swells: design rules, security rules, work process, naming conventions… crammed into a single file of a few thousand words that's hard to manage and hard to spot redundancy in. The rules/ folder exists to split it up: one rule file for each area (for example design-rules.md, workflow.md, security.md).
The nice part is you don't have to split it by hand. Just tell the machine: “split this project's CLAUDE.md into rule files following the Claude Code rules standard”. It reads, divides and files them into the folder itself. After the split, when you want to change a design rule you touch exactly one file, with no risk of accidentally breaking the security rules next to it. Teamwork gets easier too: give the designer rights to edit the design rule file, while the team lead keeps the overall process.
Here's a point many people misunderstand: there isn't just one CLAUDE.md. There are three layers, and the machine reads all three each time it opens a session:
~/.claude/CLAUDE.md). Instructions here apply to EVERY project on the machine. Good for personal tastes: how to address you, which language, the absolute prohibitions.How companies organize it: the boss holds the top layer and sets the general rules (“do not delete these files”, “address staff this way”), and each employee adjusts the project layer for their own part of the work. Sounds familiar? It's exactly how a company runs on general house rules + a job description for each department. At MONA we use this exact model for the software projects running every day.
Jumping into an existing project folder that doesn't have a CLAUDE.md yet? Type /init. The machine skims the whole folder, figures out what the project does, then writes a summary CLAUDE.md: what the project is, what the architecture is, how it's deployed, which conventions to remember.
Why is it worth doing, when the machine “can read the files anyway”? Because of money and quality. Without a summary, every new session the machine has to dig through piles of files to understand the context: that costs tokens (meaning money), and the longer the prompt, the lower the average answer quality. That's a statistical property of AI models. So CLAUDE.md has a second role beyond the “ship course correction” from Part 2: it's a compressed copy of the context, helping every session start light, cheap and smarter.

Distilled from heavy users, plus our own daily experience:
Do:
Don't:
Besides the three CLAUDE.md layers, there's one more file loaded at the start of each session: memory, an automatic notebook. You say “remember, my younger brother is named George”, and the machine writes it in the notebook; in the next session, another machine instance asked “what's my brother's name” can answer right away. The difference from CLAUDE.md: memory is notes the machine writes for itself, while CLAUDE.md is the rulebook you write for the machine. Put important things in CLAUDE.md to be safe, and don't entrust them to the machine's notebook.
rules/.Part 5 covers what decides how safe it is to let the machine touch real things: the four permission modes, including the notorious “skip permissions” mode, and plan mode, the planning mode that people building complex systems treat as their main weapon.
After this lesson, you'll know how much permission to give the machine for each kind of job, understand why system builders treat plan mode as their main weapon, and walk through the full process of building a complete web app: with login, automatic document creation and payment acceptance. This is the lesson where you level up the most in the whole course.
Claude Code can touch real files on your machine, so it has a permission system. Press Shift + Tab (or the mode button in the bottom corner) to cycle through four modes:
1. Ask before editing (the default). Before touching any file, the machine shows the exact piece it intends to change and waits for your nod. You have four choices: approve this time, approve for the session, refuse, or “don't do it that way, do it like this”. Perfectly safe, but once the machine gets into its groove it asks every five seconds, which is rather annoying. Suited to: touching critical systems, where a small slip turns into a big miss.
2. Auto-edit existing files, ask when creating new ones. The machine has full rights to edit existing files, but still asks to create new ones. The balance where many people settle.
3. Plan mode: read only, forbidden to touch. The machine may only research: read files, search the web, reason, then present a plan. It can't change anything. We'll cover it in detail in a later section, because this is the single best-value mode.
4. Skip permissions (bypass permissions). The machine does everything and asks nothing. This mode must be turned on yourself in settings (it's locked by default), and it's famous in both senses: heavy users practically live in this mode for the speed, but there have been cases where a machine misunderstood a request and ran a command that wiped the victim's whole hard drive. The probability is extremely low, but not zero.
Our advice, from daily use at MONA: beginners should move up from mode 1 gradually, and never turn on mode 4 in a folder holding real business data without a backup. The more freedom the machine gets, the tighter your habits of backing up and separating test environments must be. One more cleanup tip worth remembering: a machine run with a loose leash for a long time will spawn lots of temp files and surplus libraries; every so often tell it to “go through the folder and list whatever's no longer needed for me to approve deleting”.

For finer tuning there's the command /permissions: allow, force asking, or flatly forbid each tool one by one (for example forbid running system commands, allow only web reading). If a business wants to lock the machine down per its own policy, this is where to tighten.
Why is there a “no touching, research only” mode? Do the math. Building without a plan: the machine builds for 15 minutes, you test for 5, discover the approach was wrong from the root, tear it down and rebuild for another 15 minutes, and round two can still be wrong. That's 35 minutes plus a pile of tokens. Building with a plan: 5 minutes for the machine to research and present a detailed plan; the mistake shows up right on paper, fixing the plan costs one sentence; then one build lands in 15 minutes. Mistakes on a blueprint are cheap, mistakes on a construction site are expensive. It's just like building a house: nobody wants to discover they're short of materials only when they reach the second floor.
Rule of use: for anything more complex than a simple web page, open with plan mode. Let the machine ask back and present a plan, you approve it, and only then switch to build mode.
Now apply the whole lesson to an ambitious project: a platform that automatically generates proposals/quotes as beautiful as professional software (like PandaDoc): with a login page, AI-generated proposals from your own template, a link sent to the customer, the customer opens it, signs on the page and clicks to pay. It sounds like a project costing several hundred million dong; the real process goes like this:
Step 1: unload the brief by voice. You don't need to write a technical document. Open a speech-to-text tool and describe in one go: I want a platform that creates proposals, with these sections, where customers can sign and pay, with a minimalist Apple-style aesthetic. Paste that whole stream into Claude Code in plan mode.
Step 2: the machine asks back, you answer like a buyer. The machine will put up technical questions: which interface framework to use, how legally strict the signature needs to be, fixed price or variable. When you hit a question you don't understand, just pick the option the machine recommends and move on. You're the one setting the business brief, not the one answering technical exams.
Step 3: give a reference. Drag the best proposal PDF you currently use into the project folder and tell the machine to follow that design. With a reference, output quality jumps, exactly the “give a reference as an anchor” lesson from Part 2.
Step 4: approve the plan, then let it build. The machine presents the overall plan: the pages, the user flow, the data structure. If you can't understand the technical part, that's fine; what you need to inspect is the business flow: what you see after logging in, what to click to create one, what to send the customer with. Once satisfied, switch modes and let the machine build, waiting about ten minutes. When our MONA engineers reach this wait, they go make coffee and answer customer messages; do the same, and don't sit staring at the machine running.
Step 5: plug in the “outside tools”. A real app needs a place to store accounts (a database service like Supabase, with a free tier) and a payment gateway (Stripe, with a test mode that costs no real money). Your job is just to register accounts and get the API key (a secret string of characters that lets software talk to a service) and hand it to the machine, which wires it in. Two vital points about API keys: treat it like a safe's password, don't paste it anywhere public and don't show it in a video; and when testing payments, always use test mode and never plug in a real card.
Step 6: test it like a picky customer. Sign up, log in, create a test proposal, open the link in an incognito browser to see what the customer sees, sign it, pay in test mode. Whatever bugs you, gather into one round of feedback (Part 3): “after clicking create nothing shows up, add a progress bar; the problem section text is too cramped, widen it by double; the team photo is cropped at the forehead, fix it.” A few rounds like that and the app settles into shape.

What business owners should take from this isn't “I can build great software myself now, no need to hire anyone”. The version you just built works, and is very suitable for internal use and for pinning down exactly what you need. Putting it in front of real customers and real money needs an extra layer of security verification and proper infrastructure, which we covered in detail in the agentic vibe coding series on mona.media. Knowing that boundary is what separates a smart AI user from a reckless one.
Part 6 tackles what quietly decides whether the machine is smart or dumb and whether the bill is expensive or cheap: context and token management. Why the longer a chat session runs the more muddled the machine gets, and the set of habits that keeps it sharp.
After this lesson, you'll understand how an AI's “short-term memory” works, be able to see where your token money is flowing with a single command, and know the set of habits that make the machine both smarter and cheaper. It sounds technical, but it's really a lesson about managing cost and quality, right in a businessperson's line of work.
Every AI model has a context window: the total amount of text (measured in tokens) it can “hold” in its head at one time, for example around 200,000 tokens for a large model. Picture it as a work desk: however wide the desk is, it can only lay out that much paper. The longer the chat session, the higher the paper piles up, and just like a real person, the messier the desk the muddier the work. Answer quality declines as the context fills up, which is a property of every model today.
Something few people know: the moment you open a new session, before typing a single word, the desk already has a few tens of thousands of tokens of paperwork on it. Type the command /context and look: it lists clearly who is taking up space:

Why care? Because you pay for every token on the desk, including what's loaded silently. A CLAUDE.md stuffed with 10,000 tokens gets charged again every time you open a session. A sloppy MCP can swallow 20% of the desk the moment you plug it in. Tokens are money, and a crowded desk also makes the machine answer worse: a double loss.
Two cleanup commands to know by heart:
/compact: compresses the whole conversation history into a high-density summary, freeing up the desk while keeping the main points. The machine also does this itself when the desk is nearly full (autocompact), but compacting proactively at a point you choose gives better control. A good tip: compact with instructions, like “/compact prioritize keeping the design decisions and the list of unfinished tasks”.
/clear: wipes everything, a spotless blank desk. Use it when switching to an unrelated task. This is the habit beginners skip most: done with job A, they casually ask about job B in the same session, so job B gets contaminated by the mountain of context from job A. New job, new session. Remember: opening a new session loses nothing, because everything worth remembering is already in CLAUDE.md.
A tip for people who like watching the clock: the command /statusline lets you customize the status line at the bottom of the terminal screen, for example adding a bar showing the percentage of tokens used, so you see at a glance when it's time to clear the desk. (The newer terminal version can adjust this, while the graphical version can't, one more reason to stick with the terminal.)
The command /model lets you swap the “brain” between sizes: the large model (Opus) is the smartest but most expensive, while the medium (Sonnet) and small (Haiku) are much cheaper. The spending principle is the same as assigning work in a company: give hard jobs to the best person, and don't make the director do the odd jobs. By Part 9 you'll see this principle become a system: sub-agents use cheap models to grind through the heavy parts and send only a summary back to the parent agent running the premium model.
Inside /model there's also the thinkingoption: when on, the machine gets to “draft” in a separate thinking space before answering. The nice part: that scratch space doesn't pile onto the conversation history (though it's still billed while running), so the final answer is concise yet deep. For work that needs a lot of reasoning, turn on thinking and tell the machine “answer briefly, I'll ask more if needed”, a very effective desk-saving combo.
Collecting the official recommendations plus our own daily experience:

If you look closely, this whole lesson boils down to a familiar management saying: don't make one person carry too much at once and then blame them for sloppy work. The machine is the same. A good manager divides the work, the context and the people. Parts 7 and 9 are exactly about learning to “divide the people” for AI.
Part 7 covers skills: how to package a business process (like “scan for unfulfilled orders”, “draft a welcome email to new customers”) into a file that teaches the machine to do it again and again, so that one sentence is enough for it to know the route, just like handing an SOP to an employee.
After this lesson, you'll be able to turn a repetitive process in your company (qualifying leads, preparing a quote package, compiling research…) into a skill: a trade-teaching file for the machine, after which one sentence is all it takes for the machine to run the whole process. This is the area we rate as the best value of Claude Code for businesspeople.
Every properly run company has SOPs, meaning standard procedures: do task X in steps 1-2-3, note A, never do B. A new employee holding the SOP can do the job without anyone coaching them. A skill is exactly an SOP written for Claude Code: a small folder inside .claude/skills/, containing a file describing “what this trade does, when to use it, and what the steps are”.
The payoff lies in the words “when to use”: each skill has a description of the situation that triggers it. You just talk normally (“find me 1,000 clinics in the US”), and the machine recognizes that this matches the “scrape-leads” skill and pulls it out to run by itself. No need to remember syntax, no need to call the skill by name. And as learned in Part 6: a skill is only loaded into memory when called, so even a hundred skills don't make the chat session any heavier.
Take an example from our own house: the lead-qualifying skill that the MONA sales team uses every week. Before it was packaged, staff did every step by hand: set the search filters (15-20 minutes), filter a small batch and check quality themselves (10-15 minutes), run the big batch, pour it into a spreadsheet, cross-check and add emails… nearly half an hour to a full hour in total, every single week.
After packaging it into a skill, now one sentence is all it takes. The machine first runs a test batch of 25 rows to check quality, and if it passes, spins up 4 parallel threads and gathers over a thousand rows of data in under two minutes, pours it into the spreadsheet and fills in the missing emails itself. Midway it hit a file-name formatting error; the machine read the documentation, fixed it itself, then updated the skill file itself so it won't stumble again next time. This is worth pondering: a skill isn't rigid software that dies on an error; it's a process with a flexible brain in the middle that adapts when something goes wrong, like an employee who knows the job.

Open a skill folder and the structure is just this:
Why have scripts, why not let the machine do it from scratch every time? Because any job done the same way each time should be packaged into a fixed program: fast, cheap and consistent. The AI plays the person who presses the buttons and handles exceptions, not the person who plows through line by line. Combining the two, you get the best of both worlds: the steadiness of machinery + the adaptability of intelligence. And the nicest part: you don't need to read or understand those scripts. Honestly, many scripts in the skills we use daily at MONA have never been opened and read even by the people who use them. Who wrote them? Claude did. You just set the brief and accept the result.
Step 1: pick the right job. The golden criteria: a job that repeats weekly, has stable steps, and takes 30 minutes or more each time. A few suggestions close to Vietnamese businesses: compile the weekend sales report from the export file of the sales software; prepare a quote package from the company template using customer info; check orders undelivered for more than 3 days and draft reminder messages; gather customer reviews from various channels into one table.
Step 2: unload the process by voice. Tell the machine how you currently do the job, as if handing over to a new employee: what comes first and what comes after, where the data comes from, which template to follow, which spots tend to go wrong and should be avoided. Attach a sample of a correct result (the best quote file you've ever made, a standard report table) and a sample of input data. Then close with: “package this process as a skill following the Claude Code skill standard.”
Step 3: the machine asks back, you decide. It will ask things like: where should the output go, what is the data input, which image source to use. Answer from your business knowledge, and for questions that are too technical, choose the option the machine recommends.
Step 4: test run and refine. Hand the skill to a brand-new session (one with no context from when it was created) and run it on real data. Wherever it goes wrong, give feedback on that spot and say: “fix it in the skill file so it doesn't stumble next time.” After a few rounds like that, accuracy climbs from around 70% to 90%, then to 98-99%. At that threshold, honestly, few flesh-and-blood employees do the work more consistently.

At MONA, since our skill library has grown thicker, many repetitive operations jobs no longer require hiring more people : the work arrives, call the skill, accept the result, done. That's how high the ceiling of this tool goes. But we want you to keep a cool head: a skill running on a personal machine is best suited to the process of one person or a small team. When a process touches several departments, sensitive customer data, and needs access control and legal accountability, the problem moves into the realm of disciplined operational software, in line with what we analyzed in the automation series on mona.media. Use skills to speed yourself up first, that's the surest gain.
Part 8 covers MCP (Model Context Protocol): put plainly, “skills written in advance by other people”, a way to plug outside tools into Claude Code so it can control the Chrome browser, read outside services, plus the caution needed when plugging unknown tools into your own machine.
After this lesson, you'll know how to plug extra “outside tools” into Claude Code through the MCP standard: have the machine control the Chrome browser, read and label a Gmail inbox, and work with task-management software. Just as important, you'll know the token cost of each item you plug in, and the experienced users' strategy of “try with MCP, lock in with a skill”.
In Part 7 you learned skills: SOPs you write yourself for the machine. MCP (Model Context Protocol) is a skill that someone else has written for you, usually by the team behind a major piece of software. It's a connection standard introduced by Anthropic so outside software can “reach a hand out” to the AI: plug one in, and your machine suddenly knows a new set of actions, like hiring an employee who already knows a certain software well.
Installation is surprisingly easy. Each MCP has a short JSON configuration snippet (find it by typing “software name + MCP server”, or go to directory sites like mcpservers.org). You paste that snippet into Claude Code along with the sentence “install this MCP into my workspace”, and the machine handles the rest. For services that need a login (Gmail, task-management software…), it will walk you through getting an API key or clicking the allow-access button, just like issuing an access badge to a new employee. Remember the Part 5 principle: an API key is the safe's key, don't paste it carelessly, and don't put it in screen recordings.

A safety note, stated plainly: MCP directories on the internet are third-party stuff, with uneven quality and safety. Prefer official MCPs from the software's own developer or from Anthropic; obscure ones with few stars and few users shouldn't be plugged into a machine holding business data.
If you plug in just one, heavy users almost unanimously choose Chrome DevTools MCP: it lets Claude Code control and observe a real Chrome browser. That means the machine opens pages, scrolls, clicks buttons, takes screenshots and reads content by itself.
The business value of this is bigger than it looks: many services have no official connection port for outside software, and until now getting data from them meant hiring someone to sit and click by hand. With Chrome DevTools MCP, the machine can do things like: visit a competitor's page, capture and summarize their price table; browse e-commerce sites and gather product information by your criteria; check whether your own website displays correctly on each page. Combined with skills (Part 7), it becomes the hands and feet for processes that until now “only a person could do because you have to look at a screen”.

Now to the part Part 6 set up. After plugging in a mid-sized MCP (for example the MCP of a task-management software), type /context and look: its tool-description set alone can eat nearly 20,000 tokens, taking up more room than Claude Code's own built-in toolkit. Before you type a single command, a quarter of the “desk” is taken, and that's the start of the prompt, the highest-quality stretch.
A comparison to make it sink in: a skill loads only the description at the top of the file, and loads its full contents only when called. An MCP loads its whole tool-description set the moment it's plugged in. Connecting to the same Gmail: the MCP version costs thousands of standing tokens and runs slower; the skill version calling the API directly costs only a few dozen tokens of description, and when we tested the same job on a real inbox, the skill version ran about 5-10 times faster. (Newer versions of Claude Code have a built-in way to dodge some of this: for an MCP whose descriptions are too bulky, the machine only fetches the exact tools it needs. But don't plug things in carelessly because of that.)
From here comes the two-step strategy of experienced users, and also the most valuable lesson in this one:
The sample exercise you should follow, and the one we give beginners at MONA to practice: labeling a Gmail inbox. Step one, ask the machine to propose a sensible set of labels (prefer action-based labels: “needs action”, “waiting for reply”, “save for reference”). Step two, plug in Gmail MCP, have the machine read and label 15 emails as a trial, and once that looks good, run 100. Step three, convert it into a skill calling the API directly: it pulls a hundred emails in an instant, then classifies and labels them in about half a minute. From then on, tidying the inbox each morning is one command.

Claude Code also has a whole plugin system (go to the plugin management section in settings to see it, with Anthropic's official directory and a few third-party marketplaces). Some are useful, like Context7 (automatically compresses the API docs of tools you often use so the machine reads them token-efficiently), and some improve interface aesthetics, which we tried and found far weaker than the “reference image + screenshot loop” from Part 2. Our honest assessment: the stock version without plugins is already plenty, and the plugin area will likely be folded into skills over time. Knowing it exists is enough, so don't waste time collecting plugins.
Part 9 steps up to commanding troops: sub-agents and agent teams. How to split work among “sub-employees” running in parallel, each with its own memory space, and the thousand-email problem shrinking from hours to just over a minute.
After this lesson, you'll know how to split work among Claude Code's “sub-employees” running in parallel, know the three sub-agents worth building for every user, understand how the agent teams feature works, and, just as important, know when not to use these flashy things, so you don't waste money.
A sub-agent is a small Claude session spawned by the main session (the parent agent) to hand off a sub-task. It is born with a clean, separate memory: it knows only the exact brief it was given, finishes the work, returns the result to the parent and vanishes. Simple as it sounds, that structure overcomes exactly the two weaknesses you learned about in Part 6:
One, no clutter. Any job that means “reading a mountain to pull out a handful” (50 pages of documents, 1,000 rows of data) clutters the desk of your main session if you do it there. Hand it to a sub-agent: it holds that whole mountain in its own memory and sends back only a summary of a few hundred tokens. The parent's desk stays clean.
Two, much cheaper. Sub-agents can run on cheaper models (Sonnet, Haiku) while the parent keeps the premium model. The heavy lifting runs on budget troops, and only synthesis and decisions go to the general. It's the work-splitting principle from part 6, now built into the structure.
And the biggest payoff: that runs. The email-labeling task from part 8 takes about half a minute for 100 emails when run one by one. Split across 10 sub-agents running at once, we measured: nearly 1,000 emails done in just over a minute. A three-hour sequential job shrinks to about ten minutes, like a team of ten doing the work of one, except this team shows up at the press of a button.

There's nothing to memorize about setting this up: sub-agents are definition files that live in .claude/agents/ (the same family as skills), and you can simply ask Claude Code to build them: “turn the Gmail labeling skill into a sub-agent, I want 10 running in parallel, use the Sonnet model, test it and time it for me.” One small note: after building an agent you must open a new session before that session can see the agent, like hiring someone today who only shows up to work tomorrow.
Rule 1: the brief you give a sub-agent must be small and bare. Sub-agents run on cheaper models, so they're less smart than the parent, and this is where 11th-grade probability comes back to collect: if each one is 95% right, 3 in a row are all right only 85% of the time, 10 drop to 59%, and 50 drop to 7%. The more troops, the lower the odds that “the whole team runs smoothly.” The fix: give each one a single, tightly scoped job (“classify these 100 emails using label set X”) and don't make it carry a whole chain.
Rule 2: spell out what the troops are allowed to send back. We hit exactly this mistake: 10 agents sent thousands of emails back verbatim to the parent, the parent ran out of memory, and the whole run failed. We fixed it with one line of instruction: “sub-agents must not return raw text, only the classification results.” Troops report figures; they don't read the whole ledger aloud to the boss.
Chain these three into the standard workflow recorded in CLAUDE.md: the parent builds, the reviewer inspects, the tester runs the tests, the parent fixes based on both reports, and only then does it ship. For a personal toy it's a bit much; for anything meant for other people, this rhythm is your safety line.
Sub-agents are troops that only report to the parent. Agent teams add another layer of management: a team-lead agent splits work among team members on its own; each member is a full Claude session, reads its own CLAUDE.md, runs its own skills, and talks to the others through a shared task board (like the internal assignment board in project management software). You stand outside like a company owner: give the team lead the goal, and occasionally poke in to message one member directly. This feature is experimental and must be enabled manually in settings.json (ask the machine to switch it on and you're done).
It sounds great, and social media is hyping it to the skies. Time for a necessary splash of cold water, with figures from Anthropic itself: an agent team uses about 7x the tokens of a single session, because each member carries its own full memory plus the “meeting” overhead between agents. Left unwatched, it can literally burn tens of millions of VND in a day. The official recommendation: use cheap models for members, keep the team very small, give very tight briefs, and disband the team as soon as the work is done.
We'll close with the principle we want you to carve into memory: how impressive a tool is should never be the goal. If a single session does the job well, use a single session. If the work splits into many independent, identical pieces, use sub-agents. Only when the work truly needs several roles coordinating and debating do you reach for an agent team, with an eye on the bill. Most of the business value sits in the first two rungs.

.claude/agents/, and record the “build, review, test, fix” workflow in CLAUDE.md.Part 10, the final lesson of the course: git worktree how to run several sessions on the same project without stepping on each other, and how to put your product live on the internet. When you finish, you'll have gone the full loop: from installation to a product alive in the real world.
The final lesson of the course. When you finish, you'll know how to let several agents work on one project without stepping on each other using git worktree, and you'll know how to put what you've built on the internet for other people to really use: from a static web page to an automatic link that serves a business process.
In part 9 you had several agents running in parallel. But letting them edit one project together exposes a problem: the files in a project aren't perfectly separate, one file calls another, and when two agents touch the same file they trample each other, which people in the trade call a conflict. It's like two crews renovating the same house: the electricians and the plumbers will sooner or later collide at a shared wall.
Programmers solved this long ago with Git: a version control system that lets you split a project into branches (each branch is a copy for one separate job), and when the job is done you merge it back: the machine compares the two versions and applies the changes to the main one. Git worktree goes one step further, in a way that suits the age of agents: each branch is expanded into its own folder on your machine, sharing history but occupying separate ground. Each agent sits in its own folder, so there's no way left to step on each other.
Here's a job we run into all the time: a company website needs 3 more pages (About, Contact, Services). With one command, the machine creates 3 worktrees, one agent per folder builds one page, they run in parallel, and when done everything merges back into the main version on its own, with an agent stepping in to reconcile any differences at merge time. The trick that lets it “find its own way” is exactly what parts 2 and 4 taught: write the worktree convention into CLAUDE.md (roughly: “this project uses git worktrees for parallel work, one folder per job, never edit another branch's files, merge into the main branch when done”). Say it once, and every later session just follows it.

If you're not a professional software person, you don't need to learn a single Git command. Just remember two ideas: one, there is a mechanism for many agents to work in parallel safely, so just tell the machine you want to use worktrees; two, Git is also a time machine: every version is saved, so if something breaks you can go back to the previous one, which is why you should ask the machine to “save a checkpoint” (commit) after each stretch of work that succeeds. This is also your real safety line when you use the wide-permission modes from part 5.
All course long, everything you built has sat on your own machine. The last loop is putting it in front of other people. There are two levels:
Level 1: a static web page. An About page or a campaign page that needs no server-side processing can use services like Netlify, Vercel: tell Claude Code “deploy this page to Netlify,” and it handles everything from creating the account and connecting it until you're holding a link to send to customers. It's fast, there's a free plan, and because a static page has no server-side “guts” running, the risk surface is low too.
Level 2: a link that does work (an API). This is the real payoff for automation people: turn a process into a link that runs the process whenever anyone calls it. A compact service to start with is Modal: sign up, get a token, hand it to Claude Code along with a prompt, and a few minutes later you have a public URL of your own. Your first test run can be just a fun link (call it and it answers “is today a birthday?”), but taken seriously, it's a door connecting systems: a new order on your website fires a signal (webhook) into your link, and the link triggers a process that classifies the order and drafts a reply; or the lead-filtering skill from part 7 is put behind a link, so anyone in the company can open the link and fill in a form for the machine to run, with no need to know what Claude Code is. This kind of setup is often surprisingly cheaper than subscribing to drag-and-drop automation platforms.
Here we repeat the boundary we've stated all course, because it matters most in this very last lesson: a link that runs for fun in-house and a system carrying real customers are two different leagues. Anything that starts to hold customer data, take real money, and have many people depending on it every dayneeds a properly configured server, permissions, backups, and someone on call who is accountable. Even the people earning the most from these tools do the same: what they build with AI is used only internally and for regular customers, and isn't sold at mass scale on the internet, because the tech world has seen too many security breaches. The wise use a sharp knife and know it's sharp.

Looking back over the ten lessons: installing and reading the tool (part 1), building a website by speaking plainly and CLAUDE.md (part 2), the habit of verifying (part 3), the .claude folder and the rules for writing instructions (part 4), permission modes and plan mode with a full app that includes login and payments (part 5), managing context and tokens like managing costs (part 6), packaging workflows into skills (part 7), plugging in outside tools with care (part 8), commanding sub-agents and agent teams (part 9), working in parallel safely and going live (part 10).
You now hold something most people talking about AI out there have never done with their own hands: a complete process from idea to a working product. Learning Claude Code to this level is no longer about learning a tool, but learning a new way of working. Our closing advice fits in three sentences. Start with the task you repeat most in your own week, and turn it into a skill first. Anything meant for customers and touched by real money, have a professional review. And don't let this knowledge sit idle: automate one more task every week, and three months from now you'll look back and see your company runs very differently.
If you want a partner for the “doing it for real for your business” stretch, from validating an idea to building a system that carries load and has someone accountable, check out MONA's in-depth advisory articles on mona.media or call 1900 636 648 directly. And within this free learning series, the next course is already out: Advanced Claude Code: hooks, scheduled automation, deeper Chrome DevTools, and architectures for running machines at the scale of real work.

CEO & Founder · The MONA
The founder of The MONA built a service company of 60+ staff with 14,000+ projects delivered. Khánh Hùng shares his thinking on building self-running systems, automating a business, and the real lessons behind MONA's projects.
 509




Professional website
design services
Own a website with a beautiful, 100% exclusive design and a lifetime warranty, with the ability
to expand features flexibly as your business grows, starting today!






 MONA will never sell your information or send you spam


 MONA will never sell your information or send you spam
