
 MONA OS 2.0
 Partner with MONA


 Tự động hoá doanh nghiệp
 Cẩm nang SEO
 Digital Marketing
 Kinh nghiệm thiết kế website
 Hạ Tầng Server
 Giáo dục


 VI
 EN














Message us on
Zalo Official


 ProductsNew

 ProductsProducts
 Mới ra mắtKHA AI 2027App tự edit video, tự đăng mọi mạng xã hội, 2 phút mỗi ngày










 Website designLooks good and wins customers over.
SEO servicesBrings in customers searching for exactly what you sell.
 Tư vấn digital marketingKéo khách từ nhiều kênh, đo bằng số thật.
Corporate video productionVideos introducing your company, factory and team.
 NewAI video productionCompany story films made with AI.
 Custom software developmentCRM, ERP and HRM built for your business.
 Viết AI Agent theo yêu cầuĐặt riêng một trợ lý AI cho đúng việc của mình.
 Tư vấn chuyển đổi AIĐưa AI vào vận hành của cả công ty.
NewMONA LMSManagement for centers and schools.
MONA SkillHubInternal training for company staff.
 NHTQ systemEnd-to-end China–Vietnam shipping operations.
MONA JMSManagement for gold, diamond and pawn shops.
 MONA E-LearningA website with every feature you need to sell courses.
 How to sell online courses (course)More than 30 free lessons on selling courses on autopilot.
 MONA Cloudmonacloud.vnServers to get your apps and websites running.
 MONA Basemonabase.vnPostgres database, sign-in and file storage.
 MONA Mailmonamail.vnSend OTP, order and invoice emails from your software.
 MONA Paymonapay.vnAccept bank transfers via VietQR and notify your software when the money arrives.
 MONA eInvoiceComing soonIssue e-invoices that meet tax standards.
Gấu CườiTrả lời khách 24/7 trên web, Fanpage, Zalo và thu lead cho sale.
 Gấu TeleSalesGọi điện tư vấn, chăm khách như tổng đài viên thật.
Dê CườiTư vấn và chốt đơn cho shop ngay trong khung chat.
Gấu WebmasterNhắn nhóm Zalo là website được sửa xong.
 Gấu Pháp ChếSoạn hợp đồng, rà điều khoản trong vài phút.
 Gấu Báo GiáLên báo giá đúng mẫu và gửi khách ngay.
 AI chăm sóc khách hàngTheo dõi và giữ chân khách hàng cũ.
 Gấu Tuyển DụngLọc hồ sơ, hẹn lịch, phỏng vấn ứng viên.
 Mới ra mắt
KHA AI 2027
Xây kênh chuyên gia 2 phút mỗi ngày
Quay bằng điện thoại, AI tự edit video, tự đăng lên 16 nền tảng và tự trả lời bình luận, tin nhắn.
904.217lượt xem trên kênh CEO MONA sau 38 ngày
 Anh Khánh HùngCEO MONA đang dùng mỗi ngày
Xem app làm được gì
 AI
Gấu Cười MONA ĐANG TỰ XÀITrả lời khách 24/7 trên website, Zalo OA, Messenger và thu lead về cho sale.
Dê CườiChốt đơn bán lẻ và sàn: Shopee, TikTok Shop, web. Chăm cả khách sỉ, đại lý.
Gấu WebmasterCập nhật nội dung, tối ưu SEO website mỗi ngày.
Gấu TeleSalesGọi điện tư vấn, chăm khách như tổng đài viên thật.
Gấu Tuyển DụngLọc hồ sơ, hẹn lịch, phỏng vấn ứng viên tự động.
AI chăm sóc khách hàngGiữ khách cũ, cứu lead đã rớt cho phòng kinh doanh.
Gấu Pháp ChếSoạn hợp đồng, rà điều khoản trong vài phút.
Gấu Báo GiáLên báo giá đúng mẫu, gửi khách ngay khi có yêu cầu.
 Chuyển đổi AI toàn phầnGiải pháp tổng cho doanh nghiệp, 3 lớp triển khai.
 Viết AI Agent theo yêu cầuĐặt riêng một con AI gánh đúng nghiệp vụ của bạn.
 Custom softwareCRM, ERP and HRM with built-in AI automation.
 SEO & AEO thời đại AIĐược Google lẫn AI trích dẫn, không chỉ xếp hạng.
 Kiến thức AI cho doanh nghiệpBài phân tích, hướng dẫn ứng dụng AI vào vận hành.
 Free AI courses
 AI tools at work
App mới · KHA AI 2027
Xây kênh 2 phút mỗi ngày
AI tự edit video, tự đăng mọi mạng xã hội
Free consultation, 8am–10pm every day

14 June, 2021

However, not everyone knows enough about technology to design an engaging video for themselves. Are you worried, unsure how to make a video that is easy to use? In this article, we introduce a useful piece of software that makes building lectures easier than ever: Lightworks. So what is Lightworks and how do you use it in teaching? Let's find out in this article!

What is Lightworks?
Lightworks is one of the simplest and best pieces of software for editing video. It is built with a range of useful tools and features and a friendly, easy-to-use interface, so users can produce quality videos. Its users range from people trying video for the first time and non-professionals to seasoned professionals.
Because this is free software, it naturally has some limits in specialist and high-end technical features compared with paid software. But if you only need basic features and nothing too sophisticated, Lightworks still covers the essentials and lets you make good-quality videos on your own.
See also: Top 10 online teaching software best results
Because it is simple, fairly easy to use, supports the basic editing features you need and, importantly, costs nothing, Lightworks is trusted by many teachers. It is a handy tool for editing videos used in teaching, in place of paid software.
Before downloading Lightworks, make sure your computer meets these requirements:
To download and install Lightworks, follow these steps:
Step 1: First, click “Create a new project” on the screen to start a new project
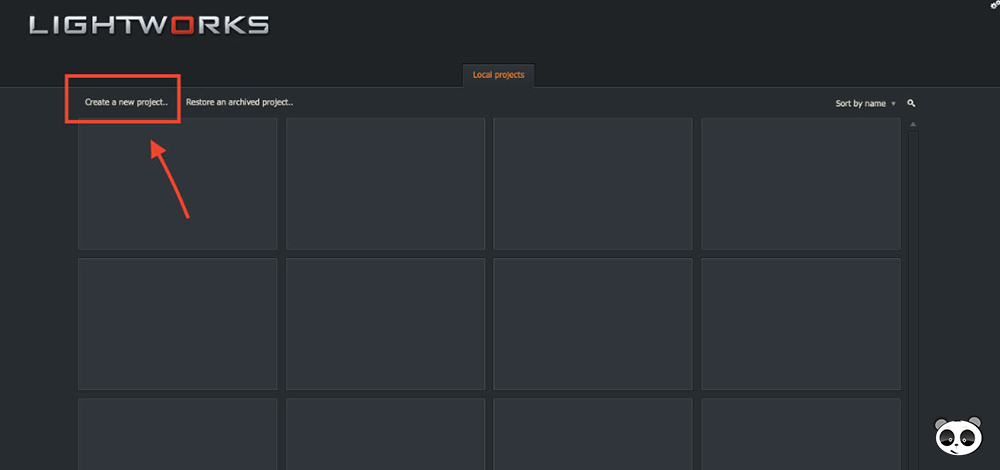
Step 2: A dialog box will appear where you enter the project details, such as the name, aspect ratio and notes. If you want the video to appear in mixed frame rates, choose “Mixed Rates”, or choose “Auto” for automatic playback. Finally, click “Create”.
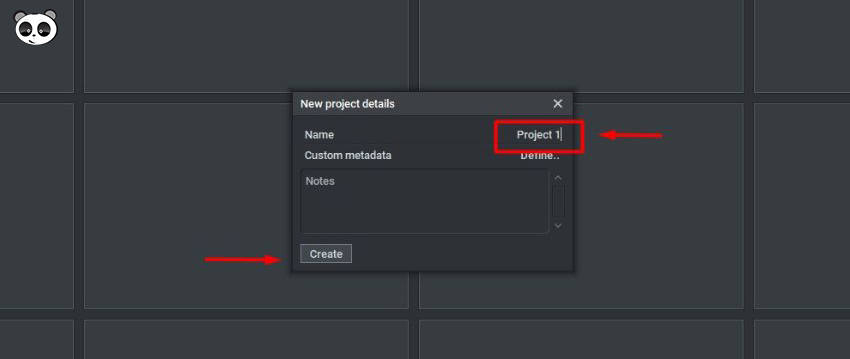
Step 3: Your new project now appears, and you are in the Log tab
Step 1: Click the Local Files tab
Step 2: Next, click the Places tab to browse the folders on your computer or any other files. If the frame rate is not suitable, the files cannot be imported, and the software immediately shows a red error message to let you know
Step 3: Import files by dragging and dropping them. You can choose Create Link, Transcode Options and Copy Local
Step 4: Click the video you want to import. To import several, hold Ctrl/Shift to select them
Once you have finished importing the videos you want to process, the content automatically moves to a Bin or Filter for storage.
Step 1: Double-click the list, or drag it to the Viewer, and the video appears in the source viewer. The clip name is shown right above the Viewer
Step 2: Start playing media files with keyboard shortcuts.
Step 3: You can jump to the selected media file using the highlighted red frames
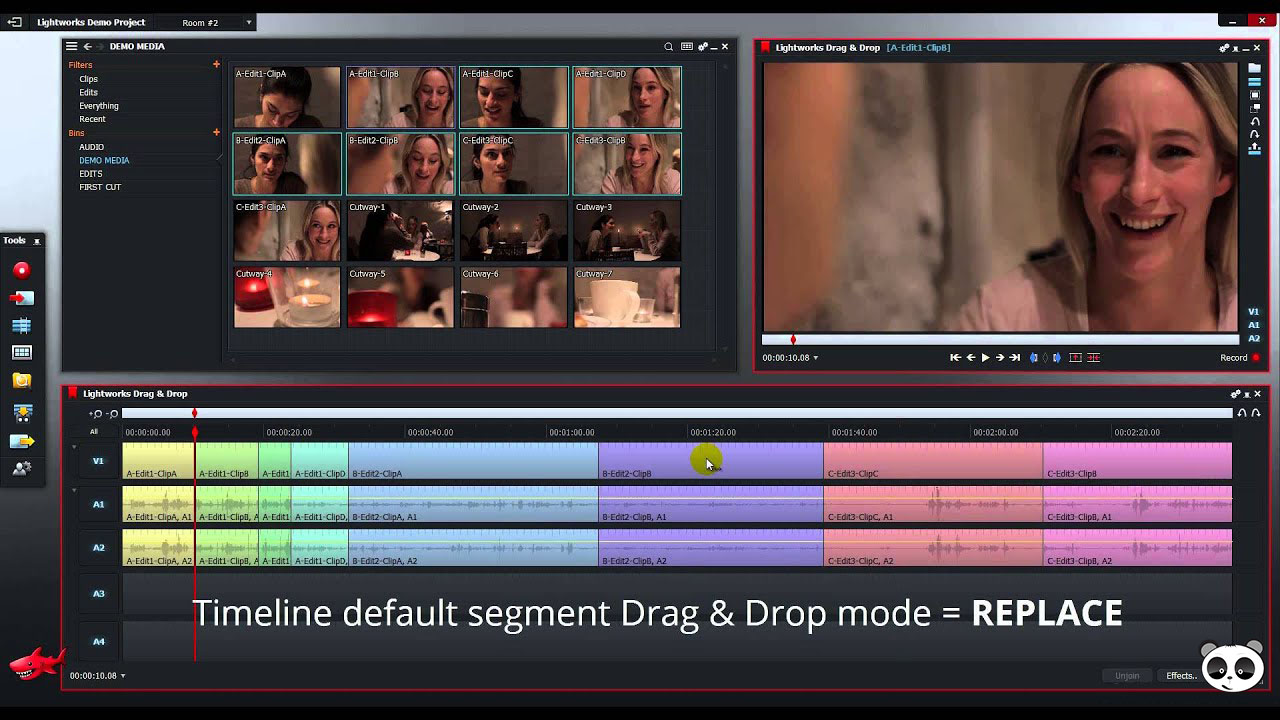
In the Edit tab window, upload a video by simply dragging it onto the timeline. Click the plus button on the left of the screen if you want to zoom in on the content.
Step 1: Find the part you want to cut out of the video and drag the mouse there. A white bracket appears; click it with the left mouse button.
Step 2: The editing tool shows a marker near the cut, indicating that the video has been split.
Step 3: Change the Trimview mode and you will see the clip frames on both sides of the cut
Step 4: Preview in the Viewer to see both clips playing.
Step 5: Then click close to leave TrimView. You can trim clips freely, move them to cut, or slide them. You can also add video transitions to make the clips smoother and more professional. On top of that, you can create sound effects directly on the video.
Open the Text menu, click Title and drag it onto the clip where you want to add text. You can edit the content of the Title and change its position, color or font as you like.
You can also add a Fade in/Fade out effect to the text in the Fade section. This makes the text more engaging, as it appears and disappears gradually over the time you set.
Set how long the text is displayed and press X to split the displayed text. After that, you can do the same to create new text.
First, lock the video tracks, then hold Shift and double-click the background music you want to adjust. Play it back to check the result.
To change a clip's speed, do the opposite: unlock the video tracks. Click the section you want to speed up, choose Speed with a suitable value, then click Do it.
Once you have finished editing, if you want to export the video to watch it or share it on an online learning site or a personal blog, follow these steps:
Step 1: Click the edited video, choose Sequence or Timeline, then click Export.
Step 2: Choose the format for the exported video. You can export videos as camera formats, media files, backups and more.
Step 3: Depending on the video format, different option dialogs will appear
Step 4: Finish the settings and click Start
MONA Media currently offers technology solutions for education, such as education management software and online teaching management. You are welcome to take a look and contact MONA Media for quick support.

That's it: you have edited a teaching video with Lightworks. Simple, right? It may feel unfamiliar the first time, but after 2-3 tries you will get the hang of it and get better and better. We hope this article helps you understand what Lightworks is and how to use this useful tool to produce quality lecture videos for teaching. Good luck!

CEO & Founder · The MONA
Founder of The MONA, who built a services company of 60+ staff with 14,000+ projects delivered. Khánh Hùng shares how he thinks about building systems that run themselves, automating a business, and the real lessons from delivering projects at MONA.
 1,6K




Professional website
design services
Own a website with a beautiful, 100% exclusive design and a lifetime warranty, with the ability
to expand features flexibly as your business grows, starting today!






 MONA will never sell your information or send you spam


 MONA will never sell your information or send you spam
