
 MONA OS 2.0
 Partner with MONA


 Tự động hoá doanh nghiệp
 Cẩm nang SEO
 Digital Marketing
 Kinh nghiệm thiết kế website
 Hạ Tầng Server
 Giáo dục


 VI
 EN













Message us on
Zalo Official


 ProductsNew

 ProductsProducts
 Mới ra mắtKHA AI 2027App tự edit video, tự đăng mọi mạng xã hội, 2 phút mỗi ngày










 Website designLooks good and wins customers over.
SEO servicesBrings in customers searching for exactly what you sell.
 Tư vấn digital marketingKéo khách từ nhiều kênh, đo bằng số thật.
Corporate video productionVideos introducing your company, factory and team.
 NewAI video productionCompany story films made with AI.
 Custom software developmentCRM, ERP and HRM built for your business.
 Viết AI Agent theo yêu cầuĐặt riêng một trợ lý AI cho đúng việc của mình.
 Tư vấn chuyển đổi AIĐưa AI vào vận hành của cả công ty.
NewMONA LMSManagement for centers and schools.
MONA SkillHubInternal training for company staff.
 NHTQ systemEnd-to-end China–Vietnam shipping operations.
MONA JMSManagement for gold, diamond and pawn shops.
 MONA E-LearningA website with every feature you need to sell courses.
 How to sell online courses (course)More than 30 free lessons on selling courses on autopilot.
 MONA Cloudmonacloud.vnServers to get your apps and websites running.
 MONA Basemonabase.vnPostgres database, sign-in and file storage.
 MONA Mailmonamail.vnSend OTP, order and invoice emails from your software.
 MONA Paymonapay.vnAccept bank transfers via VietQR and notify your software when the money arrives.
 MONA eInvoiceComing soonIssue e-invoices that meet tax standards.
Gấu CườiTrả lời khách 24/7 trên web, Fanpage, Zalo và thu lead cho sale.
 Gấu TeleSalesGọi điện tư vấn, chăm khách như tổng đài viên thật.
Dê CườiTư vấn và chốt đơn cho shop ngay trong khung chat.
Gấu WebmasterNhắn nhóm Zalo là website được sửa xong.
 Gấu Pháp ChếSoạn hợp đồng, rà điều khoản trong vài phút.
 Gấu Báo GiáLên báo giá đúng mẫu và gửi khách ngay.
 AI chăm sóc khách hàngTheo dõi và giữ chân khách hàng cũ.
 Gấu Tuyển DụngLọc hồ sơ, hẹn lịch, phỏng vấn ứng viên.
 Mới ra mắt
KHA AI 2027
Xây kênh chuyên gia 2 phút mỗi ngày
Quay bằng điện thoại, AI tự edit video, tự đăng lên 16 nền tảng và tự trả lời bình luận, tin nhắn.
884.102lượt xem trên kênh CEO MONA sau 36 ngày
 Anh Khánh HùngCEO MONA đang dùng mỗi ngày
Xem app làm được gì
 AI
Gấu Cười MONA ĐANG TỰ XÀITrả lời khách 24/7 trên website, Zalo OA, Messenger và thu lead về cho sale.
Dê CườiChốt đơn bán lẻ và sàn: Shopee, TikTok Shop, web. Chăm cả khách sỉ, đại lý.
Gấu WebmasterCập nhật nội dung, tối ưu SEO website mỗi ngày.
Gấu TeleSalesGọi điện tư vấn, chăm khách như tổng đài viên thật.
Gấu Tuyển DụngLọc hồ sơ, hẹn lịch, phỏng vấn ứng viên tự động.
AI chăm sóc khách hàngGiữ khách cũ, cứu lead đã rớt cho phòng kinh doanh.
Gấu Pháp ChếSoạn hợp đồng, rà điều khoản trong vài phút.
Gấu Báo GiáLên báo giá đúng mẫu, gửi khách ngay khi có yêu cầu.
 Chuyển đổi AI toàn phầnGiải pháp tổng cho doanh nghiệp, 3 lớp triển khai.
 Viết AI Agent theo yêu cầuĐặt riêng một con AI gánh đúng nghiệp vụ của bạn.
 Custom softwareCRM, ERP and HRM with built-in AI automation.
 SEO & AEO thời đại AIĐược Google lẫn AI trích dẫn, không chỉ xếp hạng.
 Kiến thức AI cho doanh nghiệpBài phân tích, hướng dẫn ứng dụng AI vào vận hành.
 Free AI courses
 AI tools at work
App mới · KHA AI 2027
Xây kênh 2 phút mỗi ngày
AI tự edit video, tự đăng mọi mạng xã hội
Free consultation, 8am–10pm every day

10 April, 2025

Beyond automated flows like these, Vietnamese businesses also use AI follows up with customers automatically, to handle whole conversations with customers.
Interested in
AI & Vibe Coding?
A community group for sharing experience and turning ideas into electronic products that actually earn money with AI

Make.com (formerly known as Integromat) is an automation platform no-code, helping you easily build effective workflows without writing a single line of code. It launched in 2016 in Prague, Czech Republic under the name Integromat, and in 2022, the company decided to restructure and rename it Make.com to expand the platform's potential even further.
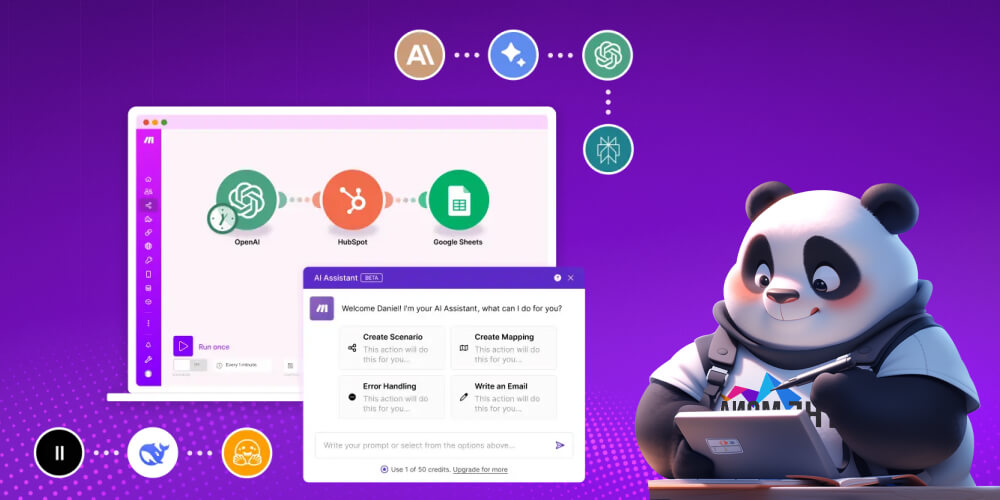
Although it's a “latecomer”, Make.com quickly won users over with its intuitive, good-looking interface and very easy operation. You can connect hundreds of popular apps and services such as Google Sheets, Gmail, Notion and Slack yourself and streamline your daily work in just a few clicks.
Thanks to this, Make.com has become a favorite of many automation agencies, such as SlimAI, when they build workflow optimization solutions for business clients. If you're looking for a tool that makes work run smoother and saves time, Make.com is definitely a useful one.
See more: What is an AI chatbot: how it differs from a scripted chatbot and how to choose the right one
Make.com helps users automation work by connecting familiar apps such as CRM, cloud storage platforms, marketing tools, sales tools and more. Instead of entering or converting data by hand, Make AI automation lets these apps talk to each other through a preset process, making sure every step runs smoothly and accurately. The process follows these steps: Our article on AI for customer care is recommended further reading. The article stop hiring and automate is recommended further reading.
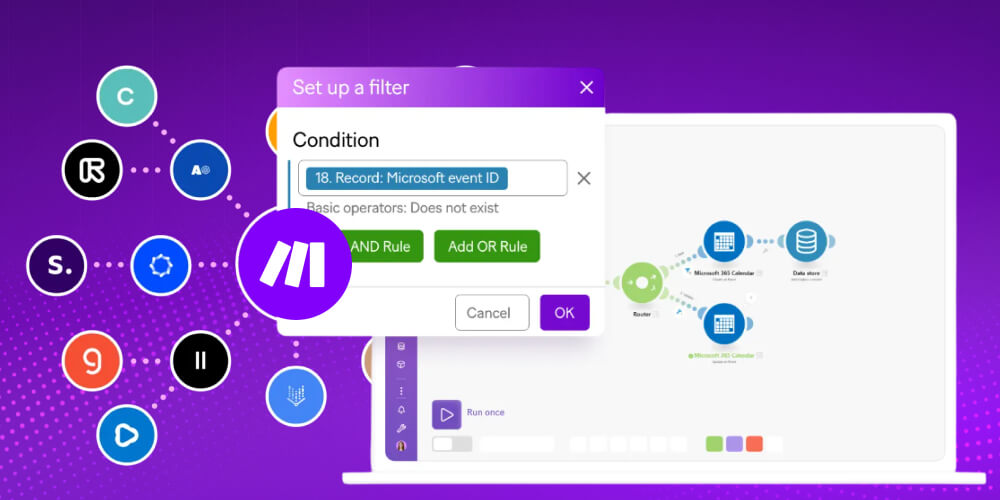
If you're looking for an automation platform that is visual and easy to use but still powerful, Make.com is definitely worth considering. Besides streamlining your workflow, the platform offers a smooth experience with a set of useful features:
Many automation platforms today have a rather dry interface, which makes the user experience dull and unappealing. With Make.com, it's completely different. From your very first contact, you'll notice the modern, intuitive and lively design that makes it enjoyable and easy to use.
Make.com doesn't just focus on powerful features, it also polishes every detail of the interface. The mix of bright colors, a logical layout and smooth motion effects makes building a workflow easier and more intuitive.
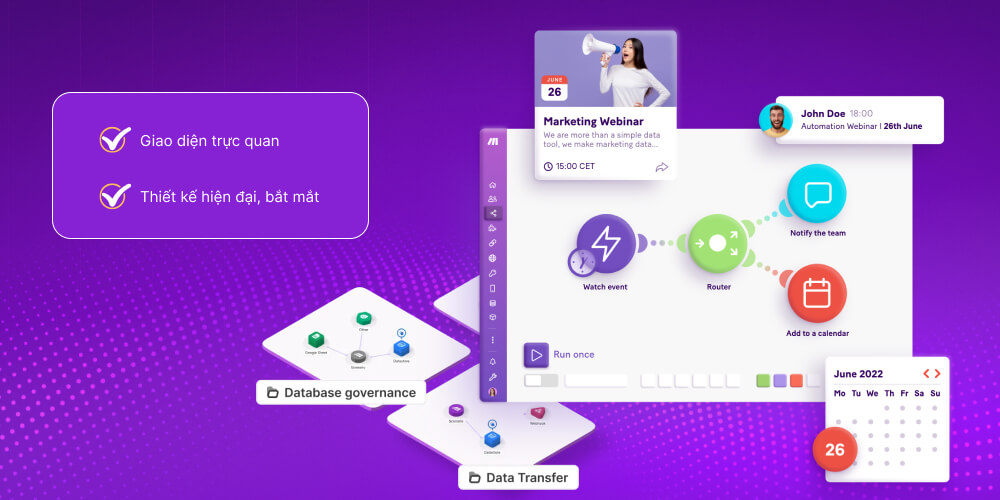
In particular, instead of showing data as dry numbers or tables, Make.com AI Automation uses charts and lively icons to depict the workflow directly. That way you quickly grasp how the system works, and you get more inspiration for the automation itself.
Make.com works on a module mechanism, so you can build workflows in the most visual way. Each module represents one specific action, and you simply drag, drop and connect them to create the automation you want.
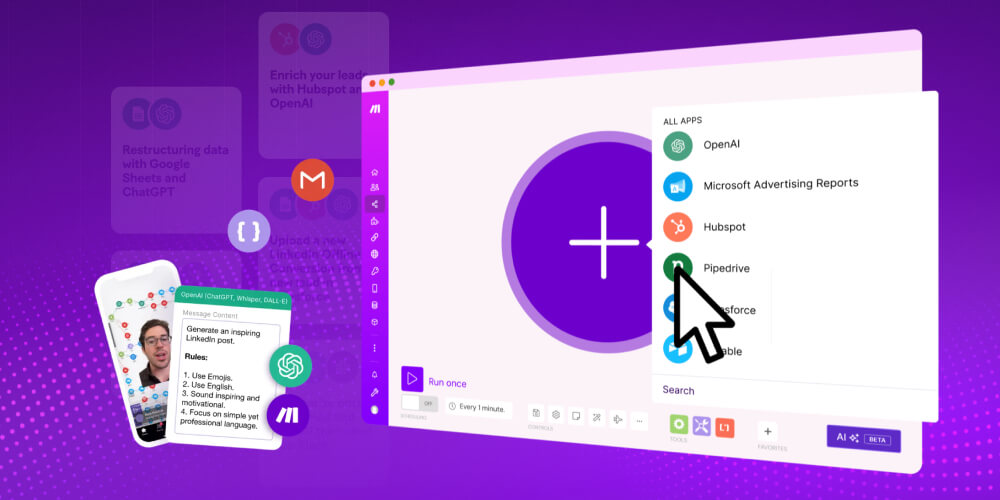
The nice part of this mechanism is that you can flexibly edit, add or delete any module without interrupting the whole system. You can also group modules into separate areas, which makes managing and optimizing the workflow easier.
Make.com AI automation delivers a visual automation experience with quick drag-and-drop. With a few simple steps, you can connect apps and add conditions, loops or filters without touching a line of code.
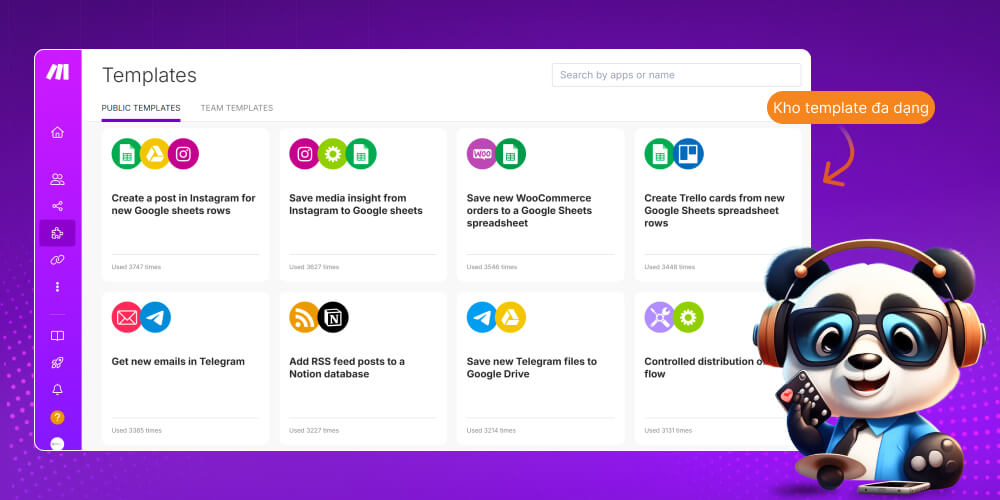
Make.com gives users a huge library of thousands of ready-made templates, along with preset scenarios (automation scripts). This saves setup time, especially for people without much experience. More importantly, all templates are free, so you can customize them and build workflows to your own needs without much effort.
You can manage data on Make.com without much trouble. The platform supports importing data from many different sources and converts formats quickly, so you don't have to edit by hand. Its data filtering is also well tuned, helping you sort and categorize information efficiently. This is a big advantage if you need to process complex data, set up automated workflows, or feed analysis and reporting.
Make.com helps connect and streamline tasks across many different apps without manual intervention. However, like any platform, Make AI automation has its own strengths and limits. Below are the pros and cons of Make.com to weigh before you use it.
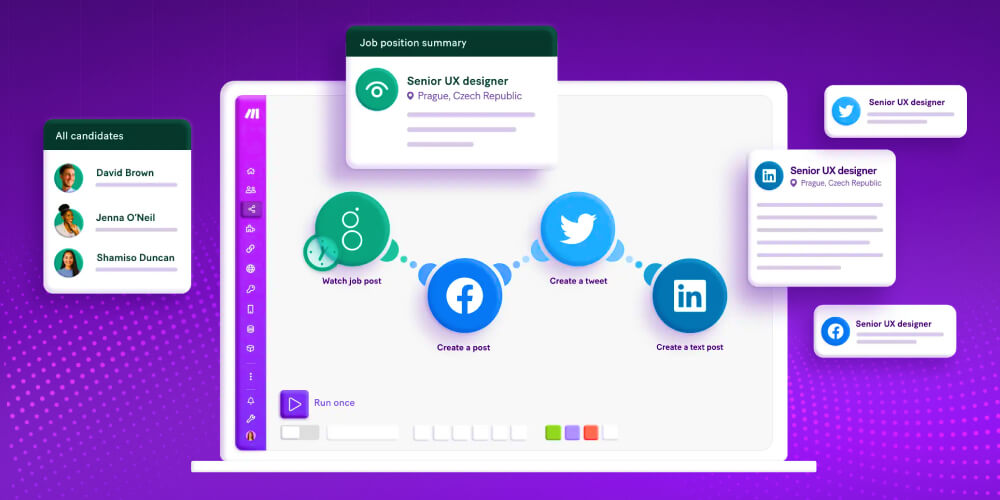
With deep customization and support for many integrations, Make.com brings the following standout benefits:
Despite its many useful features, Make.com has some limits that can affect the user experience:
Now that you know what Make.com is and what it offers, it's time to start using it. Here is a detailed guide to using Make.com so you can set up and run automation scenarios effectively:
To start using Make.com, you need to do a few key things: register an account, set up your personal details and get familiar with the dashboard.
Register an account
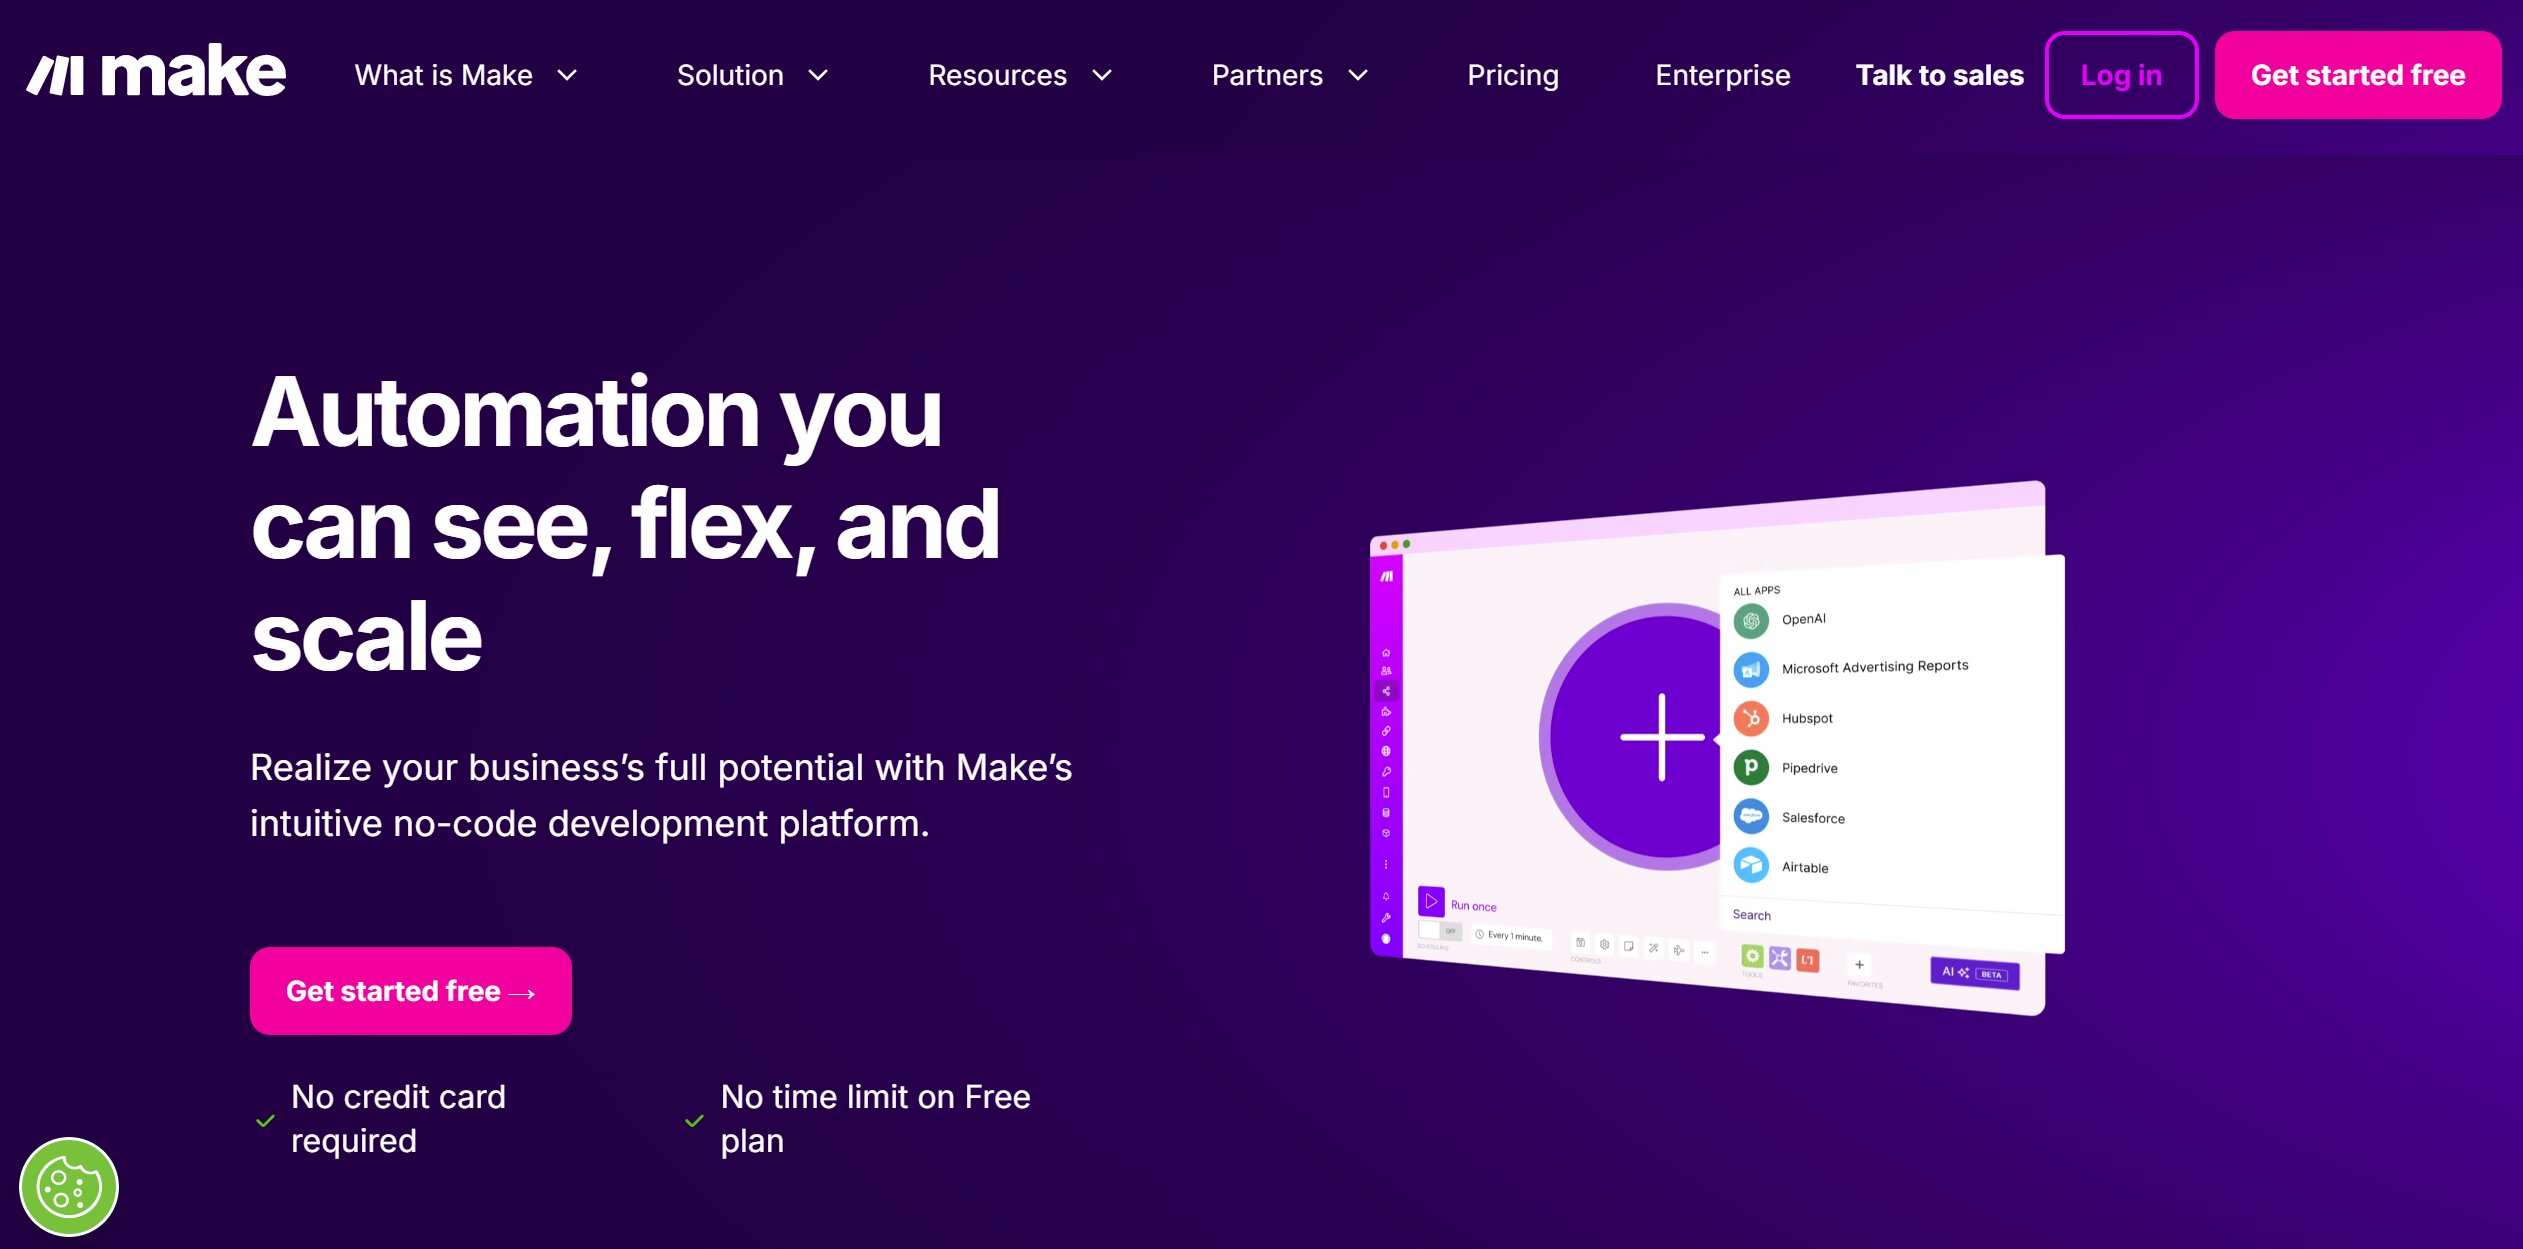
Go to the Make.com homepage and click “Get started free” to begin signing up. You can choose the free plan with 1,000 operations/month or upgrade to a paid plan if you need more. Which plan you choose depends on the scale of your operations and how much automation you want to roll out.
Set up your profile
After you finish signing up, Make.com asks for some basic information such as your name, email and password. This step lets the system personalize your experience and makes sure your account runs smoothly.
Get familiar with the Dashboard
After logging in, you'll land on the Dashboard – where all your automation scenarios are managed. Some important areas in the Dashboard to pay attention to:
To start building an automation scenario on Make.com, you need to open the Scenario Editor. This is where you design, adjust and control your whole automation process.
From the Dashboard, click “Create a new scenario” to open the scenario editor. Make AI automation provides a visual interface that makes it easy to build scenarios by dragging, dropping and connecting modules. The main parts of the editor are:
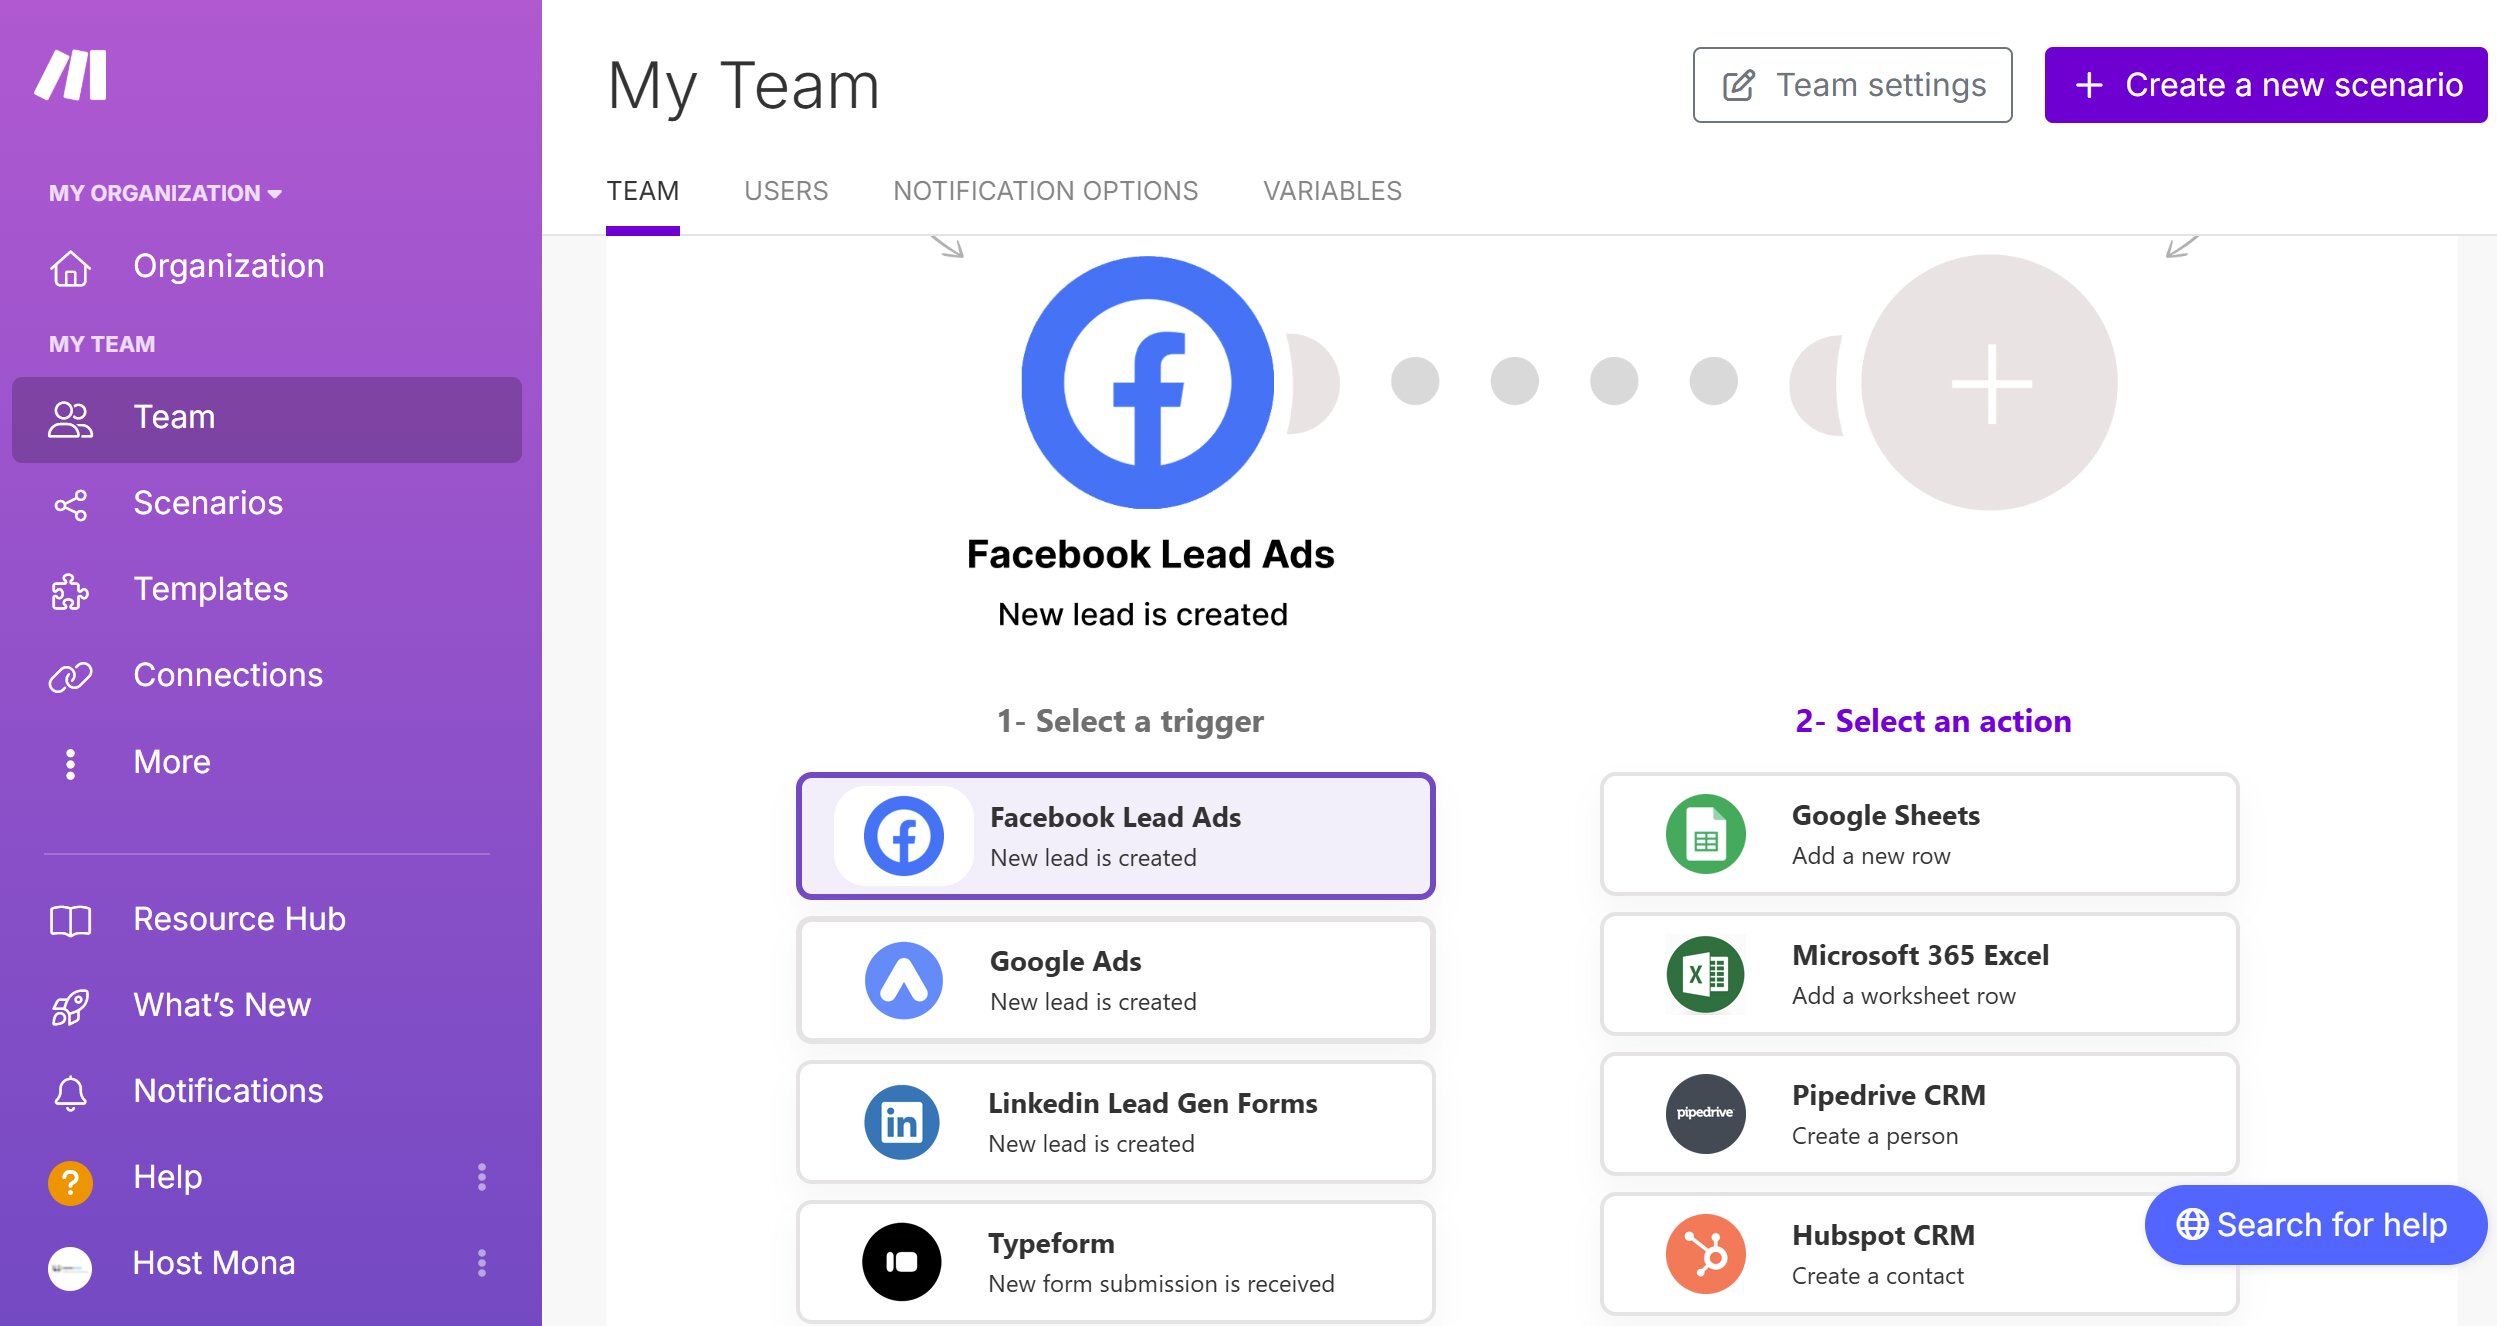
Once the editor is open, the next step is choosing a Trigger that fits your automation goal. Make.com connects with a huge number of apps, and almost any app can act as a Trigger. For example:
Each app has many different Trigger options. You just need to be clear on this: “Which event should make the system run automatically?” and you can pick the right Trigger right away.
In this article, MONA will take an example workflow that creates SEO content automatically just by entering a keyword into Google Sheets. You can set Google Sheets as the Trigger. When a cell in the spreadsheet changes, the workflow fires, has AI write the article, and updates it on the platform you want.
Note: AI-generated content should be used for reference only. Check and edit it carefully before publishing it on your website to avoid content quality problems.
As the earlier MONA article on AI Automation mentioned, to run this workflow you need to define clearly your daily process for producing content with AI.
When you have a keyword to write about, AI first creates an outline. Then AI uses the outline and the keyword you entered to write the full content. When the content is done, the system automatically updates it to Google Docs. Finally, the Google Doc link is recorded back in the Google Sheet so you can manage everything in one place and track it more easily.
To run this process, you'll need to integrate the following tools in Make.com:
Step 1: Set up the trigger on Make.com
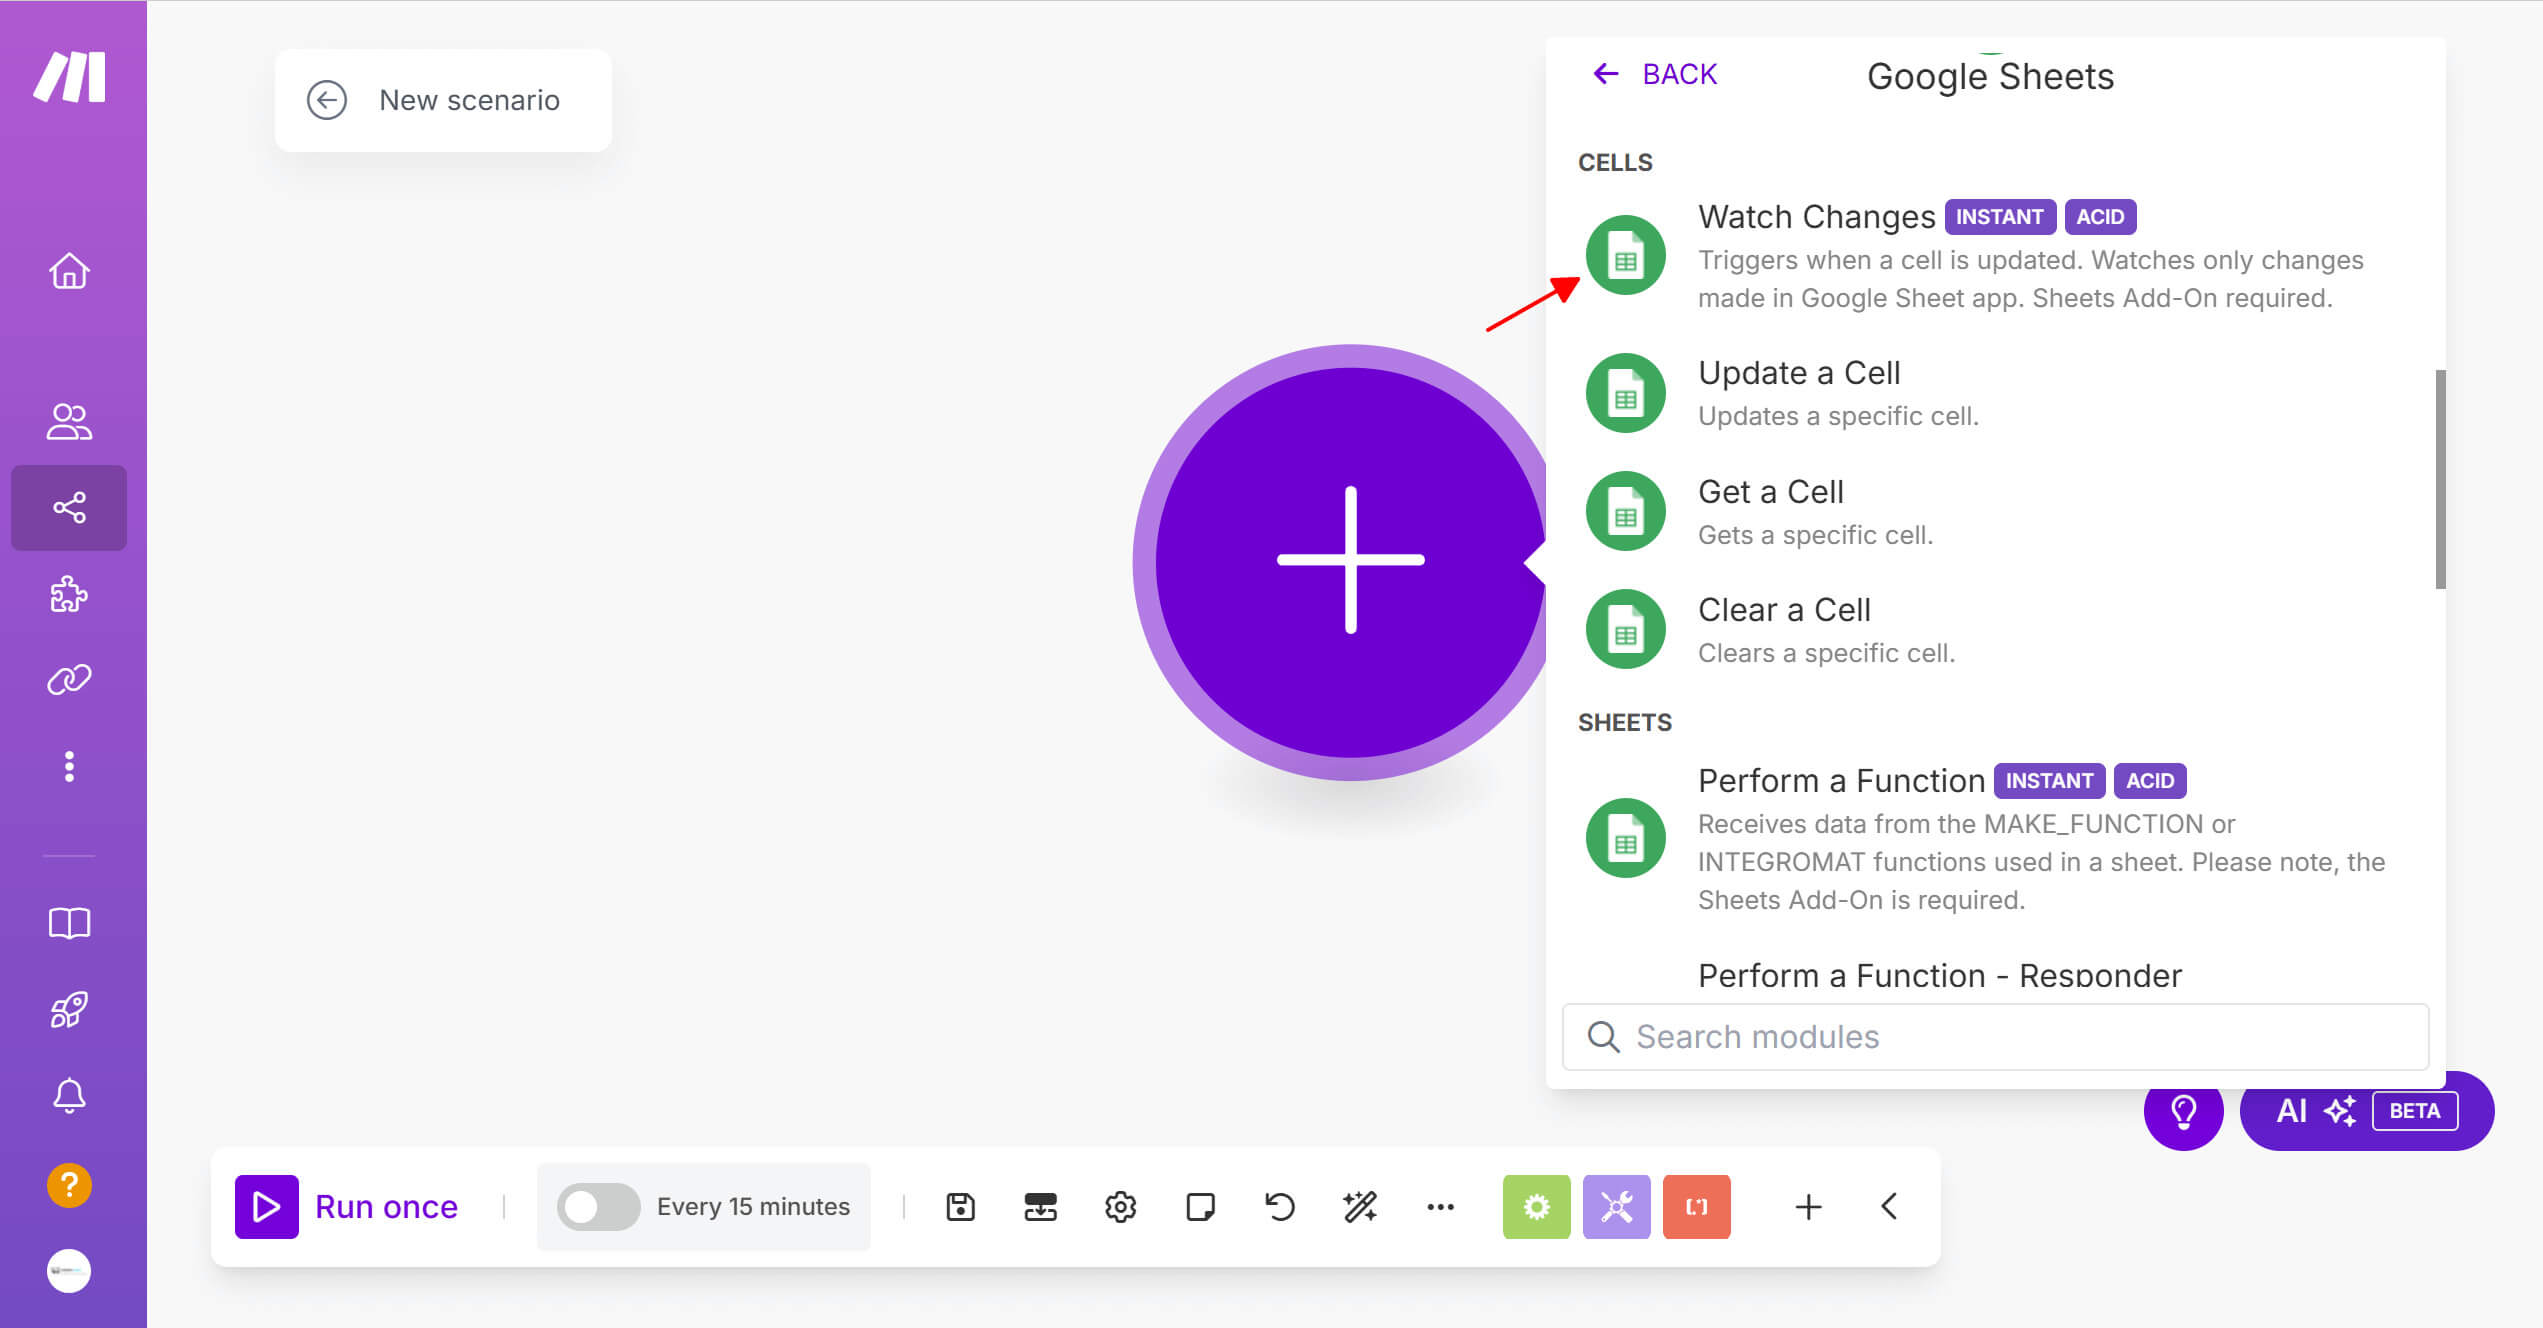
1. Create a new scenario, click the “+” → Choose Google Sheets
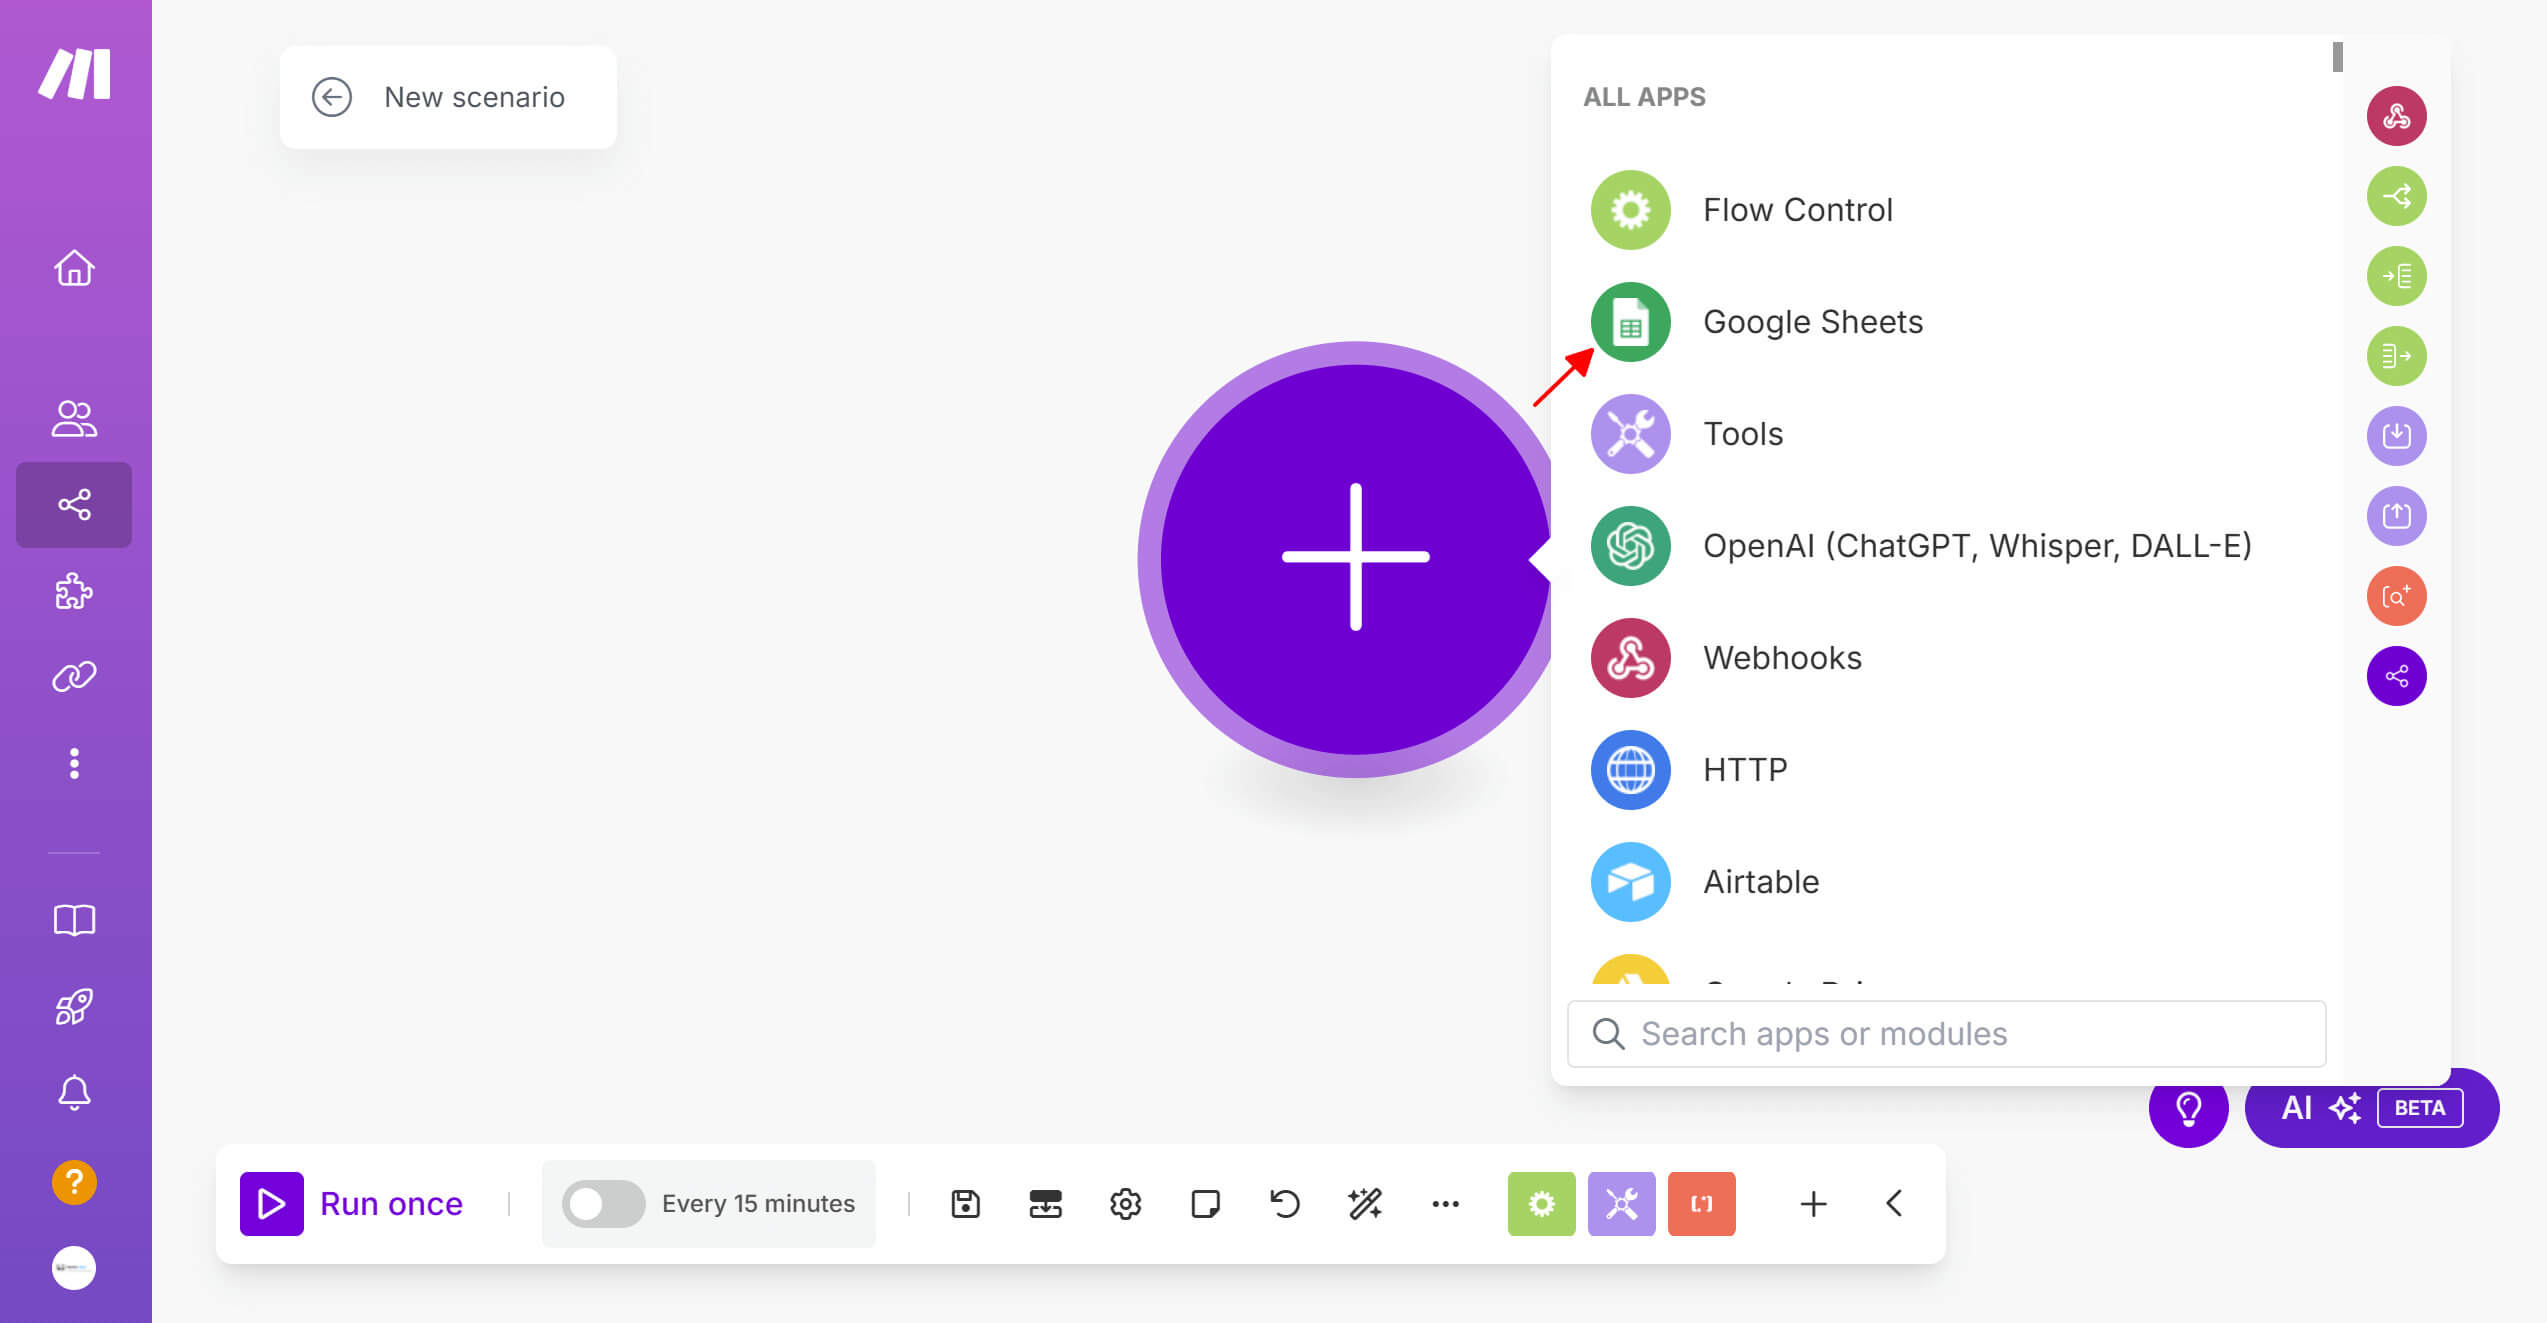
Choose Watch Changes (Cell). Configure the Range to watch – this is the data area that will trigger the workflow when something changes.
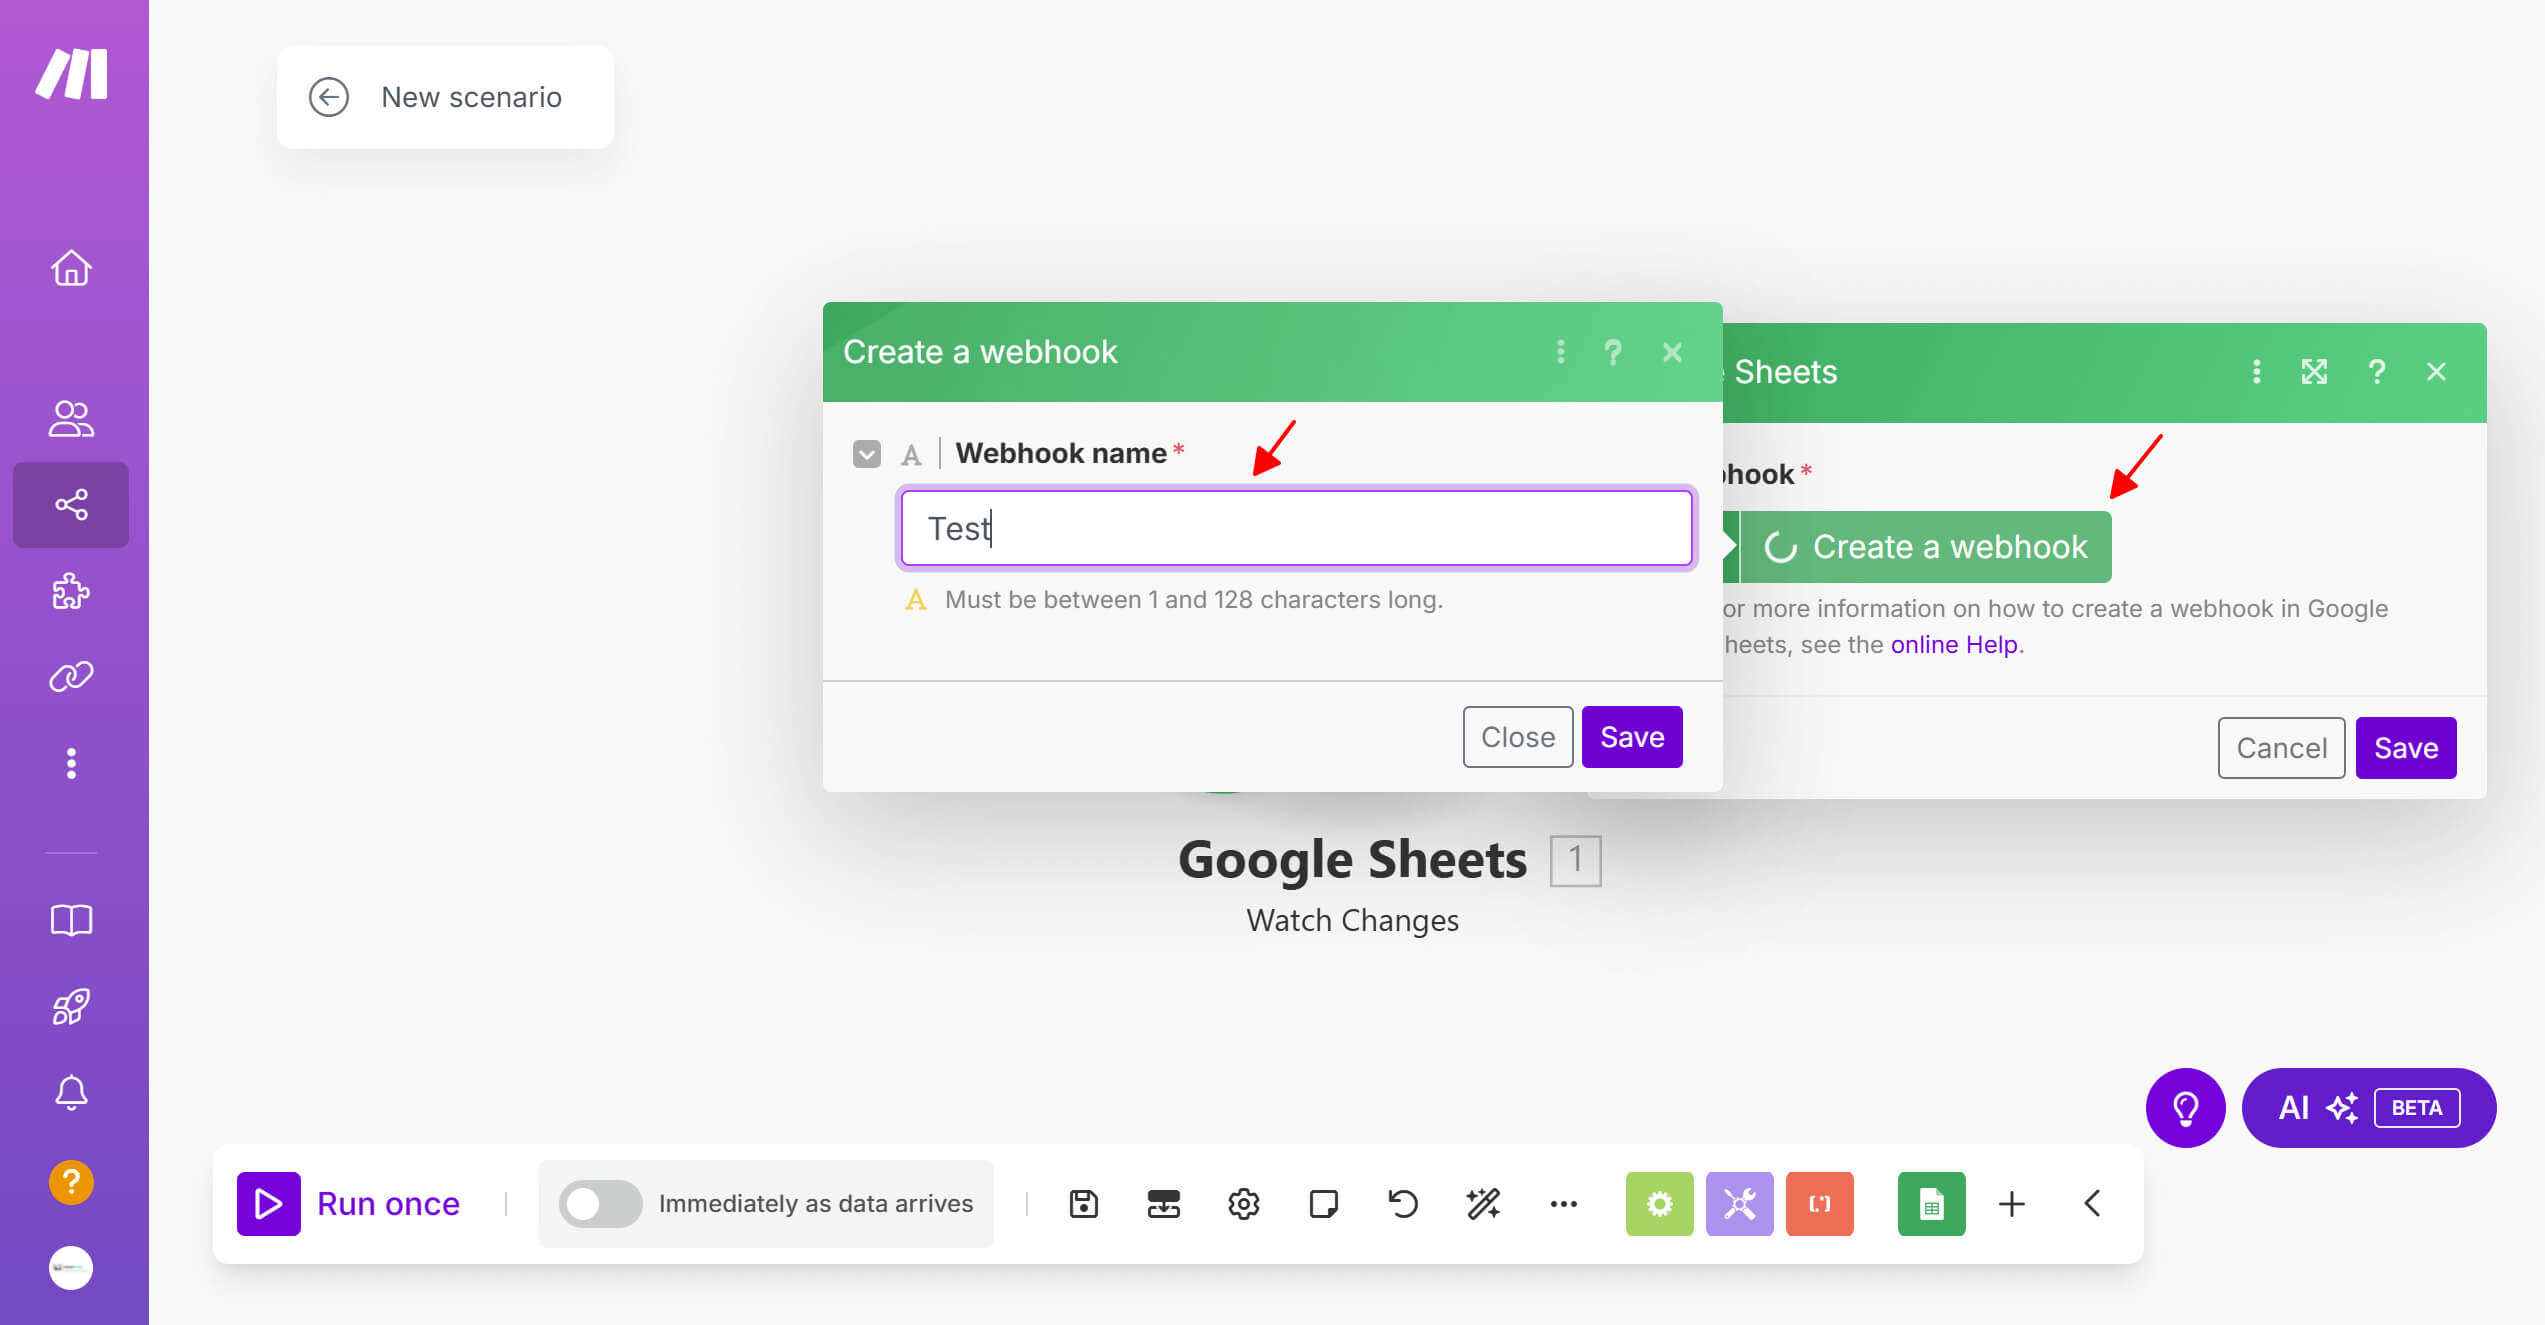
2. Create a webhook: In the scenario, create a webhook to receive data from the Google Sheet → Copy the webhook link you just created.
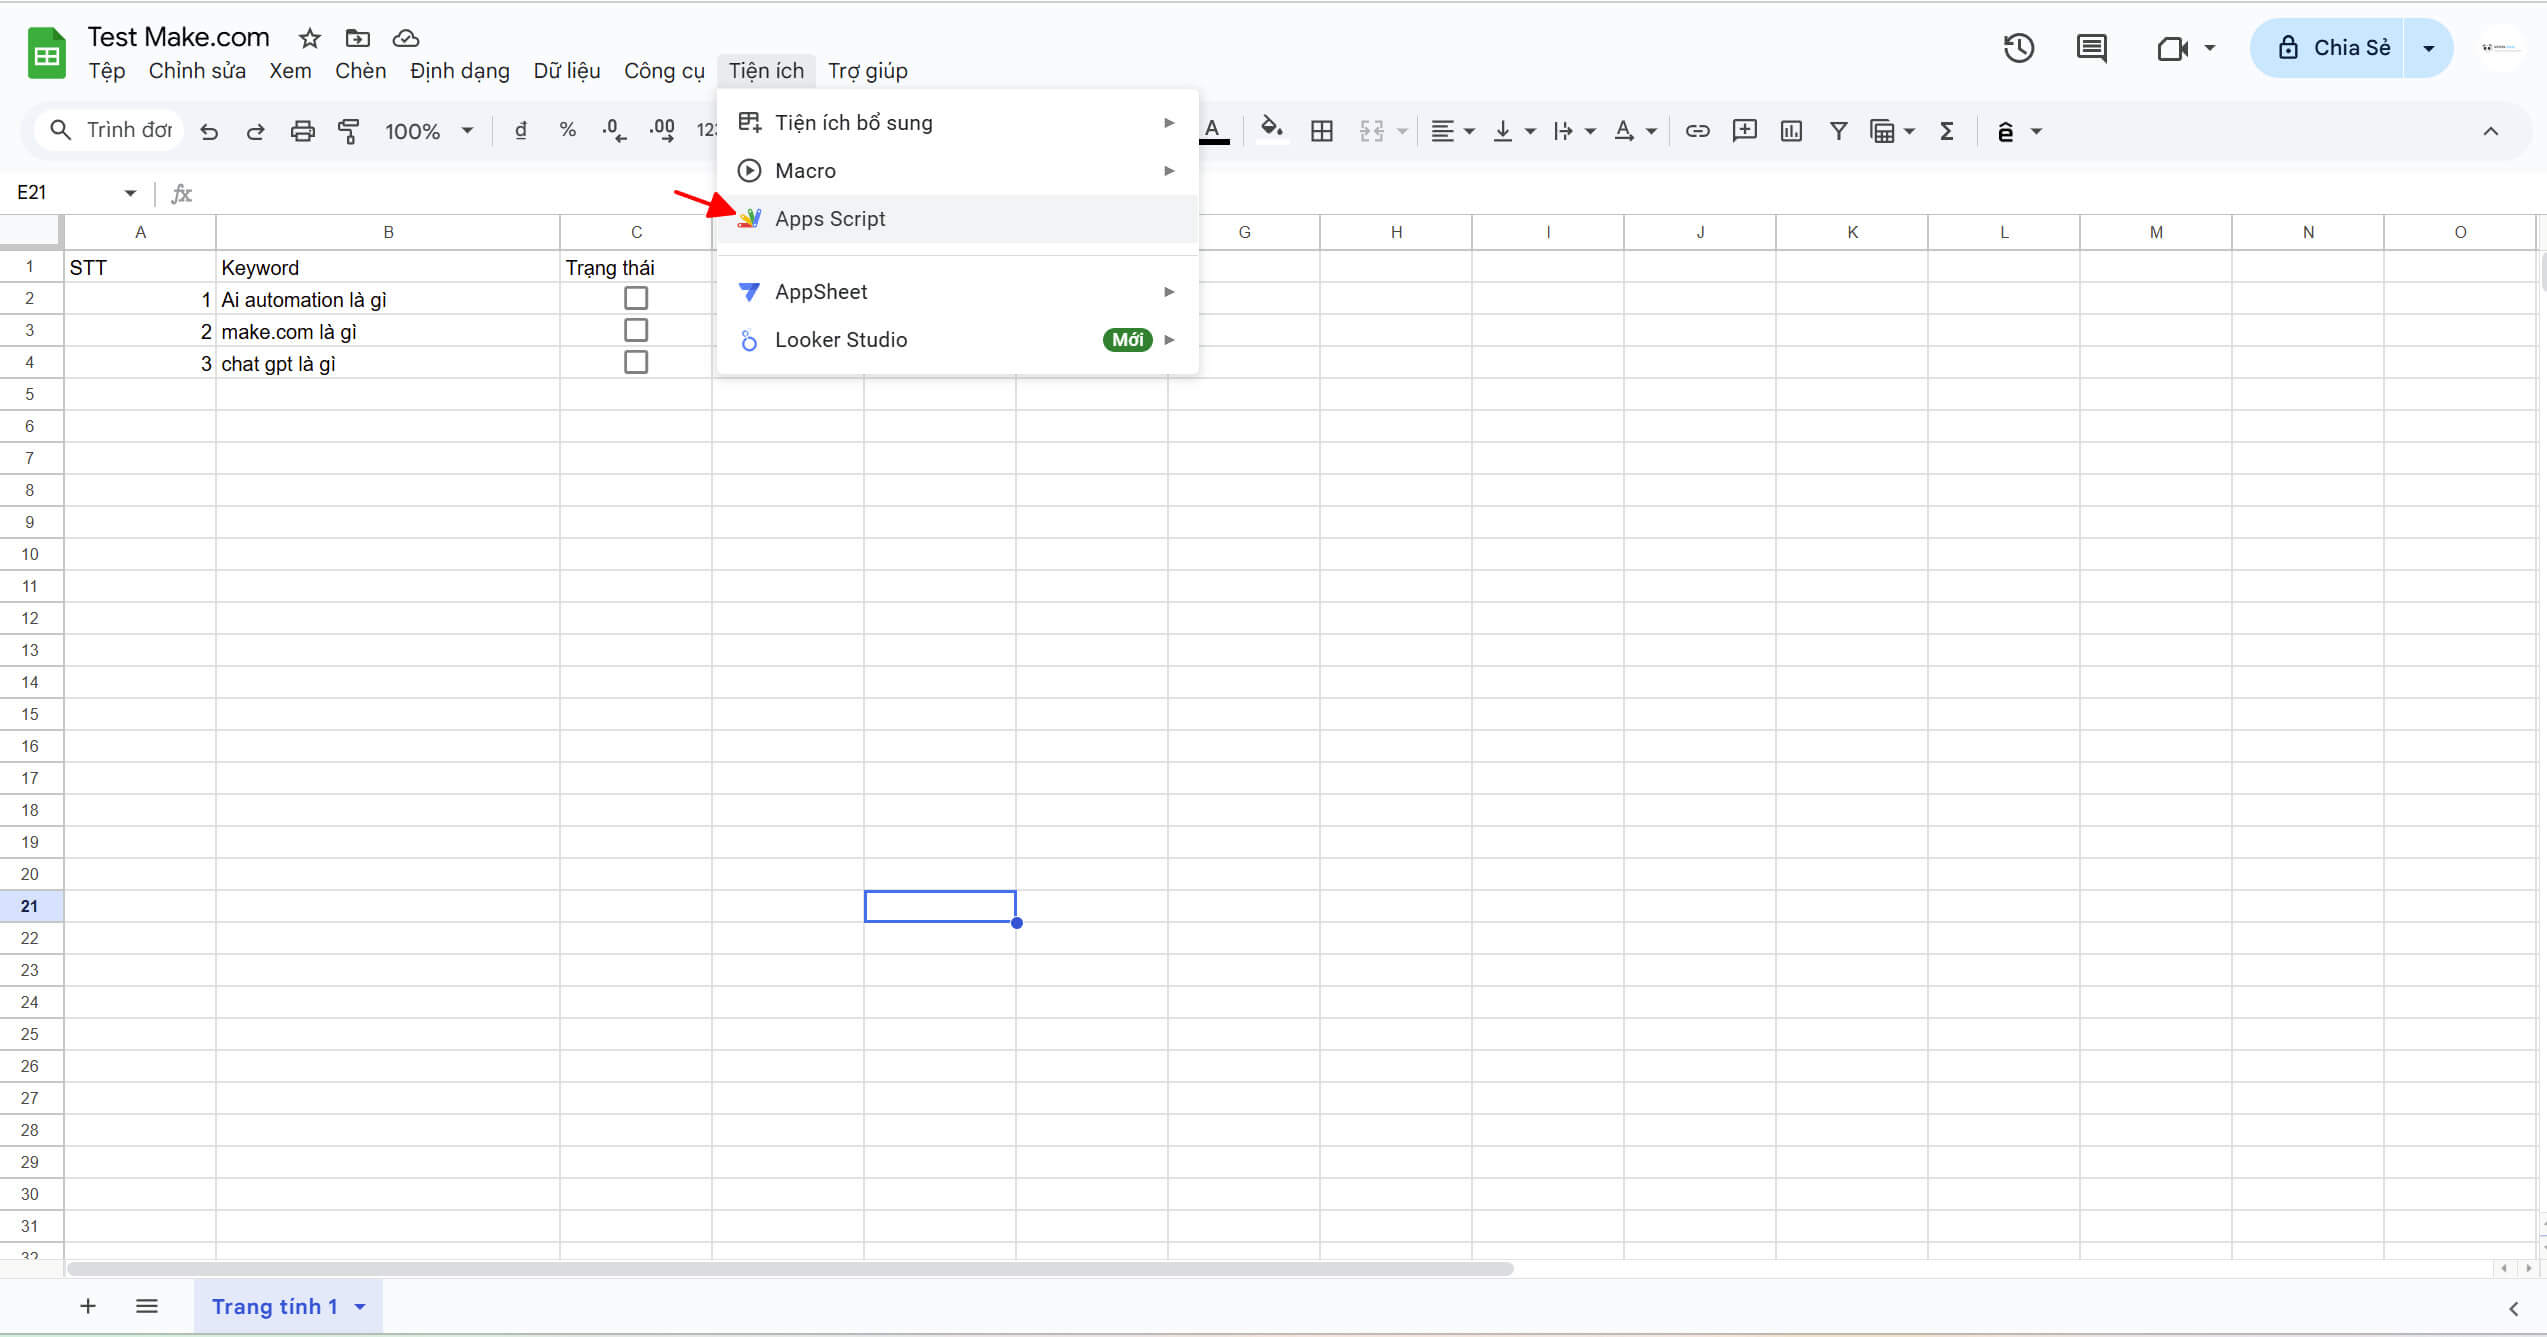
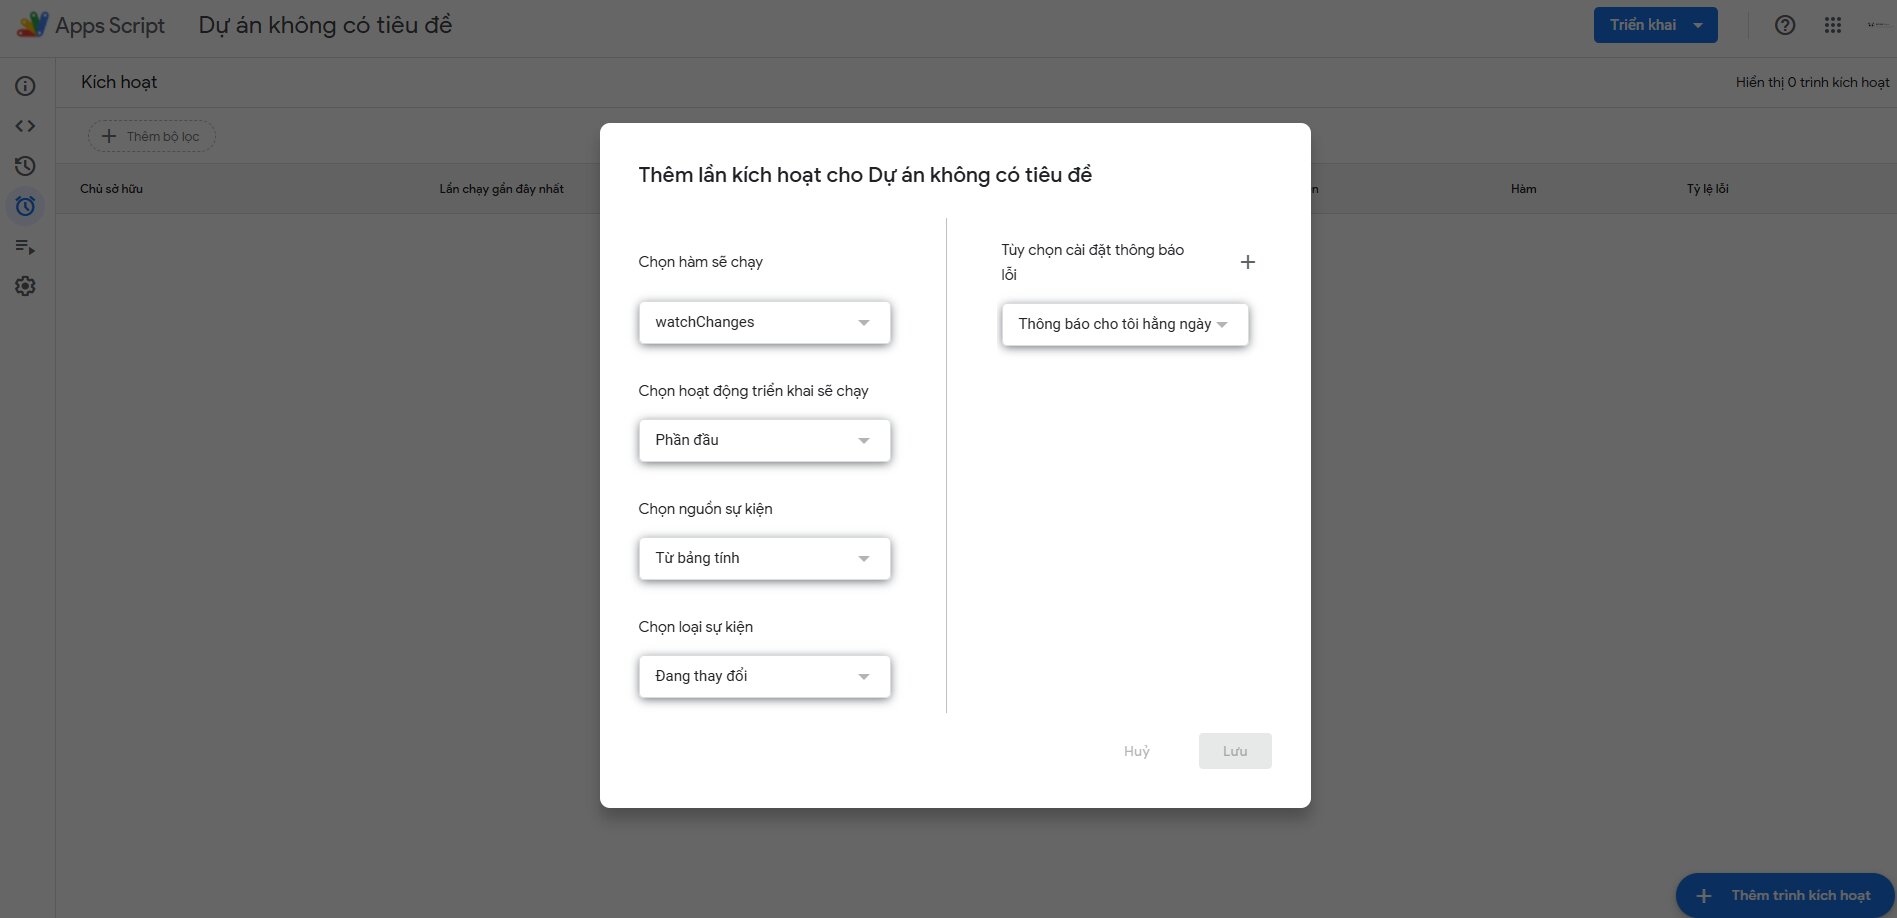
3. Deploy Google Apps Script
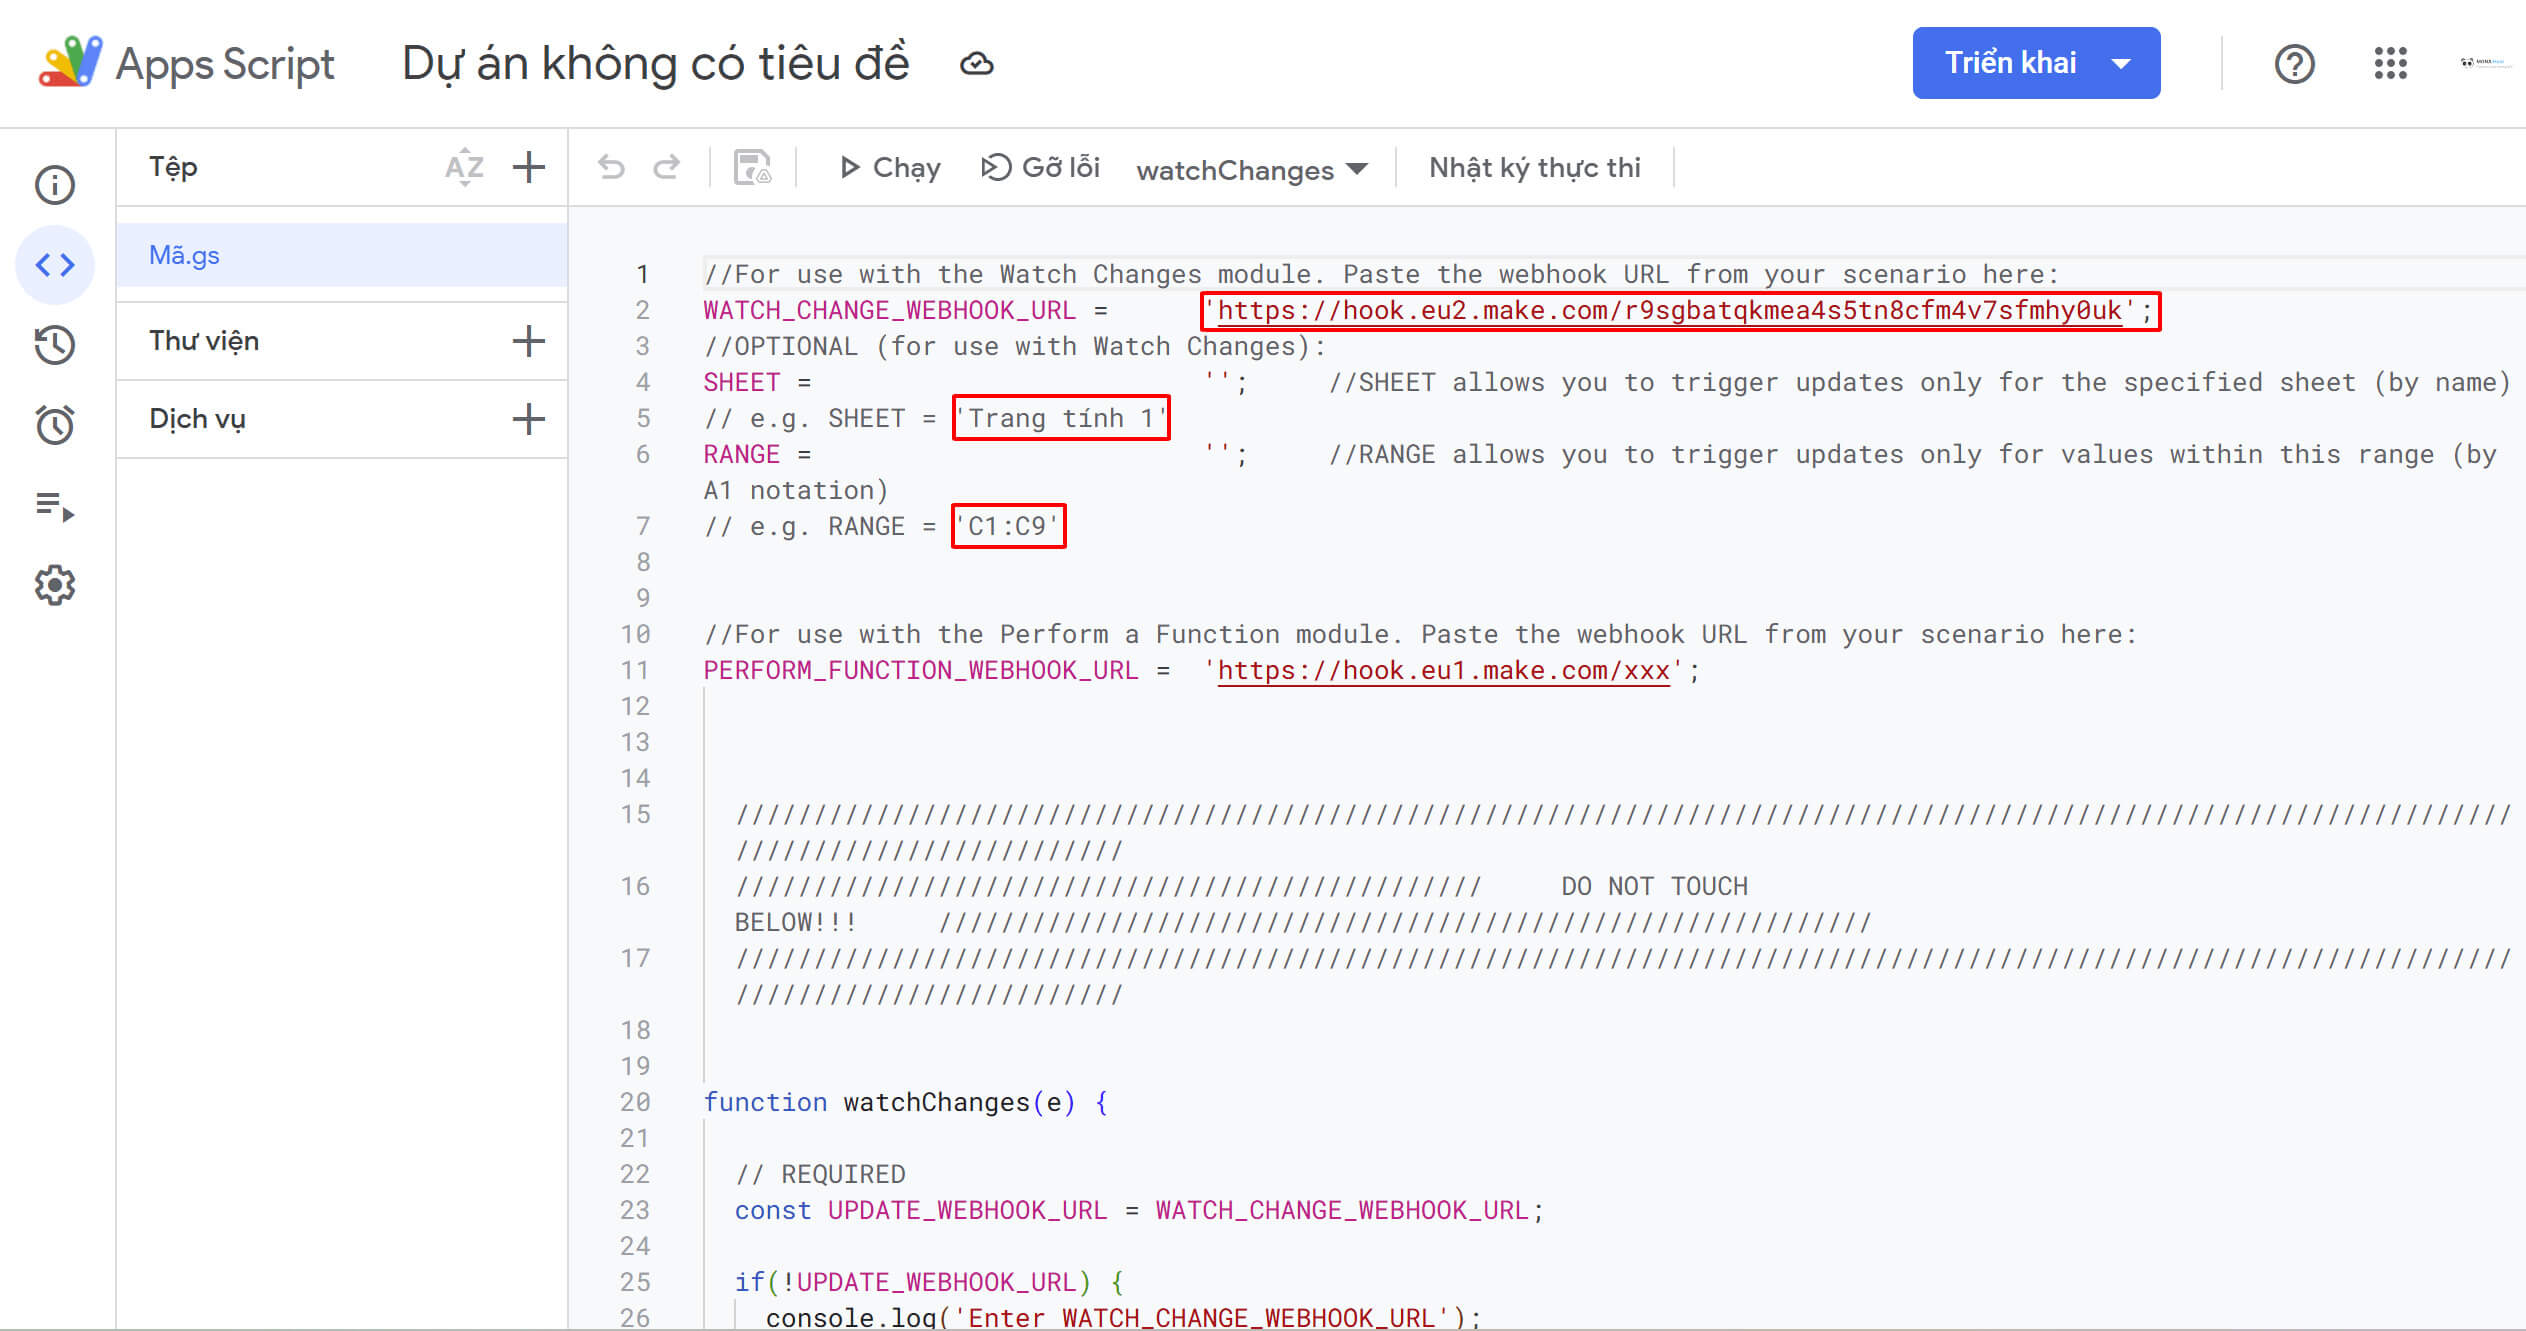
4. Activate the automatic trigger
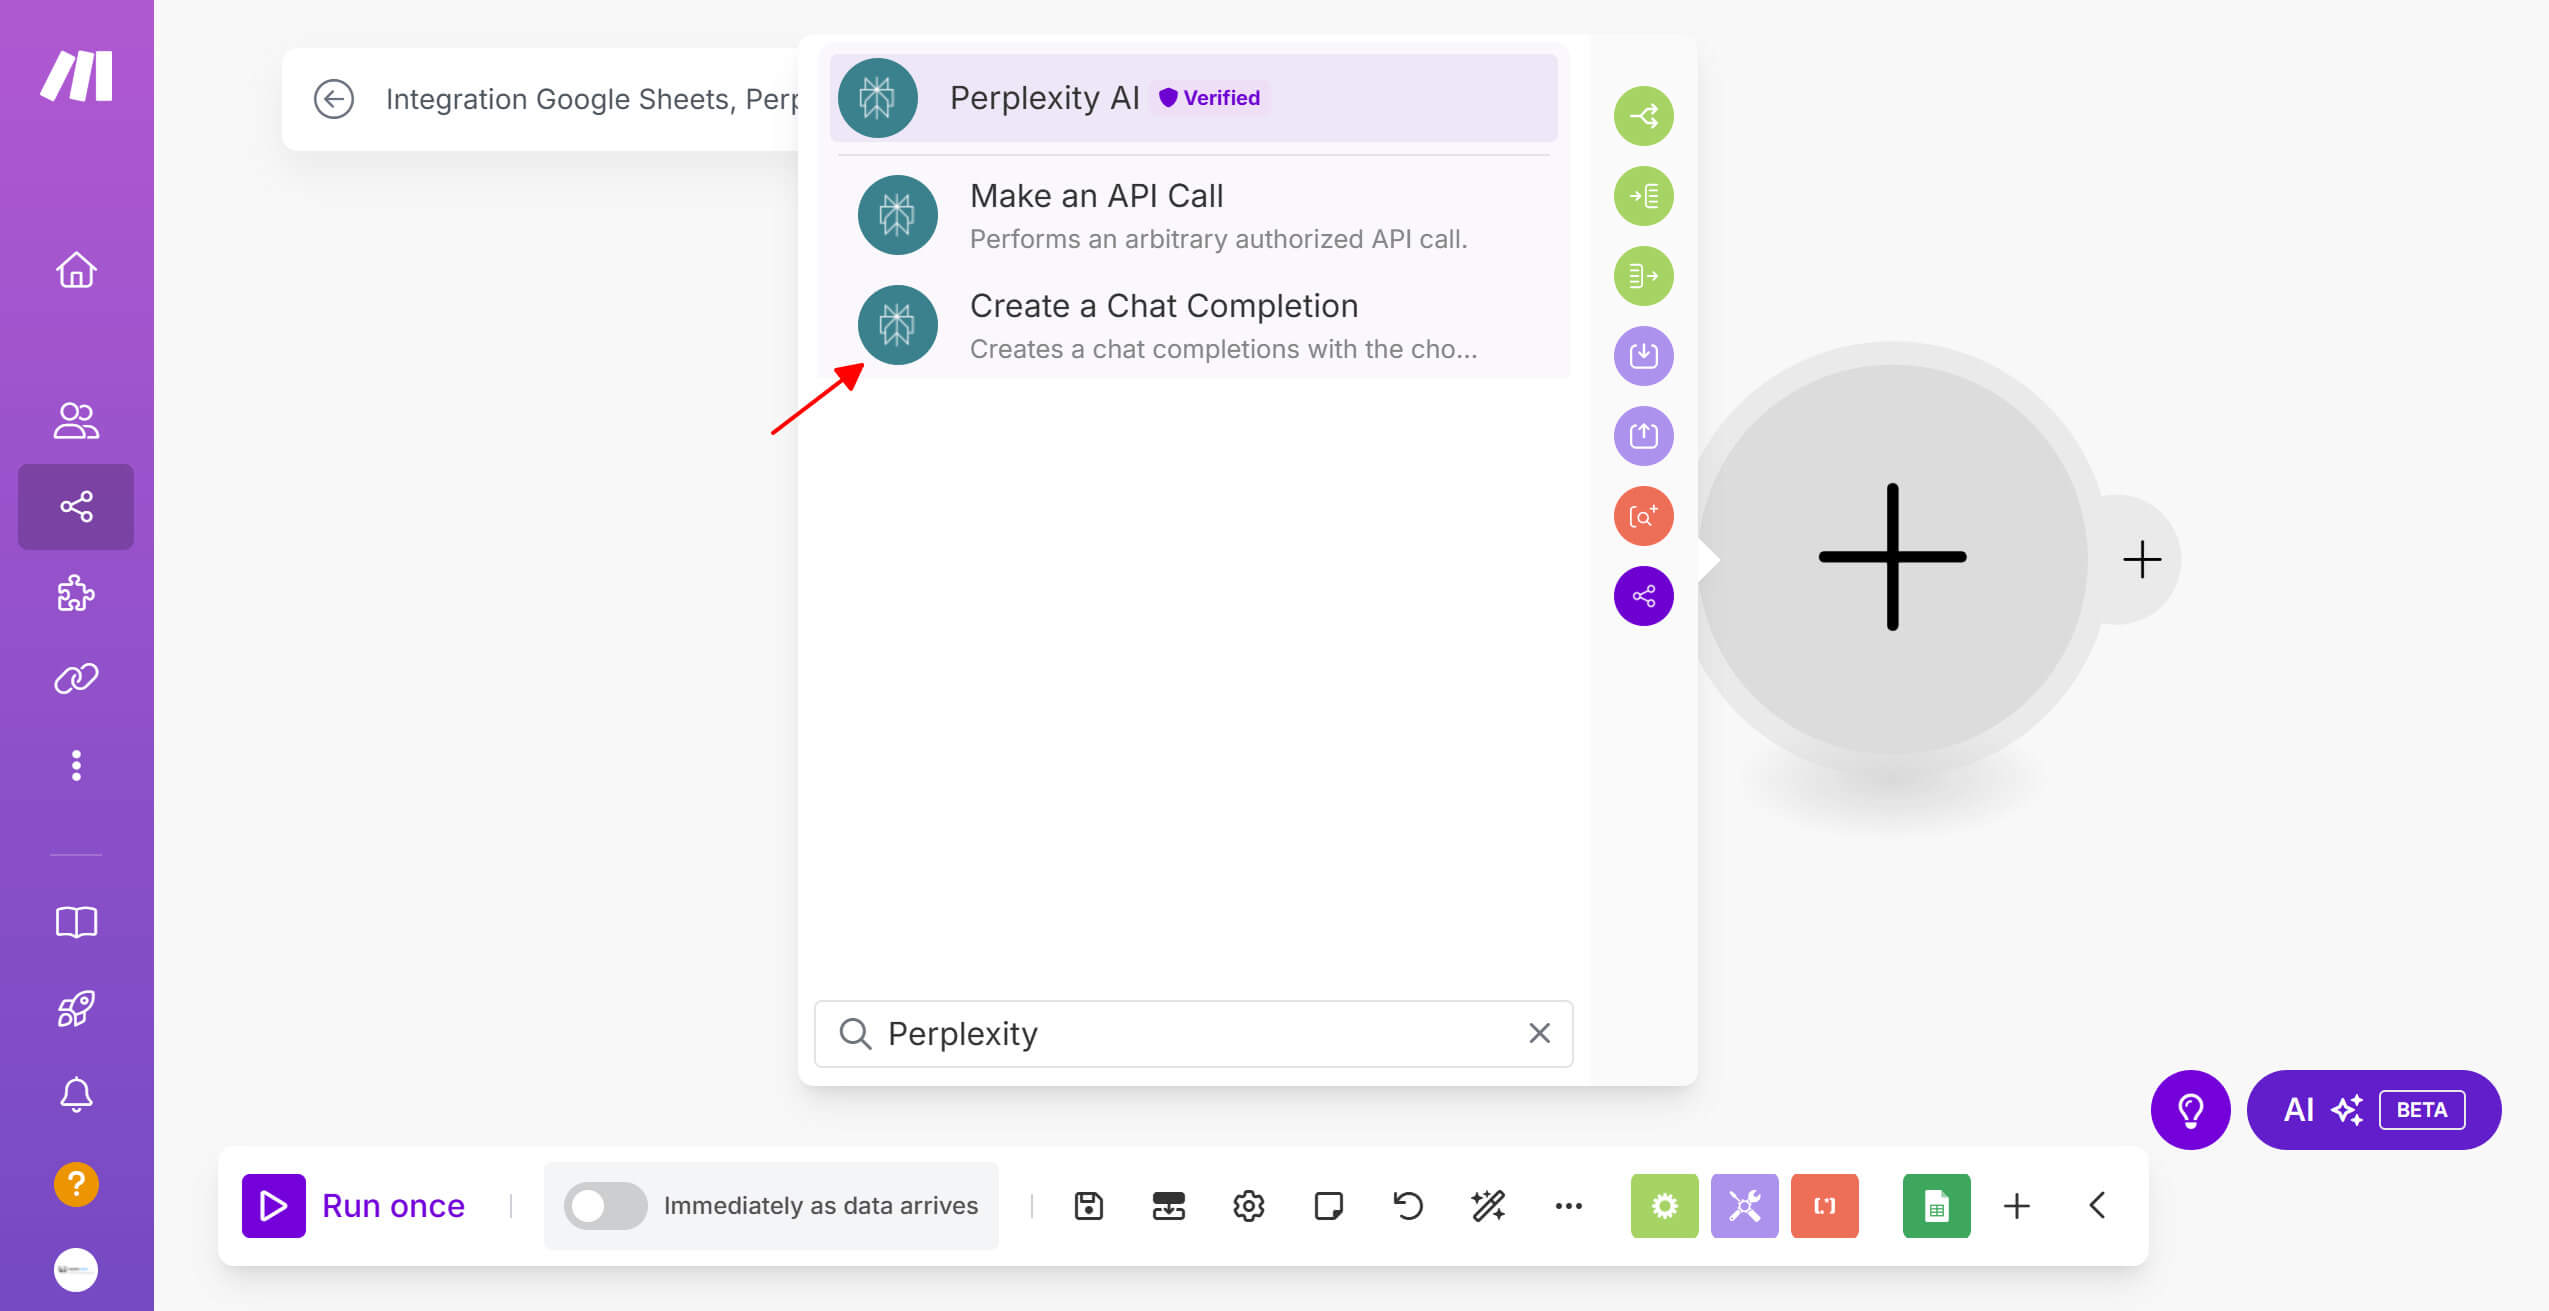
Step 2: Connect Perplexity to make.com
In the workflow MONA set up, once you have the article keyword, instead of researching on Google by hand, we let AI handle that part. It's fairly simple to do:
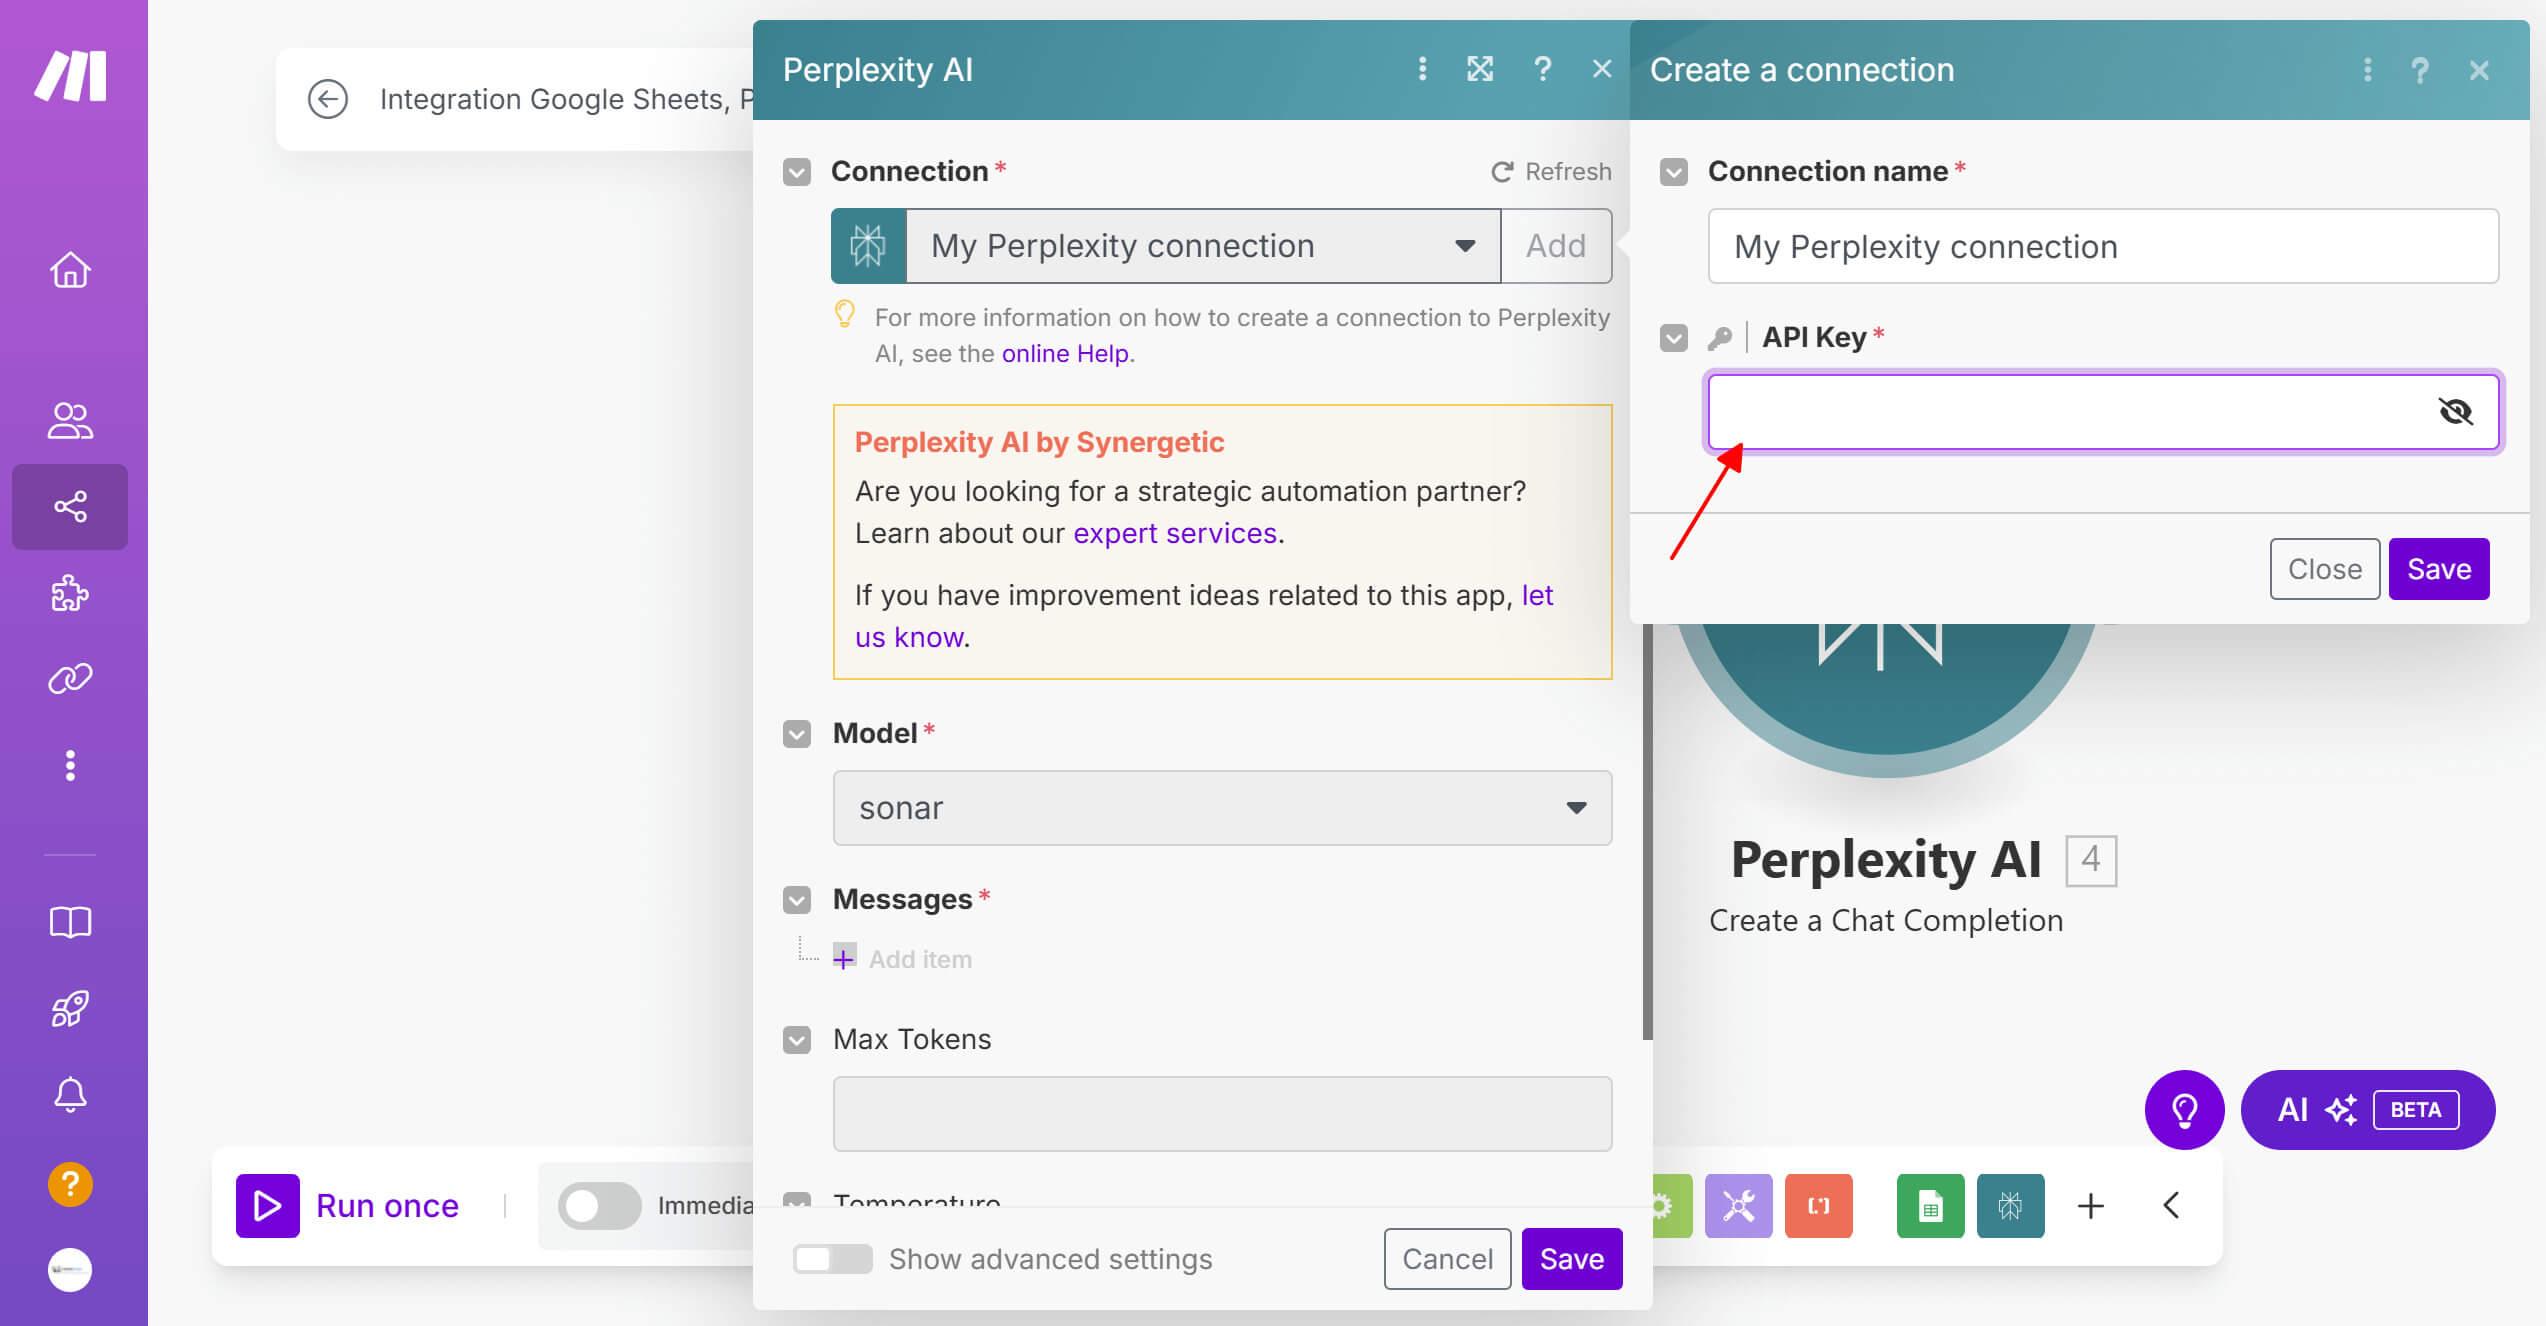
Note: If you sign up for the 20/month plan, you get 5 free API credits. Otherwise, you need to add a VISA card and top up at least $3 to use the API.
Configure the information on Perplexity:
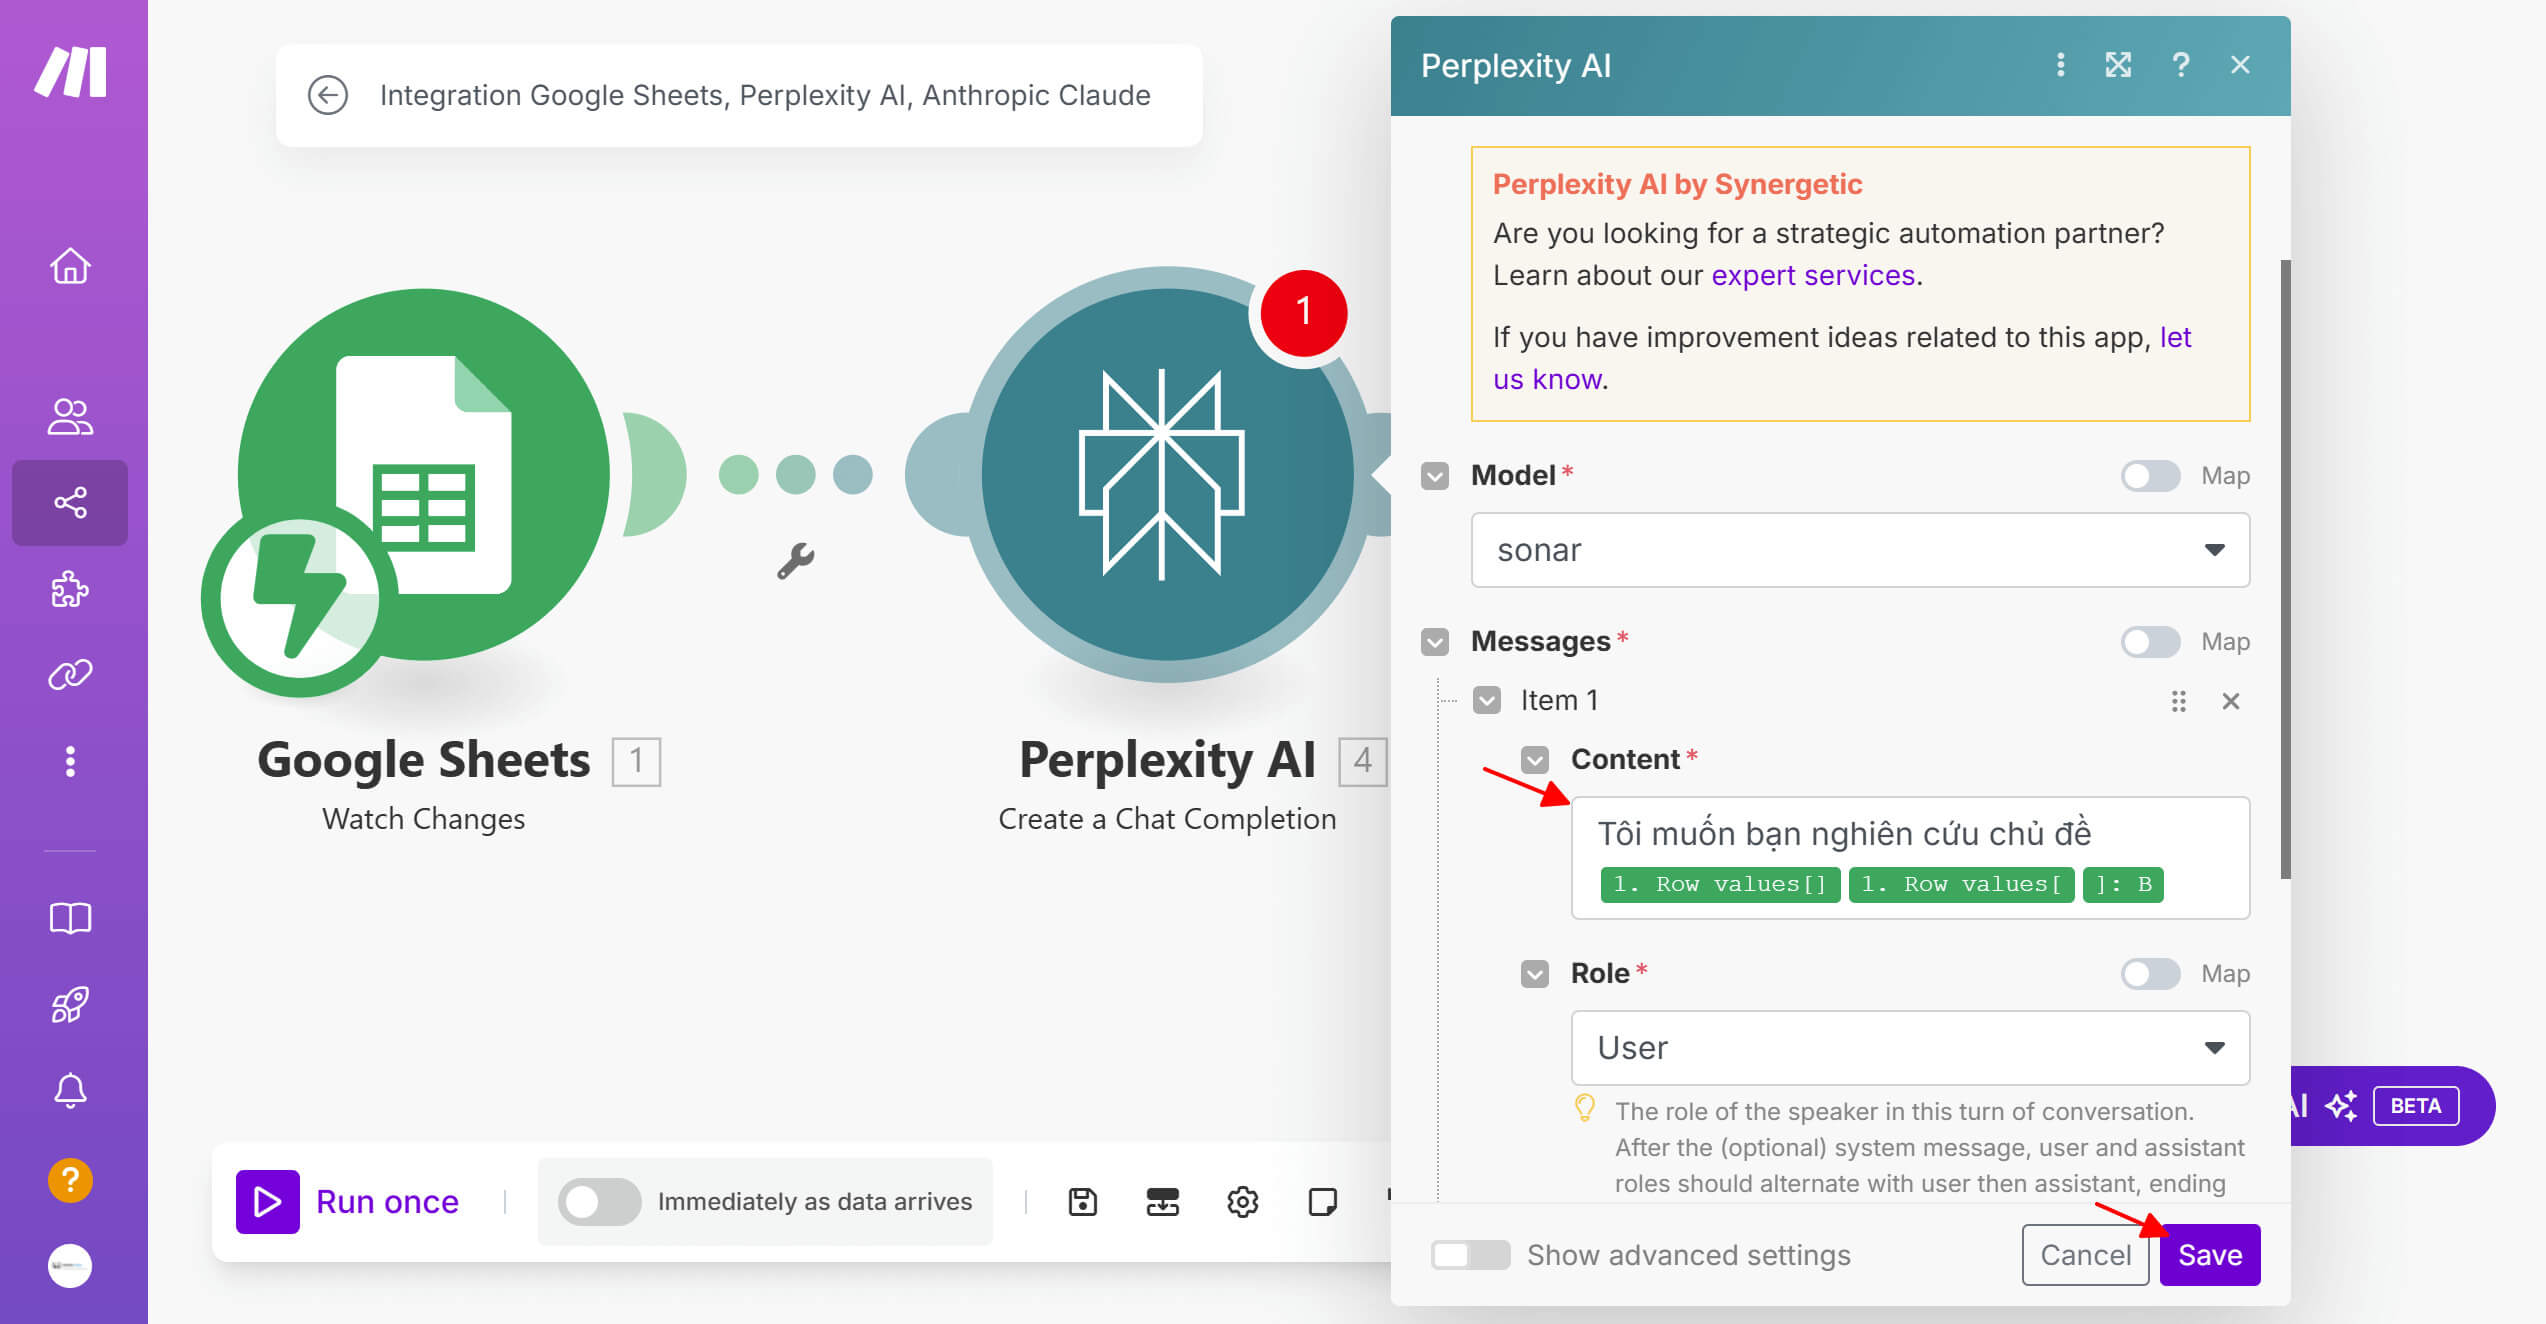
When you're done, choose Save.
Step 3: Pass the collected data to Claude AI to create the article outline
Next, you'll need to do the steps below to connect Claude AI to Make.com and let the system automatically create an article outline from the data you already have. Specifically:
1. Add Anthropic Claude → Choose Create a Prompt.
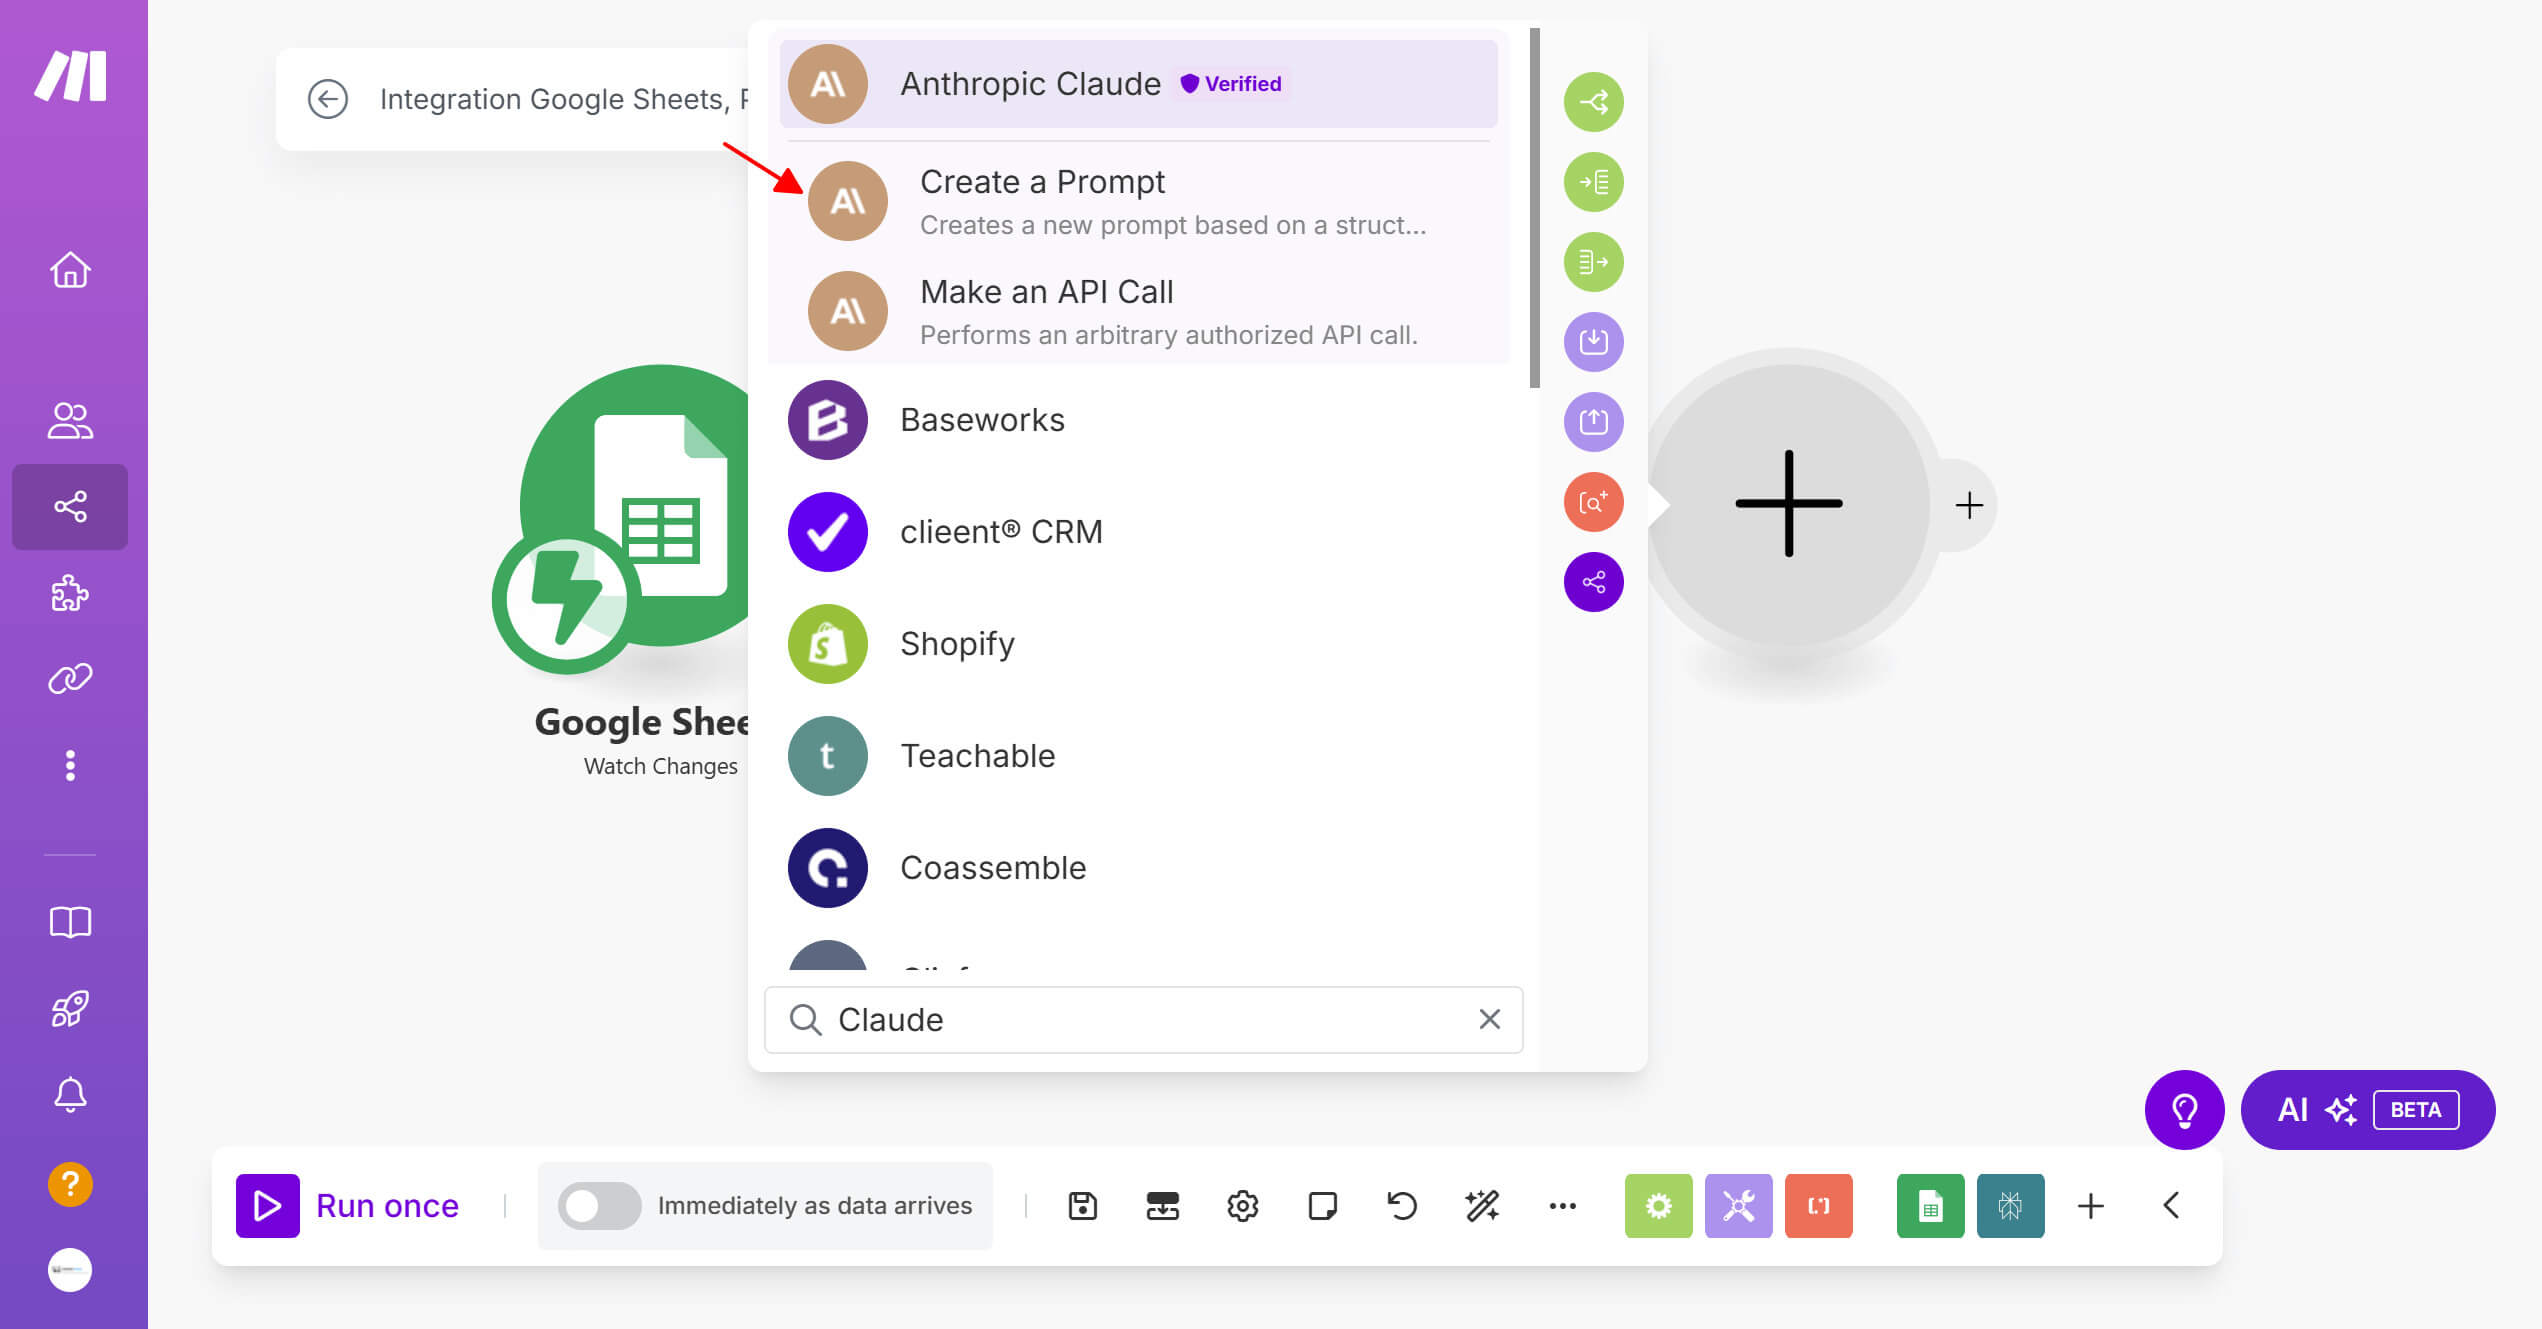
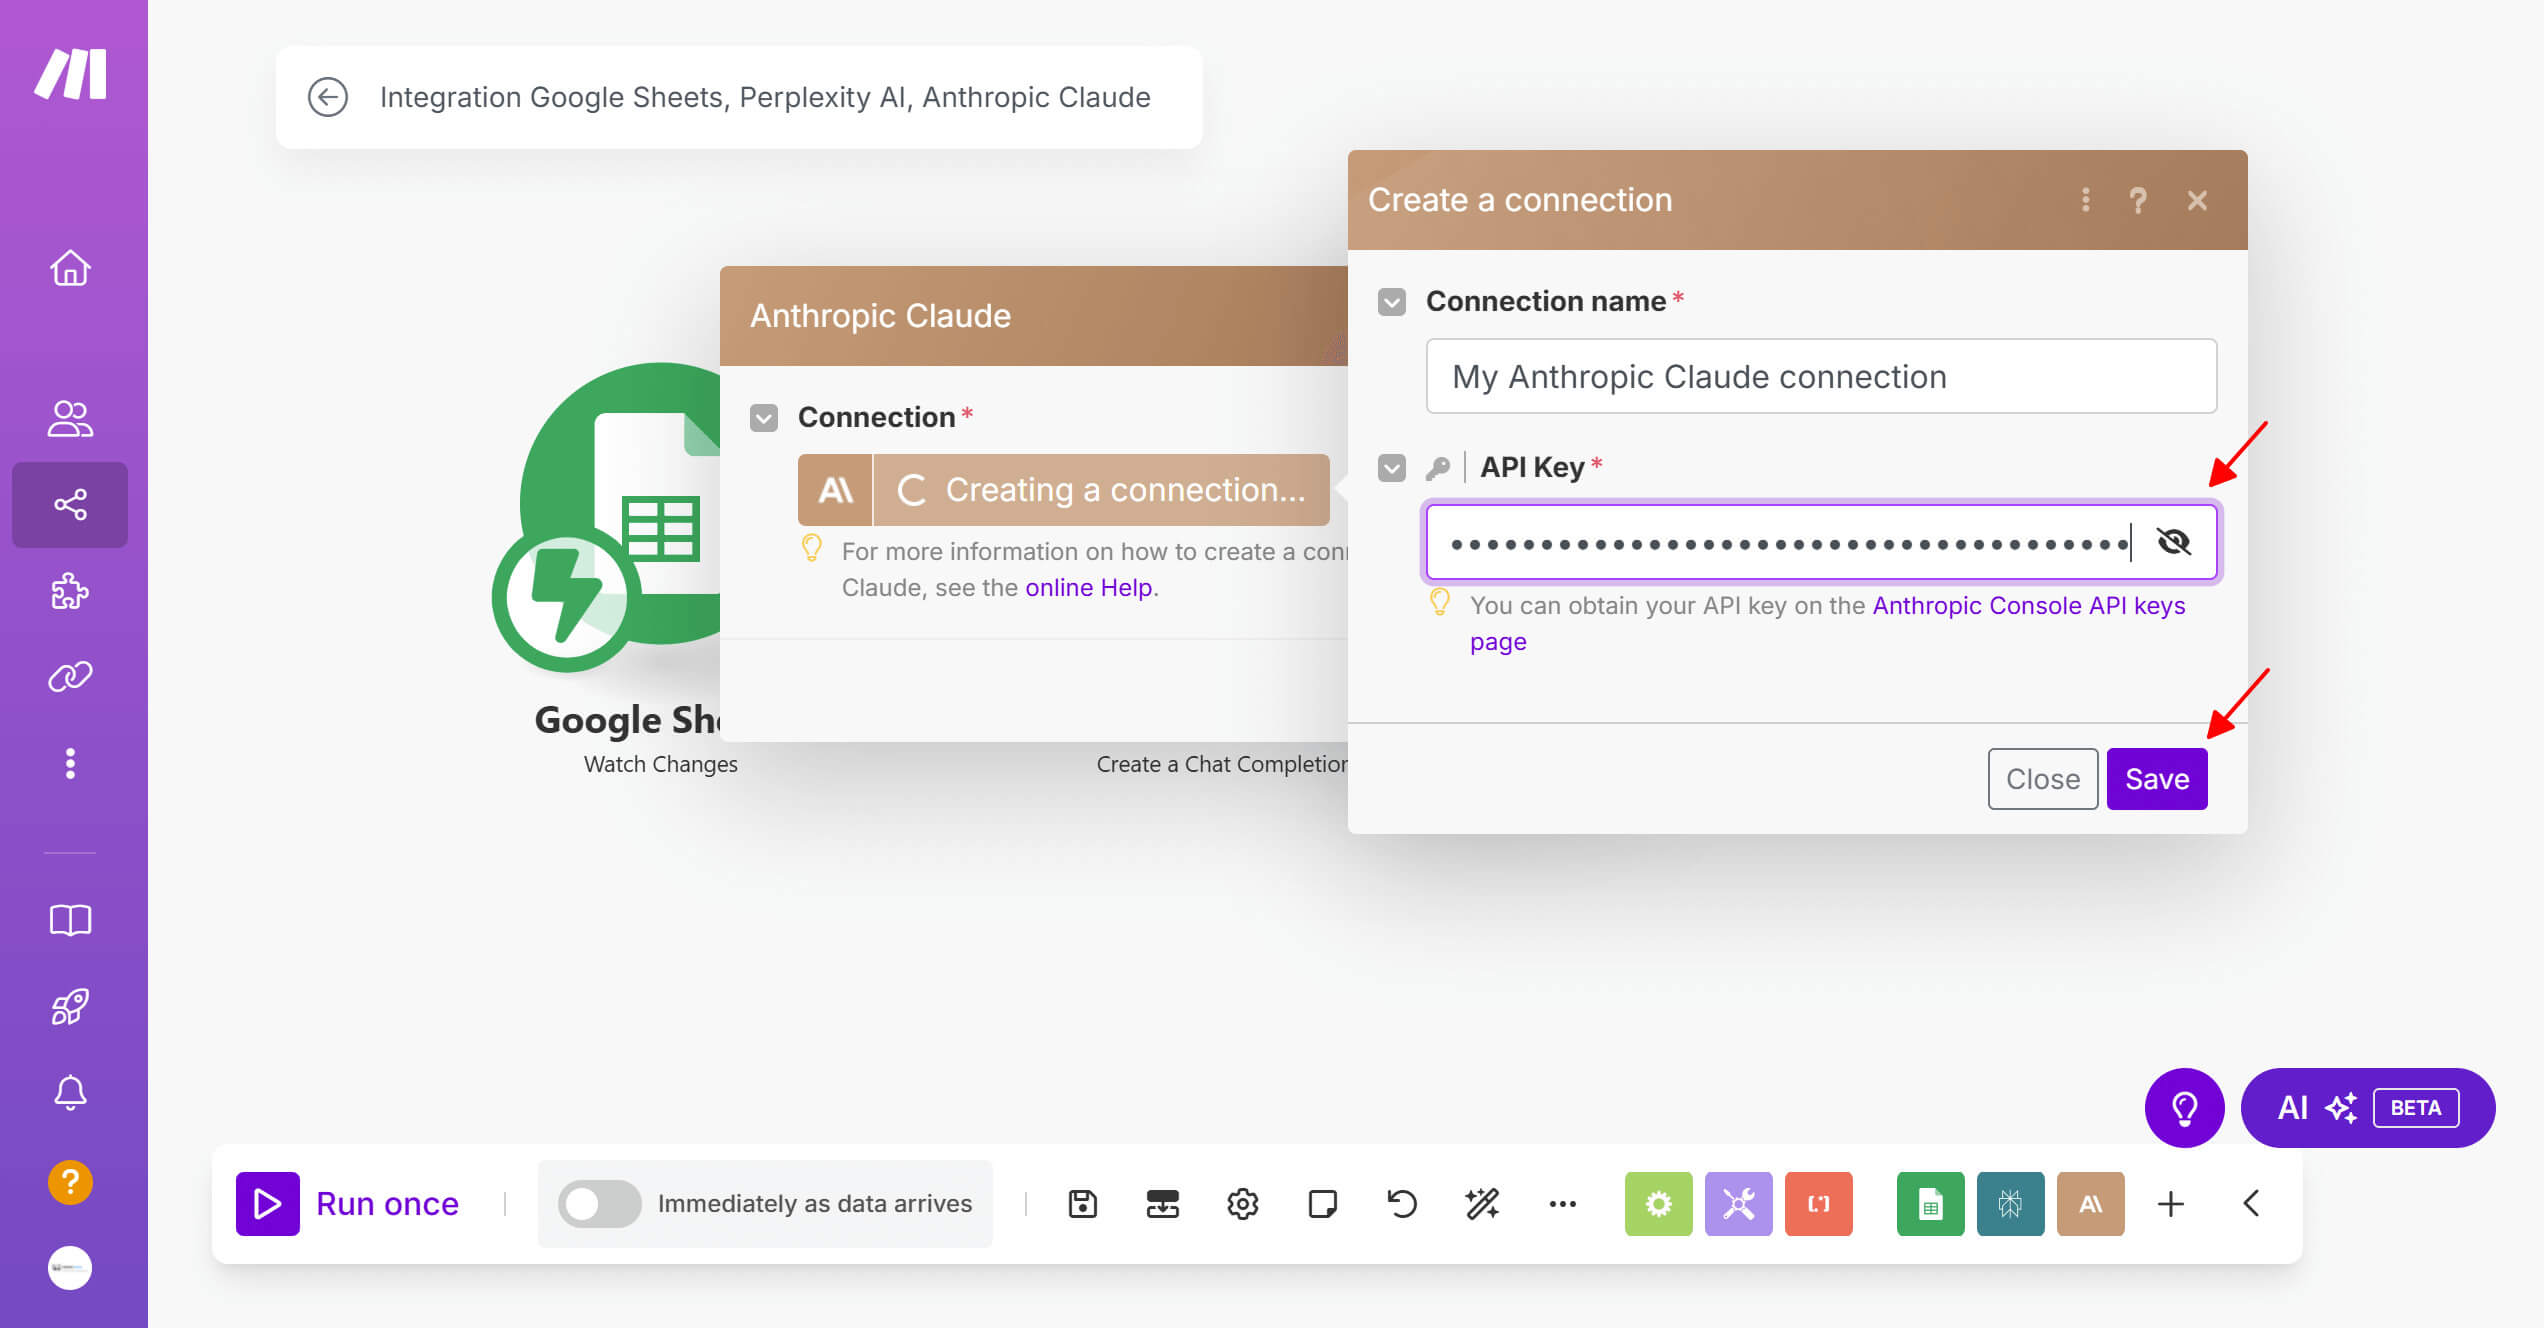
2. Connect your Claude account by going to Anthropic's API page, choosing Start building → Get API keys → Create a new key and paste it into Make.com.
3. Set up the information on Claude:
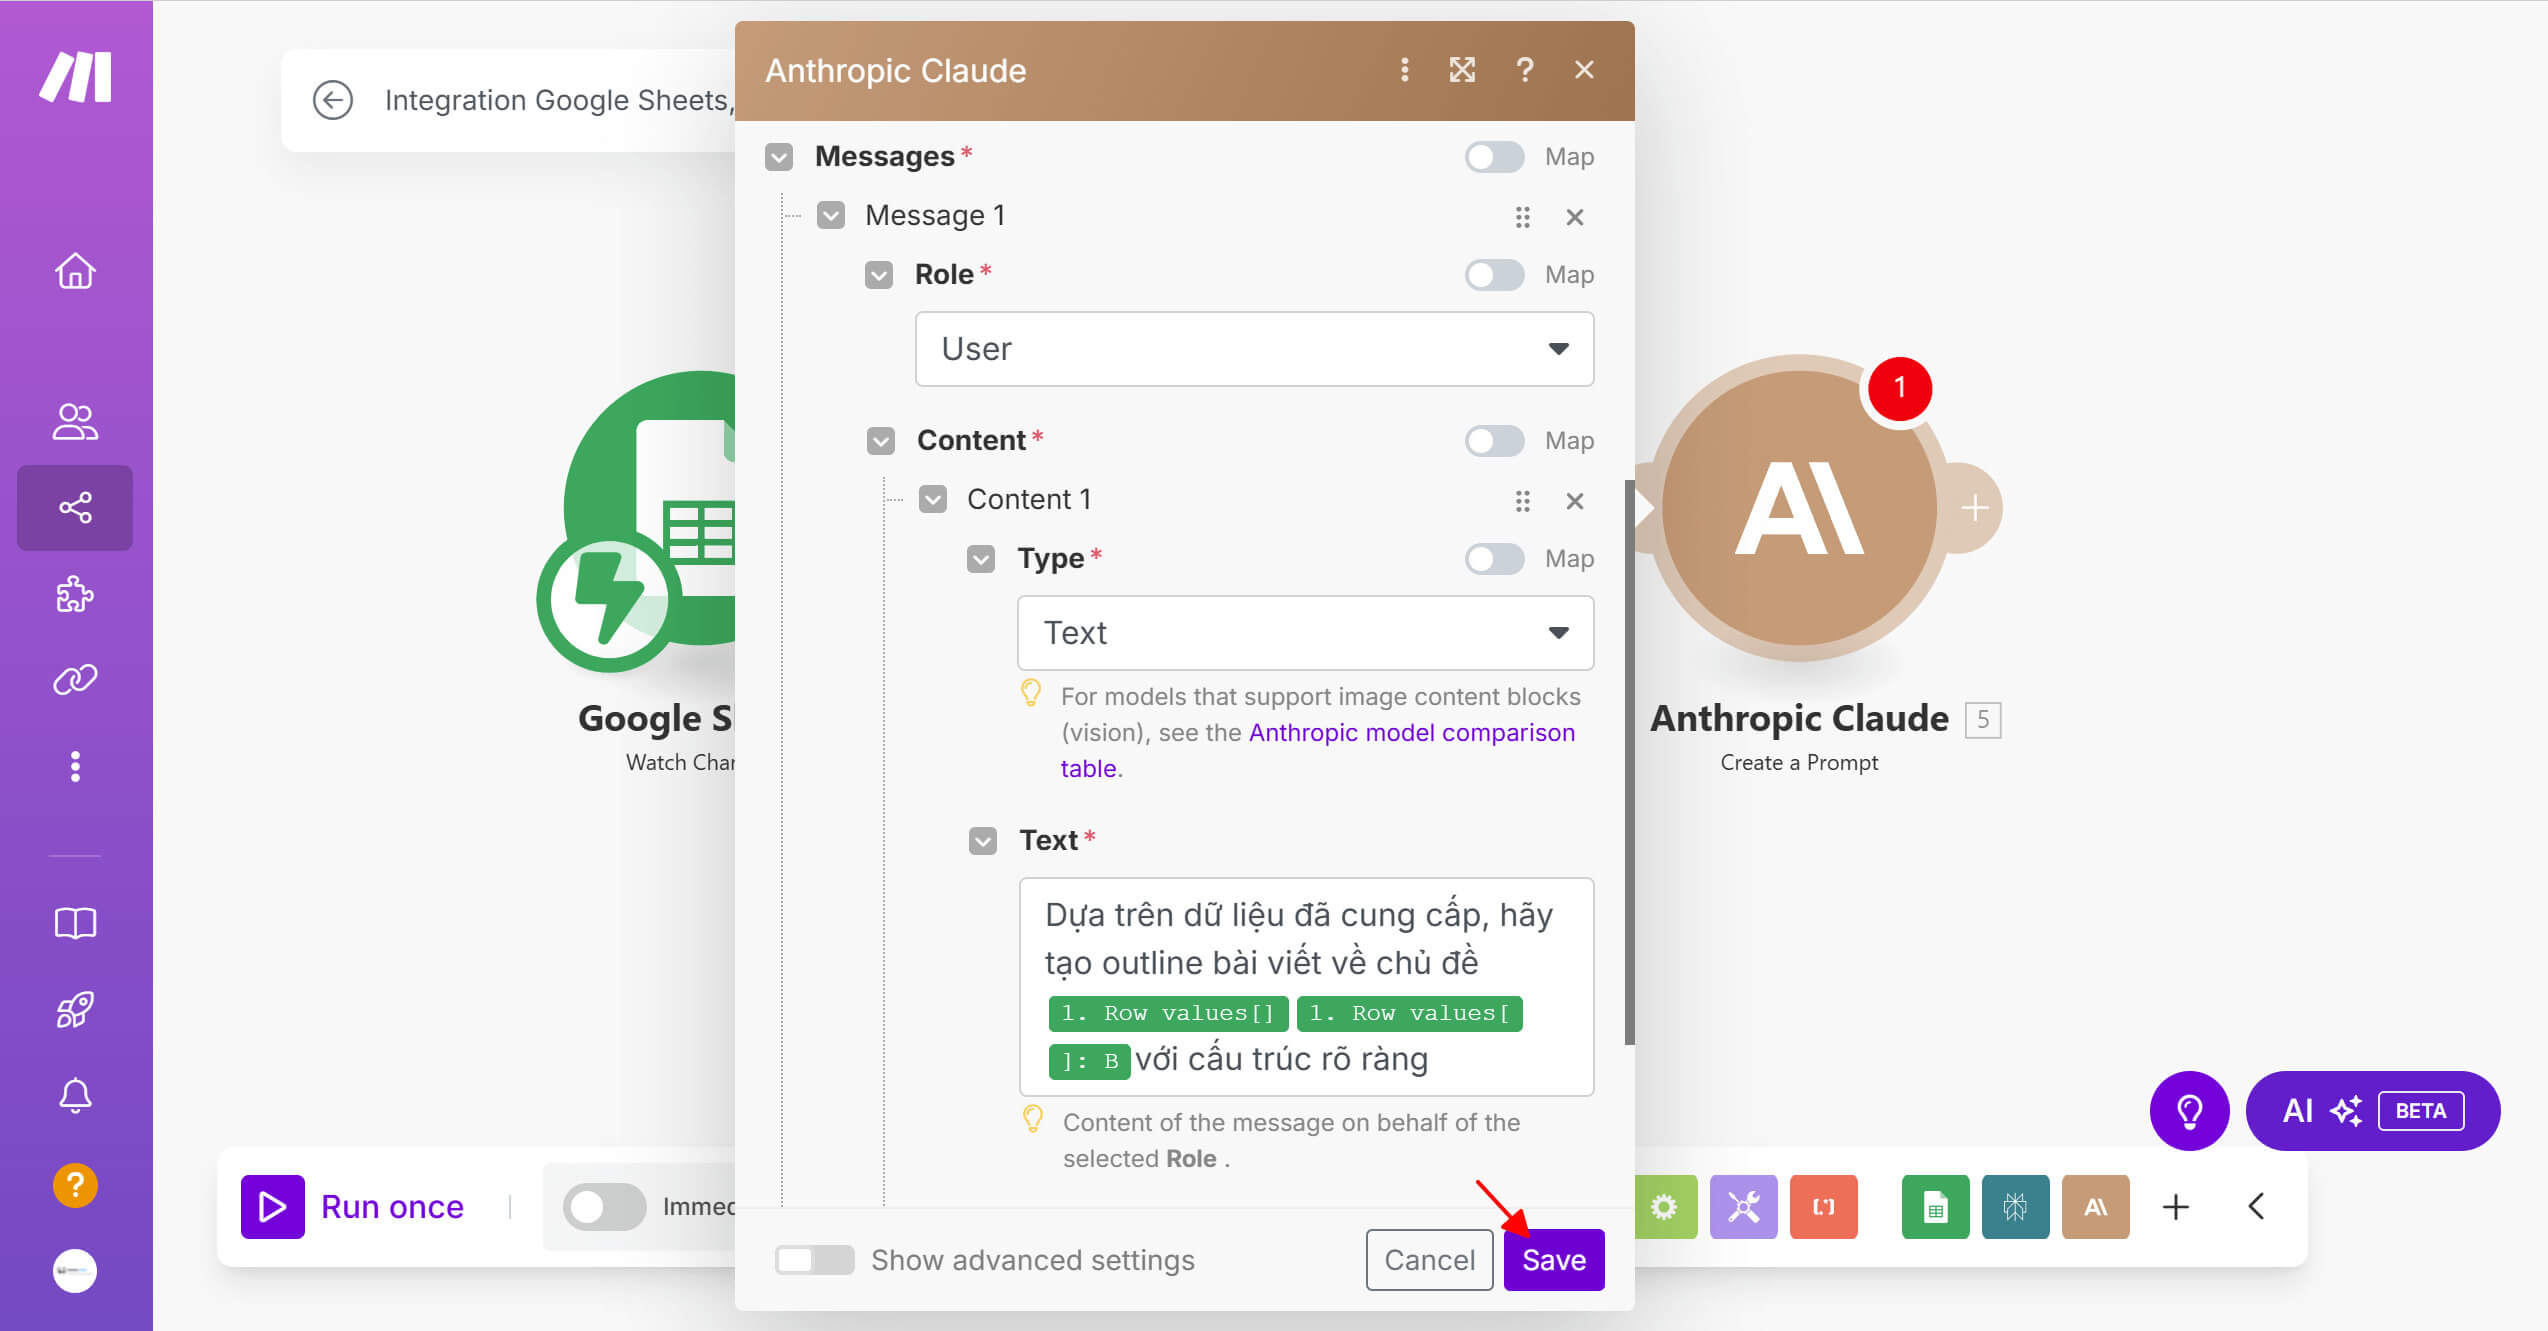
Step 4: Write the full article on Claude AI
Once you have the outline from step 3, you just adjust the prompt so Claude automatically turns it into a full article. The steps are the same as when creating the outline, only the requested content differs:
1. Keep the same connection structure: Claude API, Sonnet model, max tokens 8000, a system prompt if needed.
2. Change the prompt in the Messages section:
Step 5: Export content from Claude AI to Google Docs automatically
After Claude finishes the article, you can save the content to Google Docs automatically in a few simple steps on Make.com:
1. Add the action “Google Docs – Create a Document”
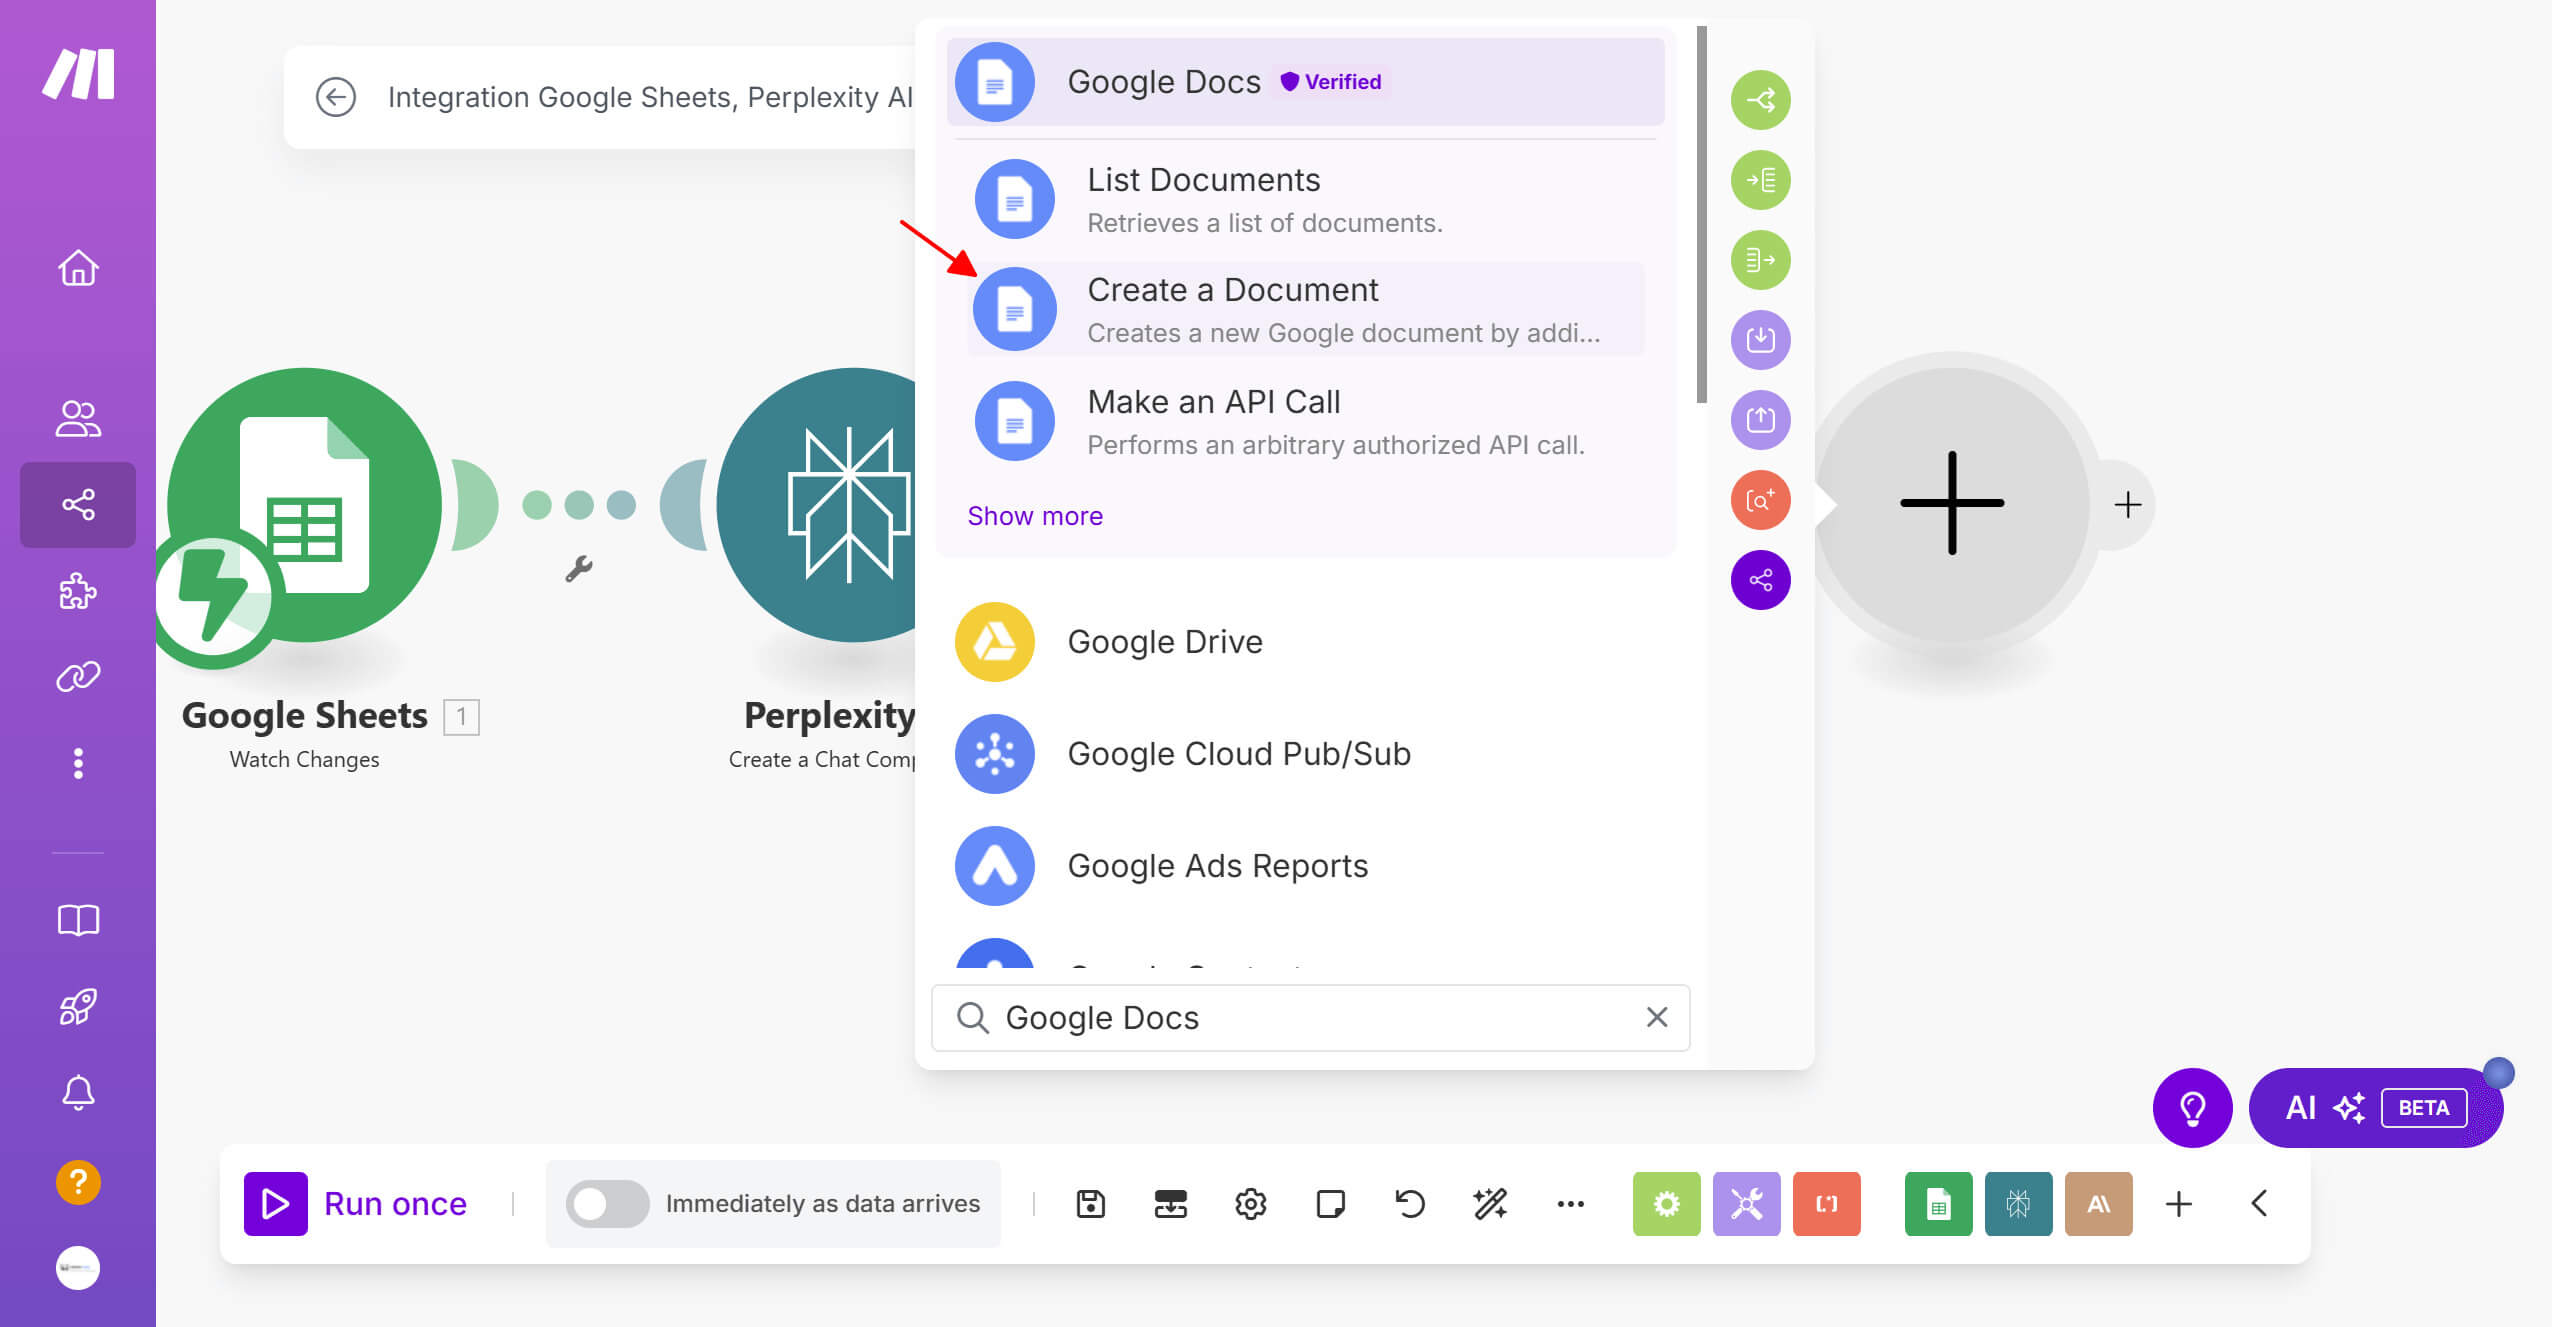
2. Set up the document information:
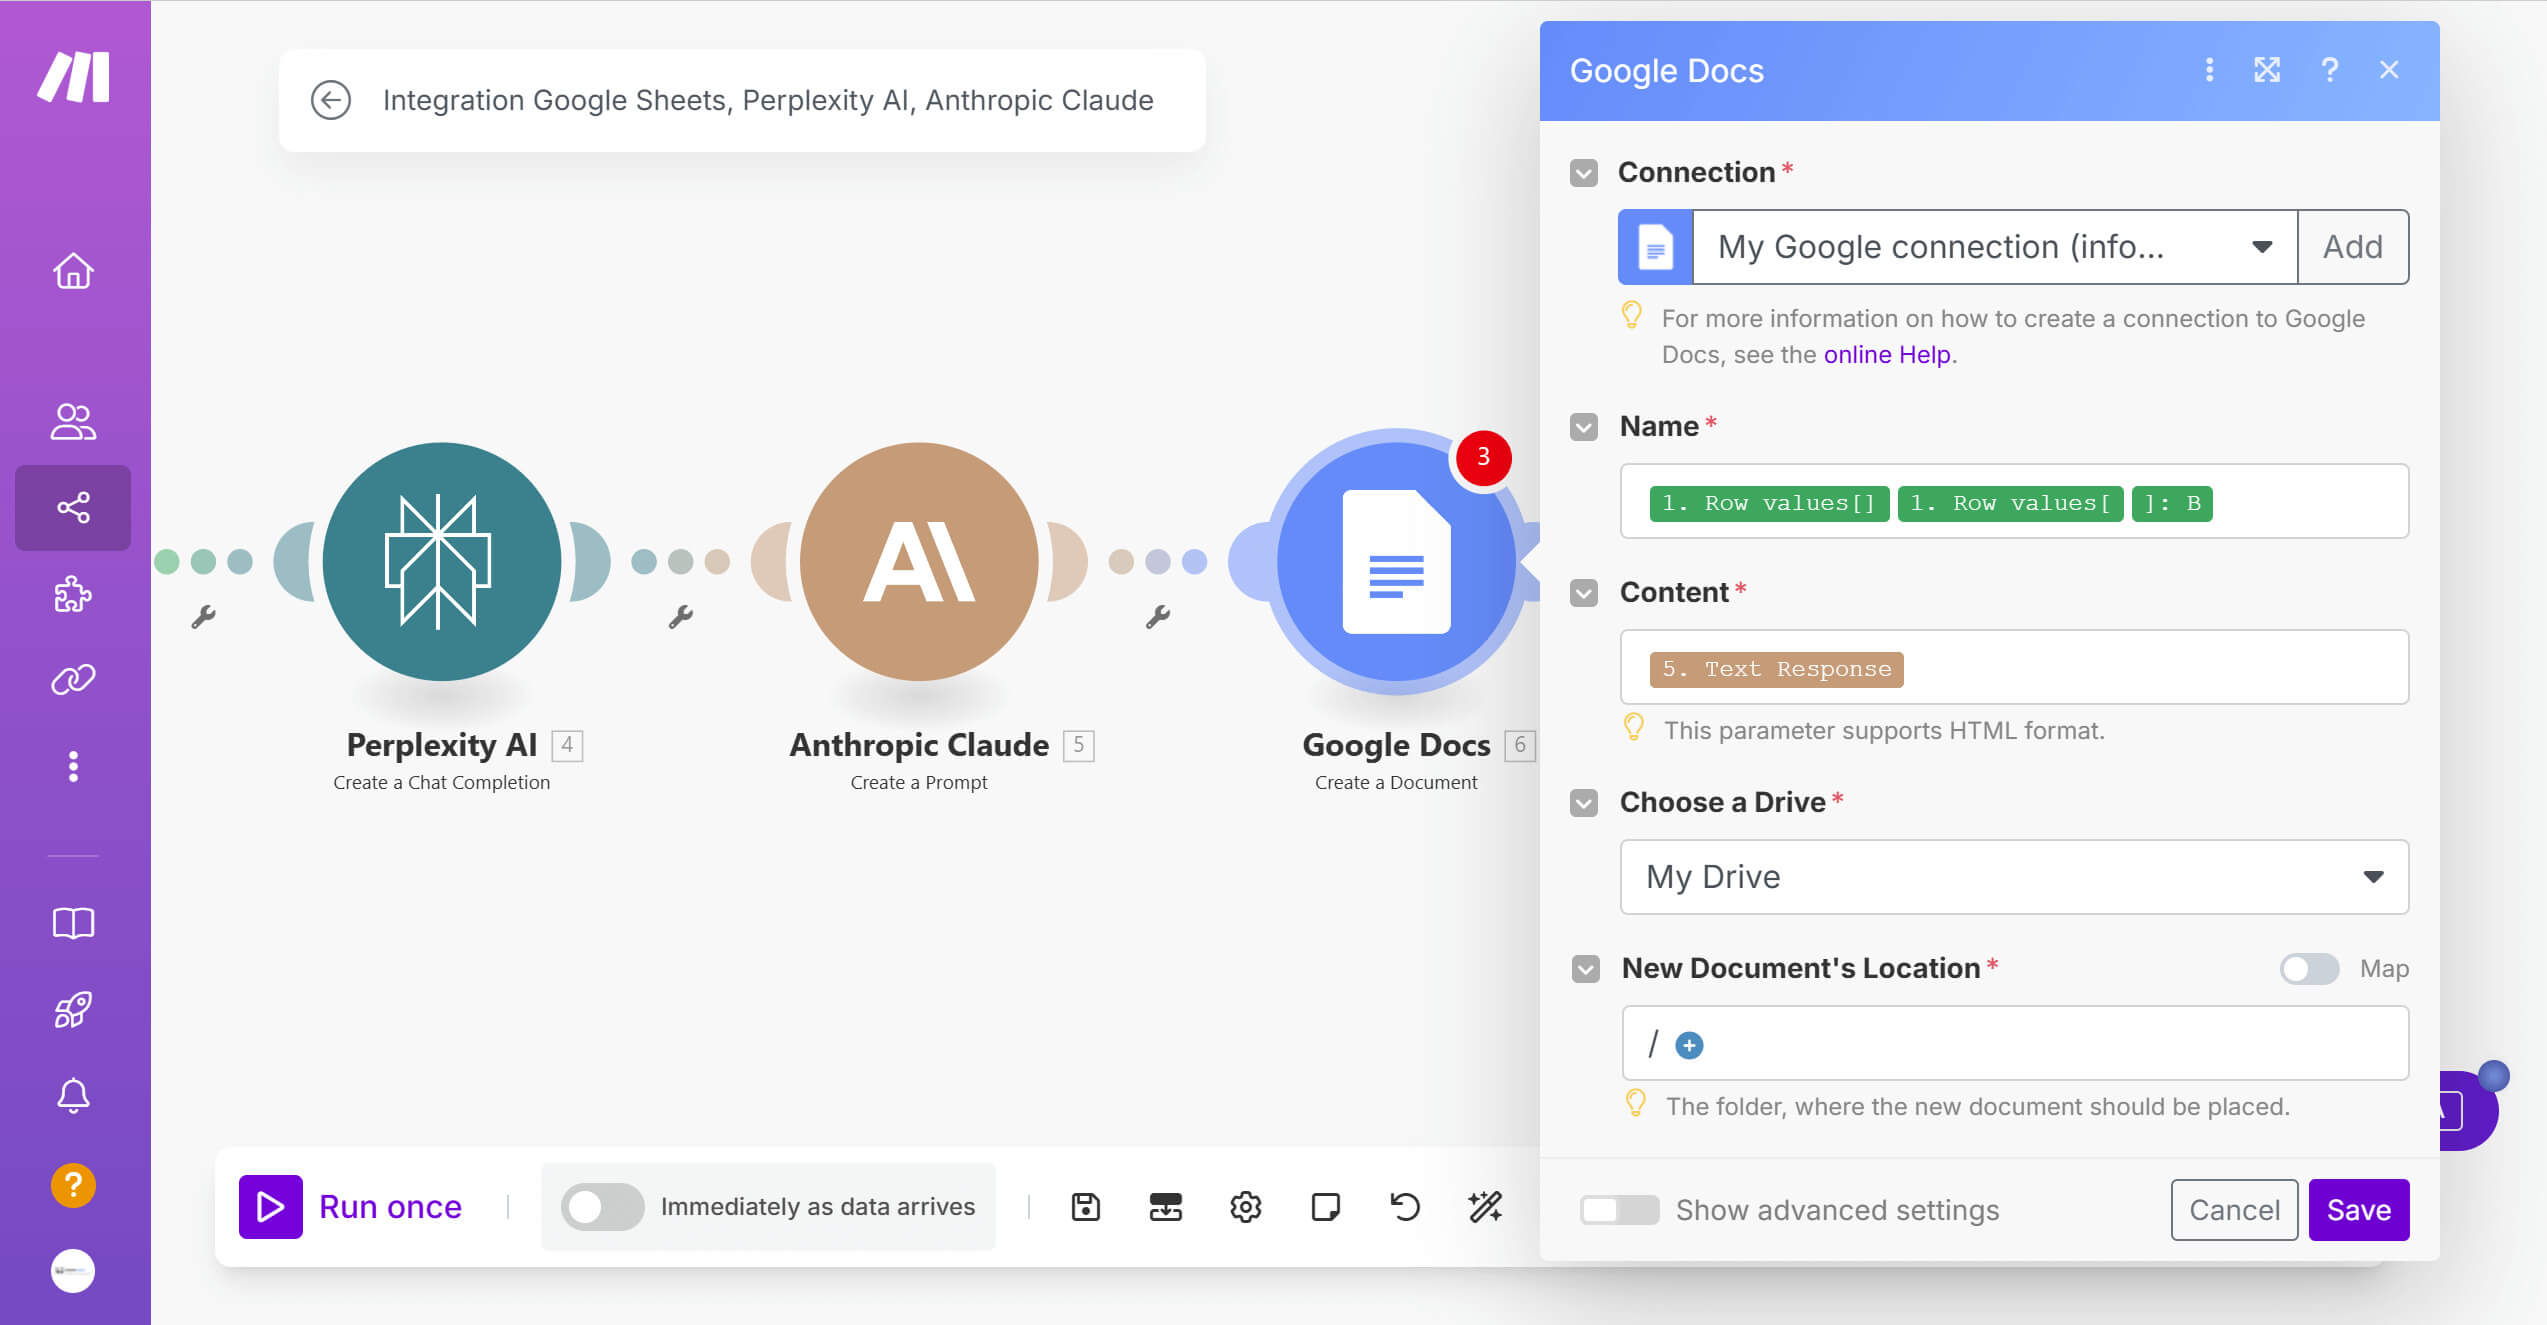
Click Save to finish
Step 6: Update the Google Docs link in Google Sheet automatically
Once you have the Google Docs file containing Claude AI's content, you need to save the link so it's easy to manage. Here is how to automatically update the docs link in the Google Sheet through Make.com:
Steps:
1. Add the action “Google Sheets – Update a Row“
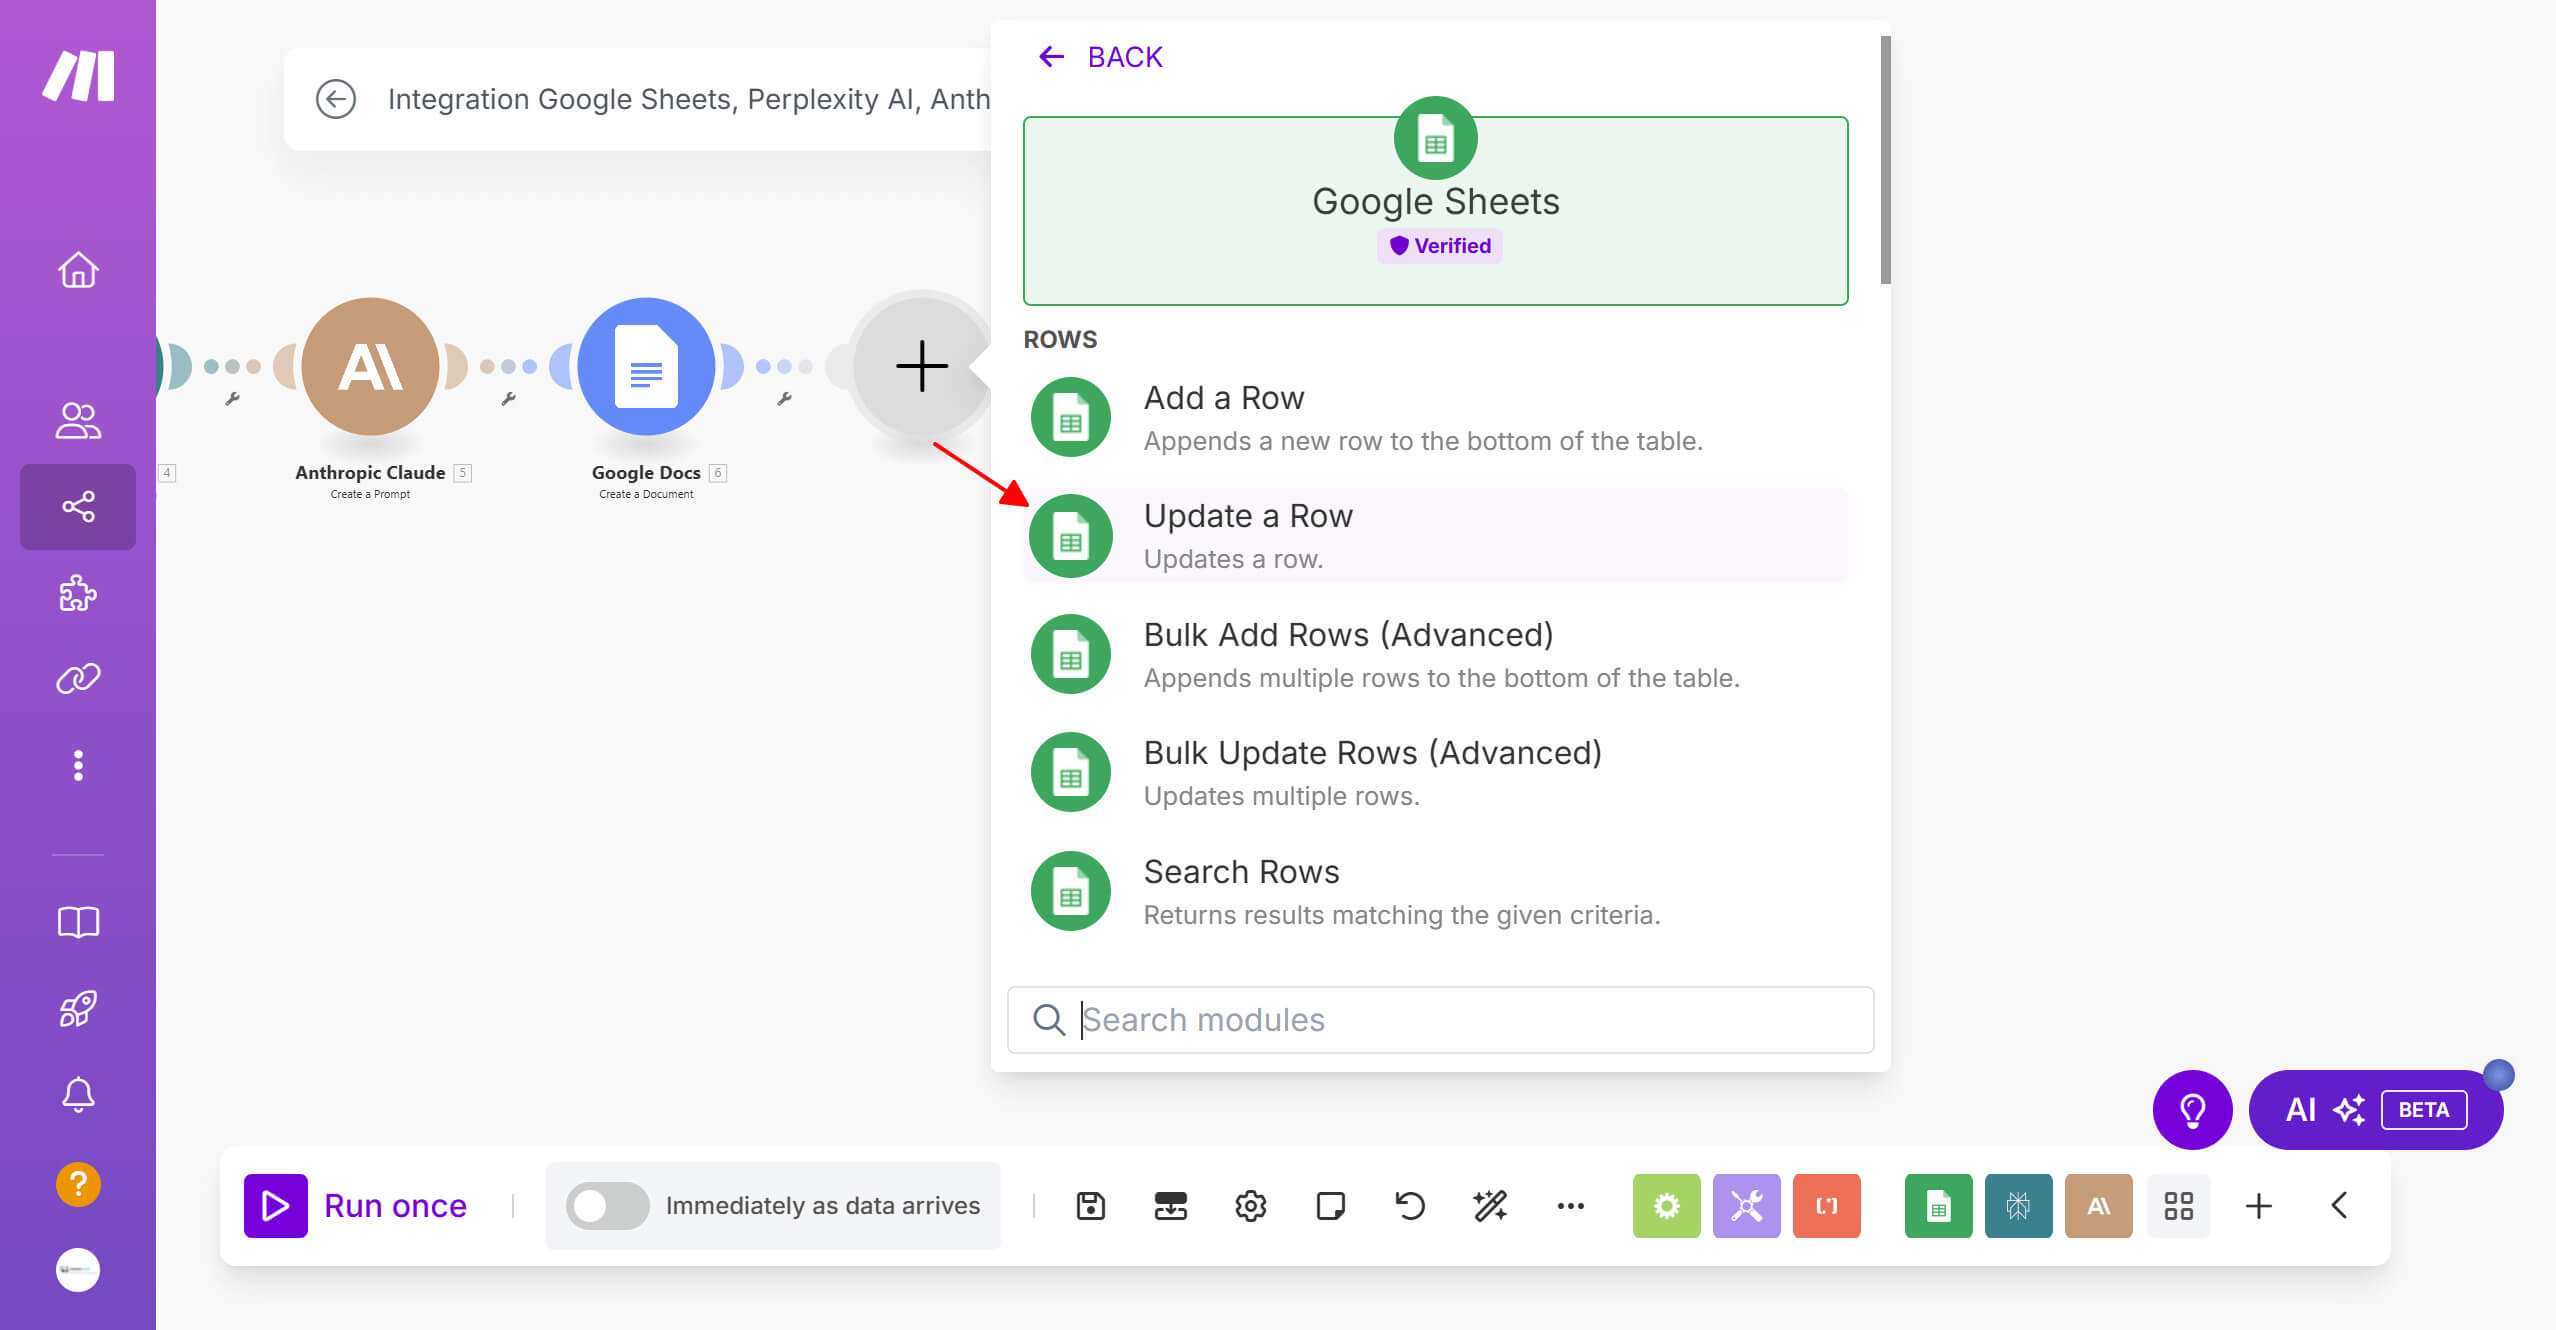
2. Set up the connection information:
Set where to update:
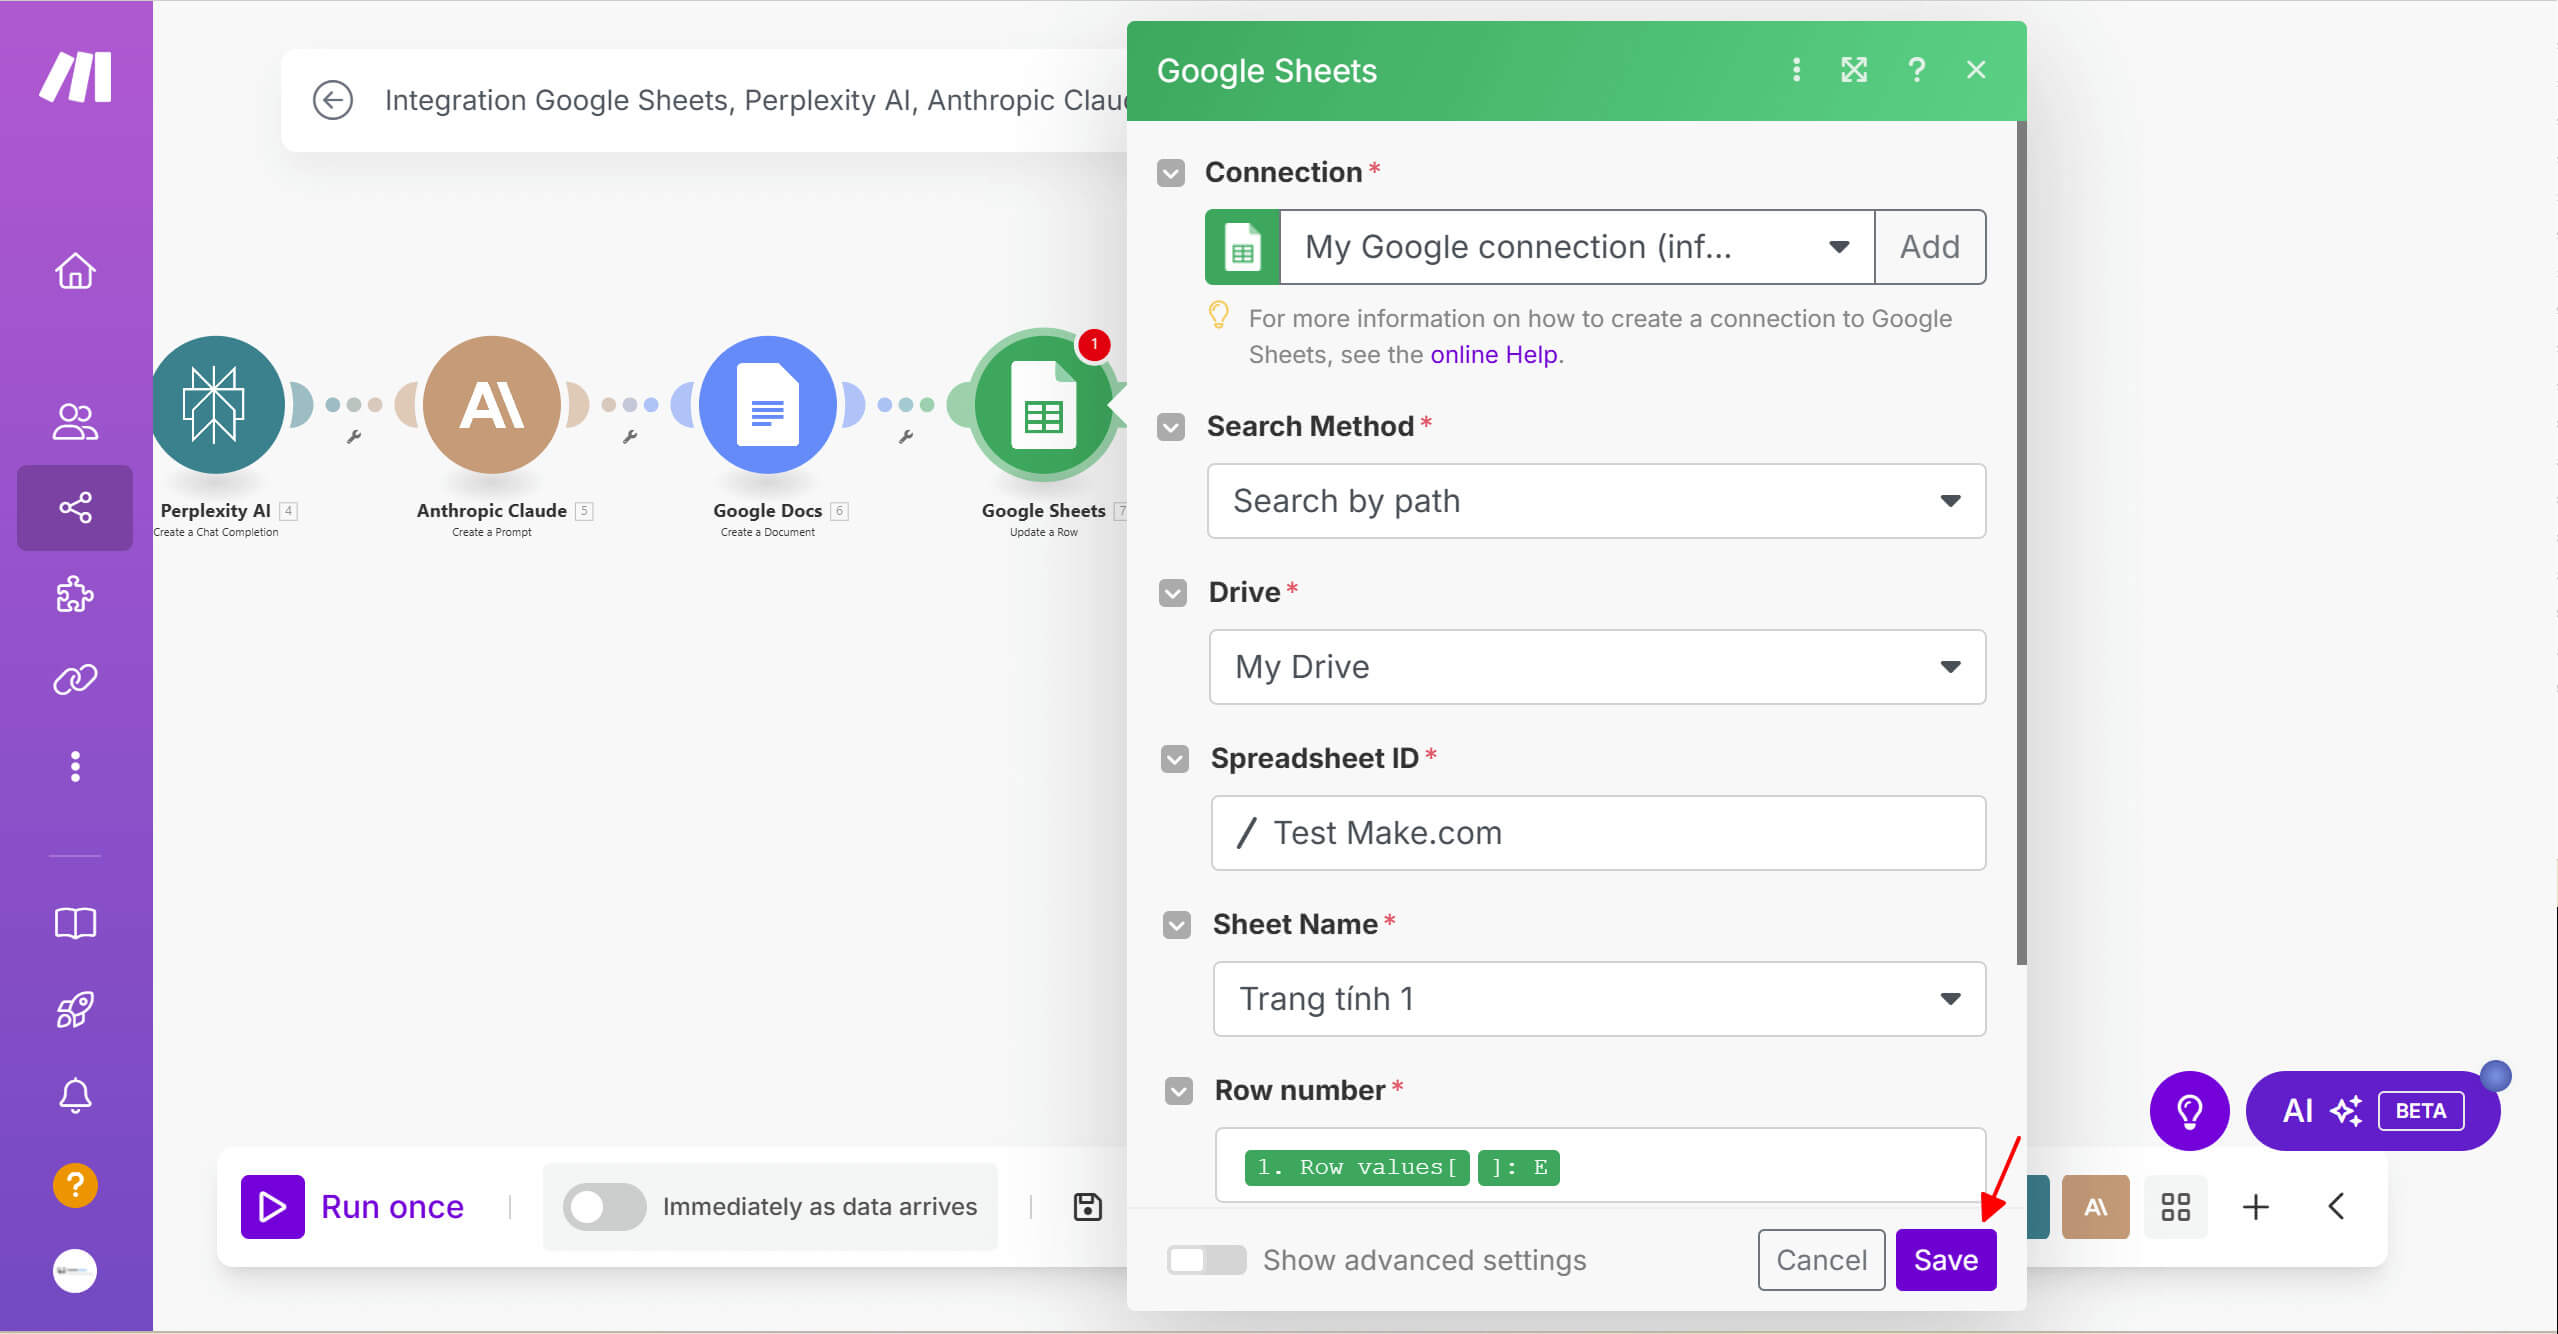
Click Save to finish
Once you've finished setting up the scenario on Make.com, the next important step is to check and test-run it to make sure everything works as expected. This is not only a way to verify the scenario runs, but also helps you spot things to optimize.
Run a test
Start by clicking “Run Once” to check whether Make.com handles the process the way you set it up. If you want to automate on a schedule, you can adjust the recurring run time, for example “Every 15 minutes” or a custom interval.
During the test run, you'll see how data moves through each step, from the moment the trigger fires to when the result is recorded, such as sending an email, updating a CRM or filling in a Google Sheet. If there's an error, Make.com AI automation shows a message so you can fix it right away.
Check the results
After the test run, go to the app or system you're integrating (Google Sheets, email, CRM…) to check whether the data was handled correctly. Pay attention to:
If everything runs smoothly, your scenario is ready to automate. If there are errors, adjust and test again until it's right. This helps you refine the process and keep the system running efficiently.
Beyond creating content automatically, Make.com can also be a strong helper in rolling out an SEO strategy, such as keyword research, data collection, or even on-page SEO optimization with AI to rank in AI Overview, or even appear in the direct answers of AI tools like ChatGPT and Perplexity. That lets you reach potential customers more naturally and effectively. This part connects to AI for sales teams which MONA has written about in more depth. This part connects to business automation workflows which MONA has covered in more depth.
However, to use that effectively and turn the data into real visibility in AI Overview, a business needs a well-planned AI SEO strategy. That is MONA Media's strength.
AI SEO services from MONA helps you:
If you don't know where to start doing AI SEO with Make.com, then contact MONA for detailed advice.
Once your first automated scenario is running reliably, you can add more features to streamline operations. This makes the system more flexible, for example automatically sending confirmation emails, notifying your team through Microsoft Teams, or integrating other apps. Here is a detailed guide to upgrading your scenario on Make.com:
Automatically send confirmation emails
One of the simplest yet most useful ways to improve a scenario is to set up an automatic confirmation email to the customer right after their order is processed. This not only gives the customer information quickly but also makes the business look professional.
Just add a send-email action to the scenario and choose the “Answer Email” field to pull the address from the Google Form. Right after that, the customer receives an email with their order details or next steps, making it easy to follow along and take the steps they need.
Notify your team through Microsoft Teams
If your business has a customer support team, you can set up an automatic notification every time a new order comes in so they're always ready to handle it. You can connect Microsoft Teams to Make.com, then add a send-notification action to the scenario. Every time there's a new order, the system sends a message to the group so the team can act immediately, cutting response time and improving service quality.
Expand your customer communication options
Expanding the channels you use to talk to customers is another way to improve your automated scenario. Instead of only sending email, you can add SMS, a chatbot or mobile app notifications so customers have more choices for receiving information.
For example, if a customer fills in a registration form, the system can send a confirmation SMS right away, which raises the response rate. If you have your own app, sending a push notification updates important information faster and more effectively.
Make.com doesn't just help you automate processes, it opens a new way to improve how you work. Whether you're an individual or a business, you can use this platform to save time, cut down manual work and focus on more important tasks. Once you have a firm grip on what Make.com is and how to use it, connecting apps will be simpler than ever.
You may also be interested in:

CEO & Founder · The MONA
The founder of The MONA built a service company of 60+ staff with 14,000+ projects delivered. Khánh Hùng shares his thinking on building self-running systems, automating a business, and the real lessons behind MONA's projects.
 1,6K




Professional website
design services
Own a website with a beautiful, 100% exclusive design and a lifetime warranty, with the ability
to expand features flexibly as your business grows, starting today!












 MONA will never sell your information or send you spam


 MONA will never sell your information or send you spam
