
 MONA OS 2.0
 Partner with MONA


 Tự động hoá doanh nghiệp
 Cẩm nang SEO
 Digital Marketing
 Kinh nghiệm thiết kế website
 Hạ Tầng Server
 Giáo dục


 VI
 EN
















Message us on
Zalo Official


 ProductsNew

 ProductsProducts
 Mới ra mắtKHA AI 2027App tự edit video, tự đăng mọi mạng xã hội, 2 phút mỗi ngày










 Website designLooks good and wins customers over.
SEO servicesBrings in customers searching for exactly what you sell.
 Tư vấn digital marketingKéo khách từ nhiều kênh, đo bằng số thật.
Corporate video productionVideos introducing your company, factory and team.
 NewAI video productionCompany story films made with AI.
 Custom software developmentCRM, ERP and HRM built for your business.
 Viết AI Agent theo yêu cầuĐặt riêng một trợ lý AI cho đúng việc của mình.
 Tư vấn chuyển đổi AIĐưa AI vào vận hành của cả công ty.
NewMONA LMSManagement for centers and schools.
MONA SkillHubInternal training for company staff.
 NHTQ systemEnd-to-end China–Vietnam shipping operations.
MONA JMSManagement for gold, diamond and pawn shops.
 MONA E-LearningA website with every feature you need to sell courses.
 How to sell online courses (course)More than 30 free lessons on selling courses on autopilot.
 MONA Cloudmonacloud.vnServers to get your apps and websites running.
 MONA Basemonabase.vnPostgres database, sign-in and file storage.
 MONA Mailmonamail.vnSend OTP, order and invoice emails from your software.
 MONA Paymonapay.vnAccept bank transfers via VietQR and notify your software when the money arrives.
 MONA eInvoiceComing soonIssue e-invoices that meet tax standards.
Gấu CườiTrả lời khách 24/7 trên web, Fanpage, Zalo và thu lead cho sale.
 Gấu TeleSalesGọi điện tư vấn, chăm khách như tổng đài viên thật.
Dê CườiTư vấn và chốt đơn cho shop ngay trong khung chat.
Gấu WebmasterNhắn nhóm Zalo là website được sửa xong.
 Gấu Pháp ChếSoạn hợp đồng, rà điều khoản trong vài phút.
 Gấu Báo GiáLên báo giá đúng mẫu và gửi khách ngay.
 AI chăm sóc khách hàngTheo dõi và giữ chân khách hàng cũ.
 Gấu Tuyển DụngLọc hồ sơ, hẹn lịch, phỏng vấn ứng viên.
 Mới ra mắt
KHA AI 2027
Xây kênh chuyên gia 2 phút mỗi ngày
Quay bằng điện thoại, AI tự edit video, tự đăng lên 16 nền tảng và tự trả lời bình luận, tin nhắn.
885.419lượt xem trên kênh CEO MONA sau 36 ngày
 Anh Khánh HùngCEO MONA đang dùng mỗi ngày
Xem app làm được gì
 AI
Gấu Cười MONA ĐANG TỰ XÀITrả lời khách 24/7 trên website, Zalo OA, Messenger và thu lead về cho sale.
Dê CườiChốt đơn bán lẻ và sàn: Shopee, TikTok Shop, web. Chăm cả khách sỉ, đại lý.
Gấu WebmasterCập nhật nội dung, tối ưu SEO website mỗi ngày.
Gấu TeleSalesGọi điện tư vấn, chăm khách như tổng đài viên thật.
Gấu Tuyển DụngLọc hồ sơ, hẹn lịch, phỏng vấn ứng viên tự động.
AI chăm sóc khách hàngGiữ khách cũ, cứu lead đã rớt cho phòng kinh doanh.
Gấu Pháp ChếSoạn hợp đồng, rà điều khoản trong vài phút.
Gấu Báo GiáLên báo giá đúng mẫu, gửi khách ngay khi có yêu cầu.
 Chuyển đổi AI toàn phầnGiải pháp tổng cho doanh nghiệp, 3 lớp triển khai.
 Viết AI Agent theo yêu cầuĐặt riêng một con AI gánh đúng nghiệp vụ của bạn.
 Custom softwareCRM, ERP and HRM with built-in AI automation.
 SEO & AEO thời đại AIĐược Google lẫn AI trích dẫn, không chỉ xếp hạng.
 Kiến thức AI cho doanh nghiệpBài phân tích, hướng dẫn ứng dụng AI vào vận hành.
 Free AI courses
 AI tools at work
App mới · KHA AI 2027
Xây kênh 2 phút mỗi ngày
AI tự edit video, tự đăng mọi mạng xã hội
Free consultation, 8am–10pm every day

06 August, 2025
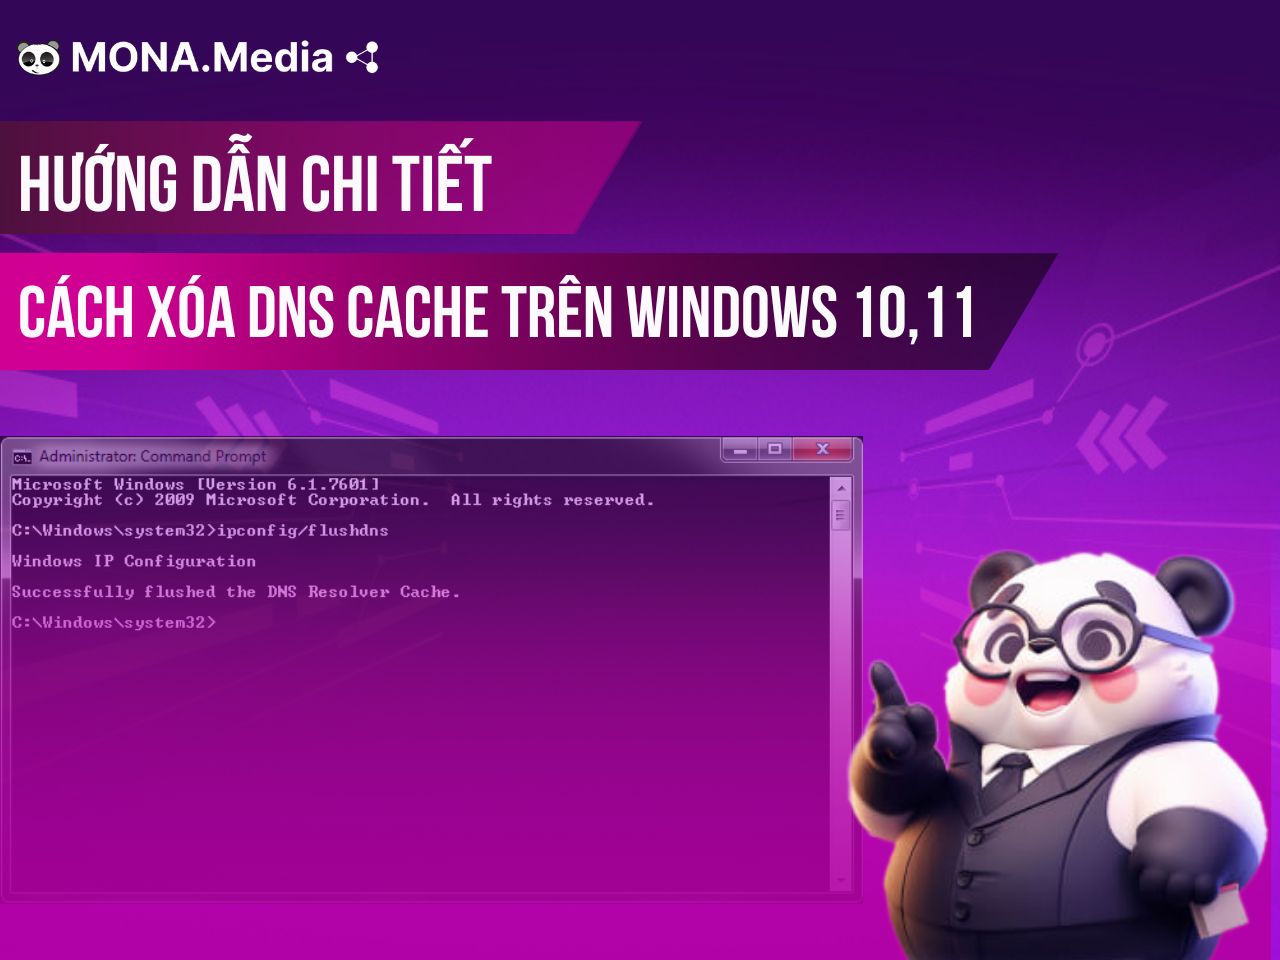
The DNS cache stores information about websites you have visited, which shortens page load time on later visits. Over time, though, it can become corrupted or hold outdated or incorrect data, causing unstable connections, sites that will not load, or unusually slow browsing. So how do you fix it effectively? Right now, MONA Media will show you how to clear the DNS cache quickly on Windows 10 and 11.
There are many ways to clear the DNS cache on Windows. Depending on your goal and technical comfort, you can choose the one that suits you. Here are 7 common, easy methods you can use right away on Windows 10 and 11.
By setting up a batch file, you save time every time you need to clear the cache. This is a very convenient way to clear the DNS cache, especially if you often work with networks or test connections.
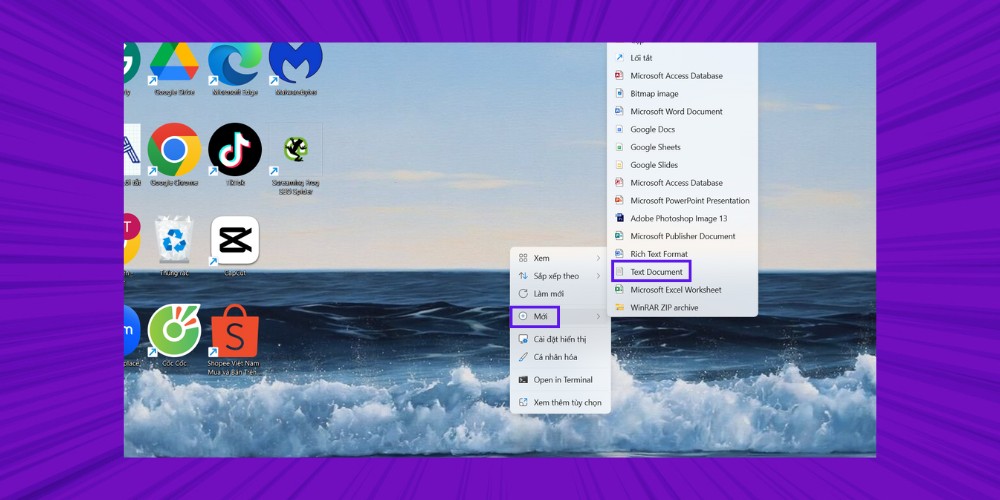
Step 1: Right-click on the desktop and choose New => Text Document to create a new text file. A new file will appear on the desktop. Name it (for example: Flush DNS), then press Enter.
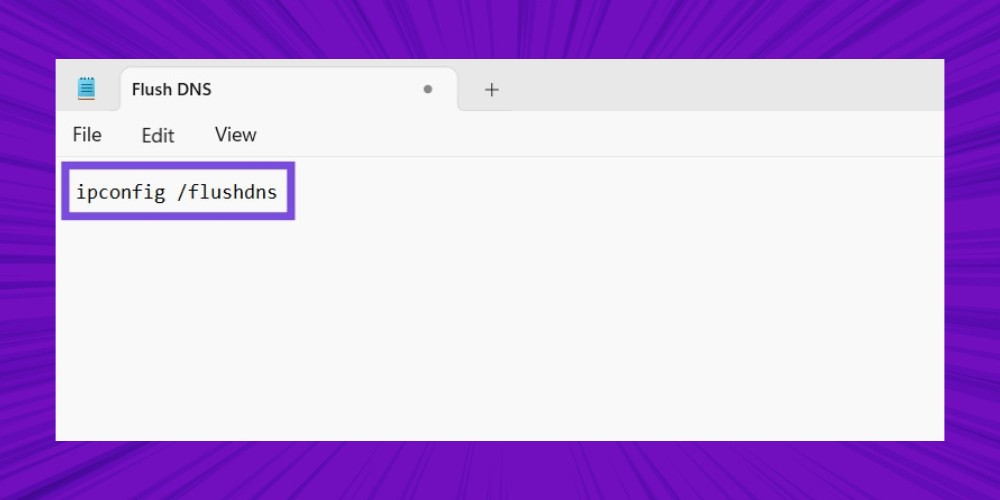
Step 2: Open the file you just created, then paste the command “ipconfig /flushdns” into the text window.
Step 3: In the File menu, choose Save As (or press the shortcut Ctrl + Shift + S).
Step 4: In the section Save as type, choose All Files from the drop-down menu.
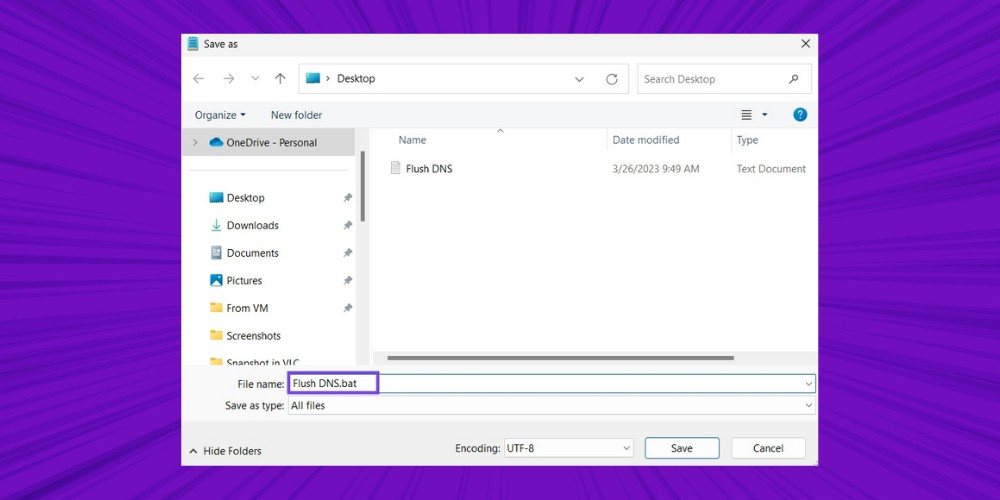
Step 5: Name the file with the extension .bat (for example: FlushDNS.bat) after the file name.
Step 6: Click Save to finish.
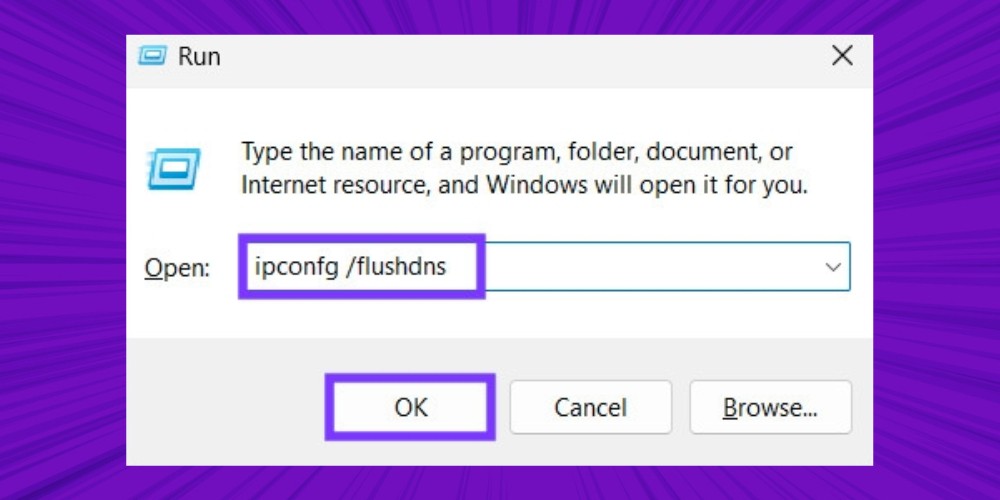
If you want a quick way to clear the DNS cache without opening several tools, the Run dialog is the best option. It is especially handy when you want to refresh the DNS cache in just a few simple steps.
Step 1: Press the keys Windows + R to open the Run dialog. You can also press the Windows key, type "Run" in the search box, and press Enter.
Step 2: In the Open box, enter the command “ipconfig /flushdns” then click OK to clear the DNS cache on Windows 10 and 11.
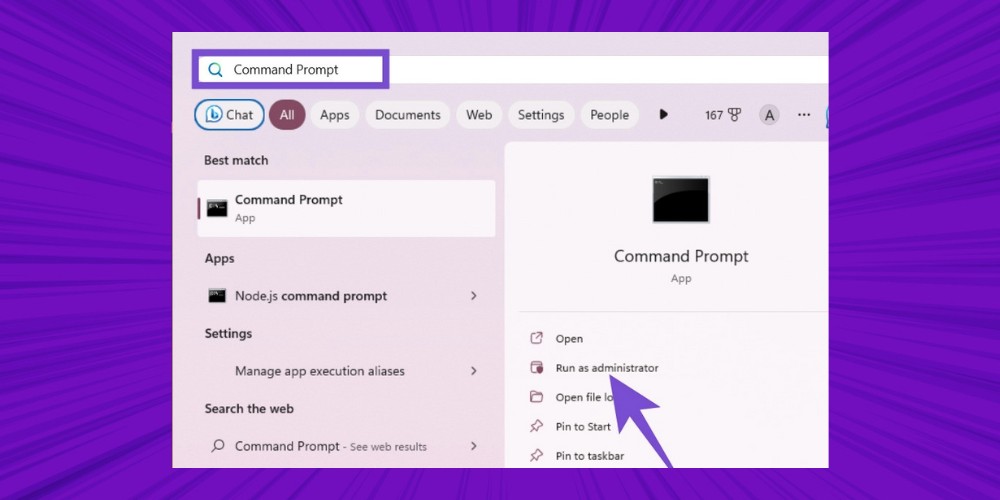
One of the simplest and most effective ways to clear the DNS cache on Windows 10 and 11 is the Command Prompt command-line tool. Besides launching programs and configuring the network, it lets you clear the whole DNS cache with a single command. Follow these steps:
Step 1: Press the Windows key and type Command Prompt in the search box. When the result appears, choose Run as administrator to open it with admin rights. If a confirmation dialog appears, click Yes to continue.
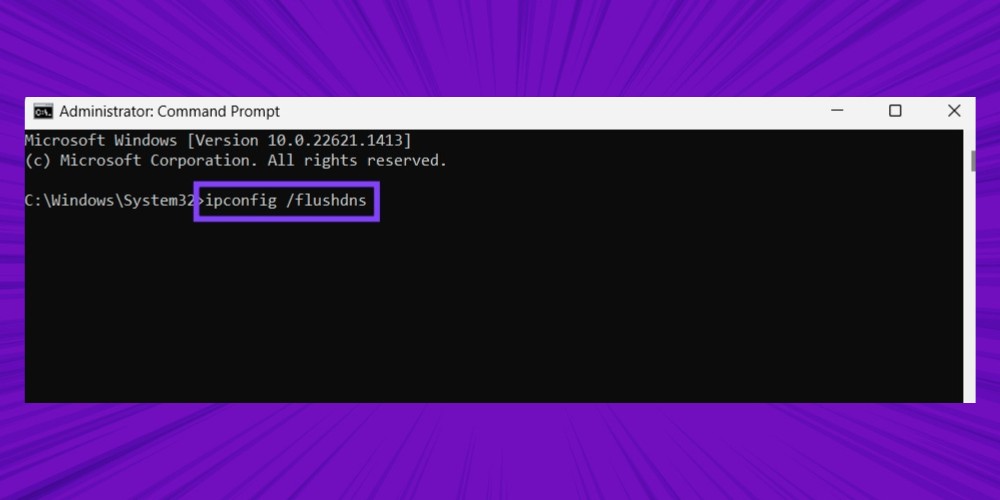
Step 2: In the command window that opens, enter the command "ipconfig /flushdns" and press Enter. You will immediately see a message confirming that the DNS cache was cleared successfully.
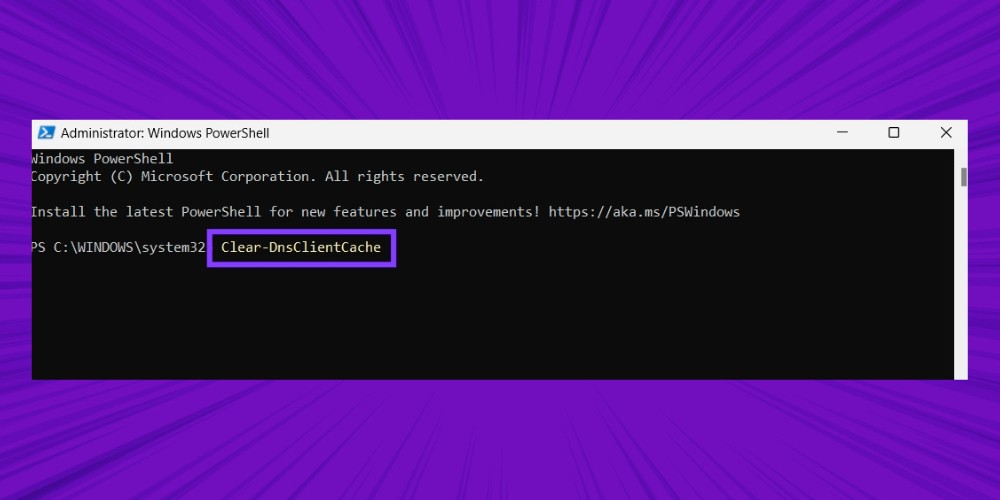
Clearing the DNS cache with PowerShell is similar to Command Prompt, as follows:
Step 1: Open PowerShell as administrator, the same way as for Command Prompt.
Step 2: Type the command "clear-DnsClientCache" and press Enter to clear the DNS cache.
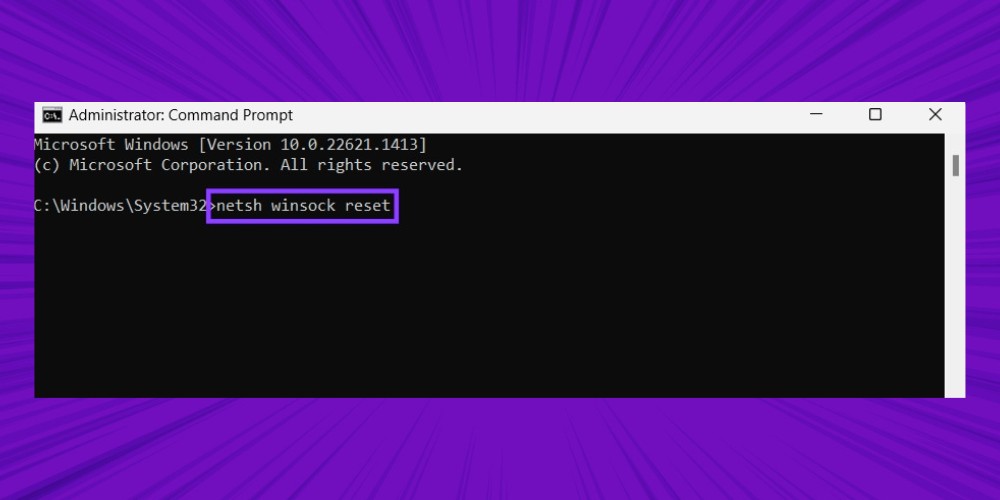
Winsock (Windows Sockets) is an important programming interface in Windows that handles network requests between the system and applications. When you reset Winsock, the system also refreshes several network components, including the DNS cache. Here is how to clear the DNS cache with Winsock:
Step 1: Press the Windows key and type Command Prompt in the search box, then choose Run as administrator from the right-hand column. When the UAC confirmation dialog appears, click Yes.
Step 2: In the command window that opens, enter the command “netsh winsock reset”, then press Enter. If you see the message "Winsock reset completed successfully”", just restart your computer to apply the change.
This setup makes the system clear the DNS cache automatically at set intervals (for example every 24 hours). Because it involves editing the Registry, back up your data before following the steps below to avoid risking the system.
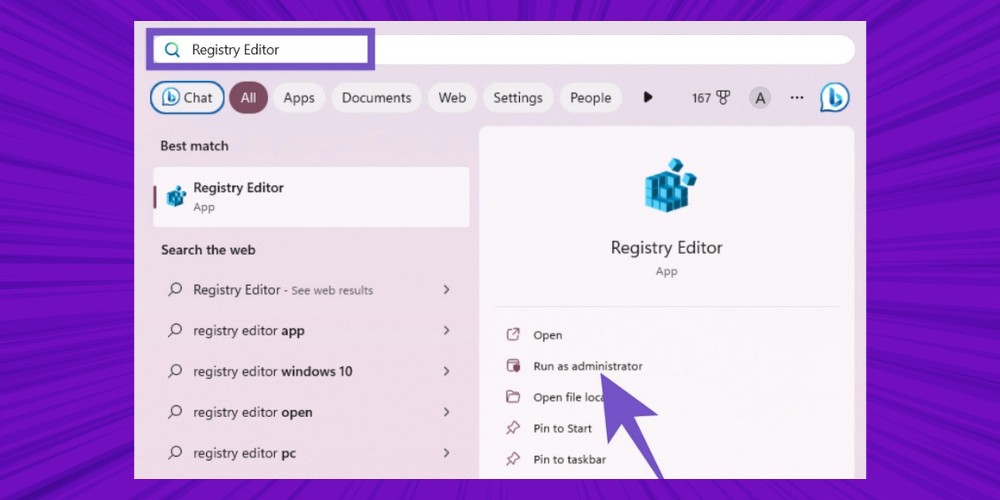
Step 1: Press the Windows key and type Registry Editor in the search box, then click Run as administrator. You can also press the key combination Windows + R => type regedit.exe => press OK to open Registry Editor.
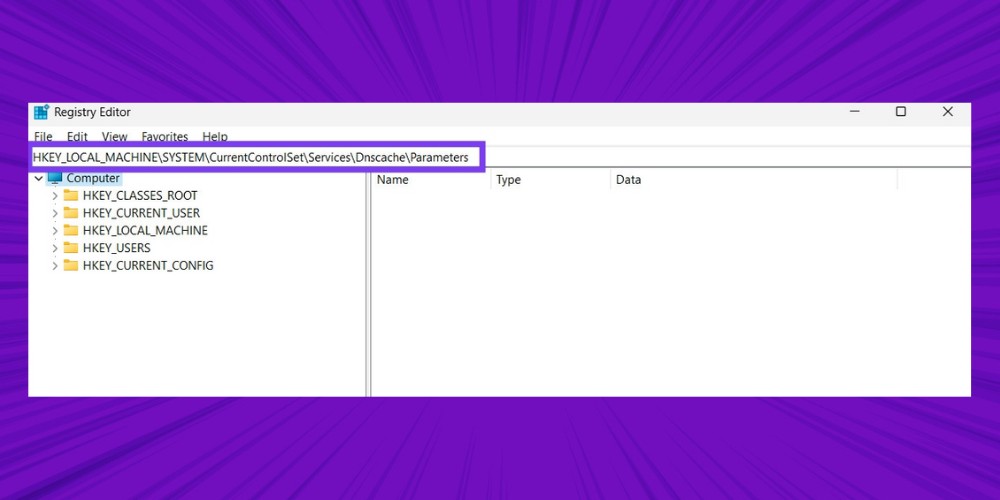
Step 2: In the Registry Editor address bar, enter the following path:
HKEY_LOCAL_MACHINESYSTEMCurrentControlSetServicesDnscacheParameters
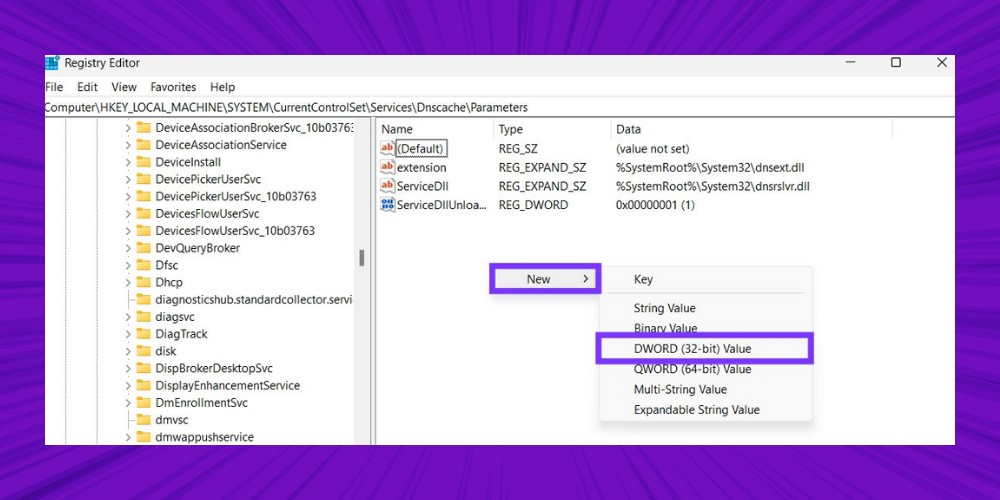
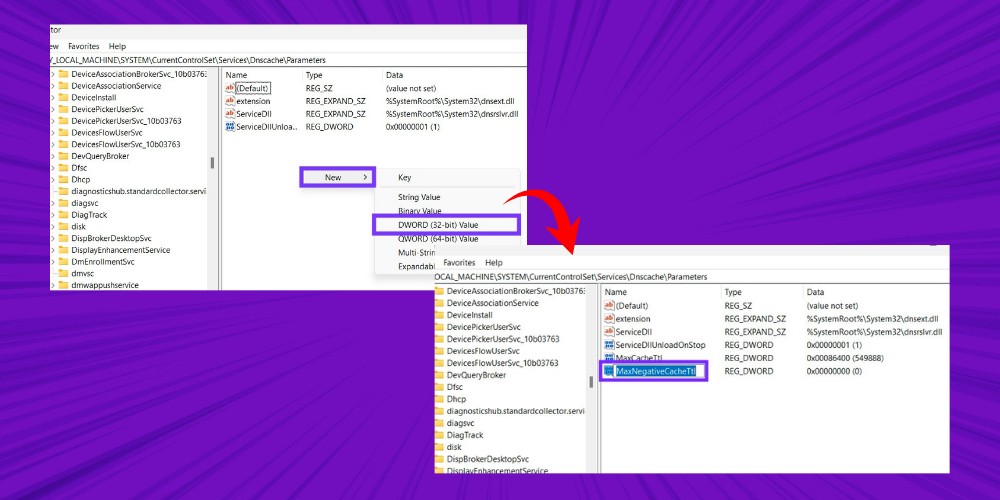
Step 3: In the folder Parameters, right-click and choose New, then choose DWORD (32-bit) Value.
Step 4: Name the new value MaxCacheTtl.
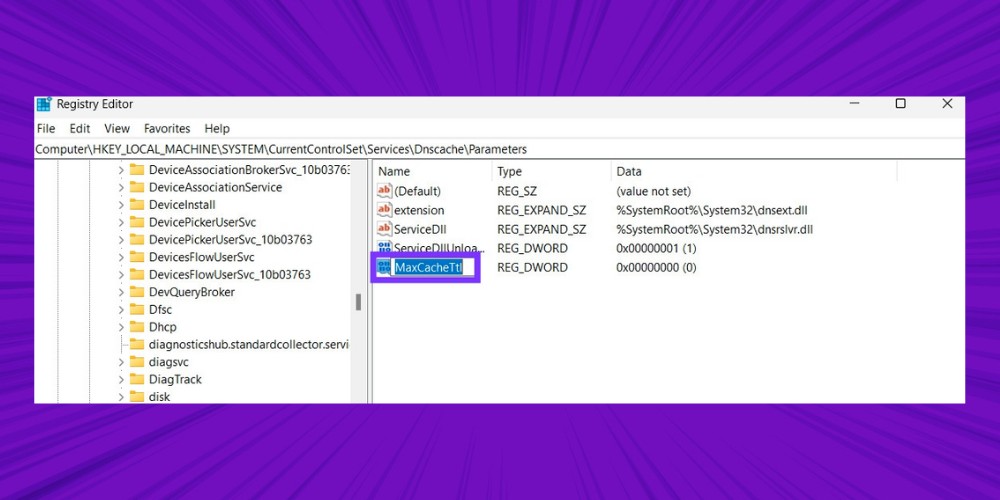
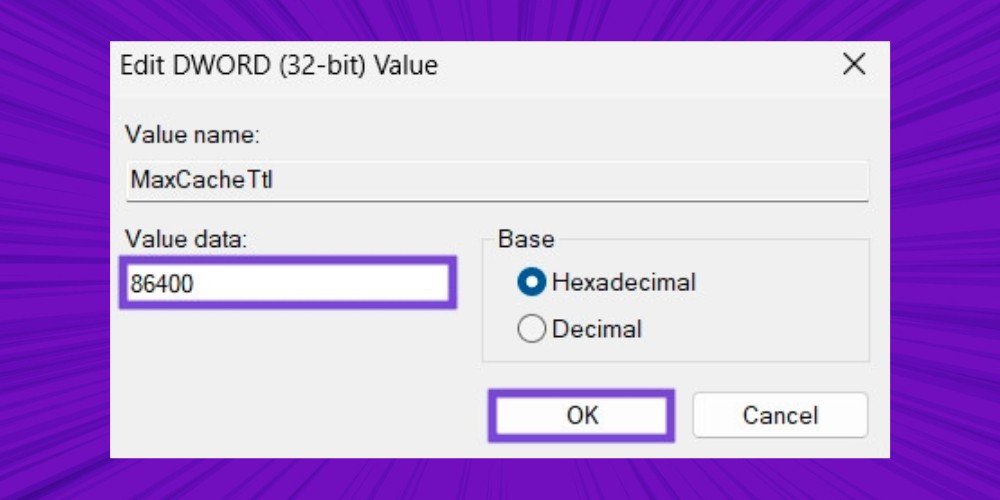
Step 5: Double-click MaxCacheTtl, then enter the value 86400 go to the Value data and press OK.
Step 6: In the folder Parameters, create another new value and name it MaxNegativeCacheTtl.
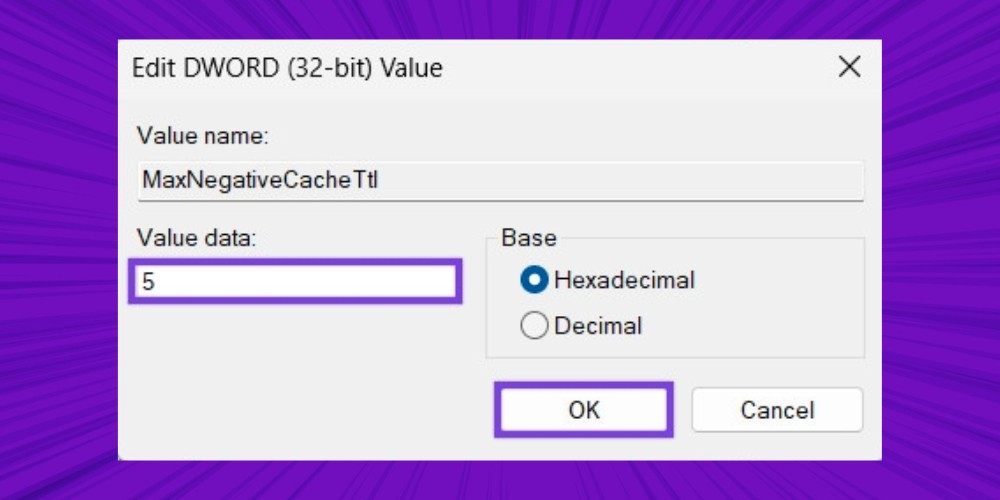
Step 7: Double-click the MaxNegativeCacheTtl value you just created, then enter 5 in Value data and press OK.
Step 8: Restart your computer for the changes to take effect. After this setup, your computer will refresh the DNS cache automatically every 86400 seconds (24 hours).
Web browsers such as Google Chrome and Microsoft Edge store DNS records to speed up site access. Over time, though, these records can become corrupted or outdated, leading to slow loading, wrong addresses, or pages that do not respond.
To keep your browser running smoothly, clear the DNS cache regularly with the steps below:
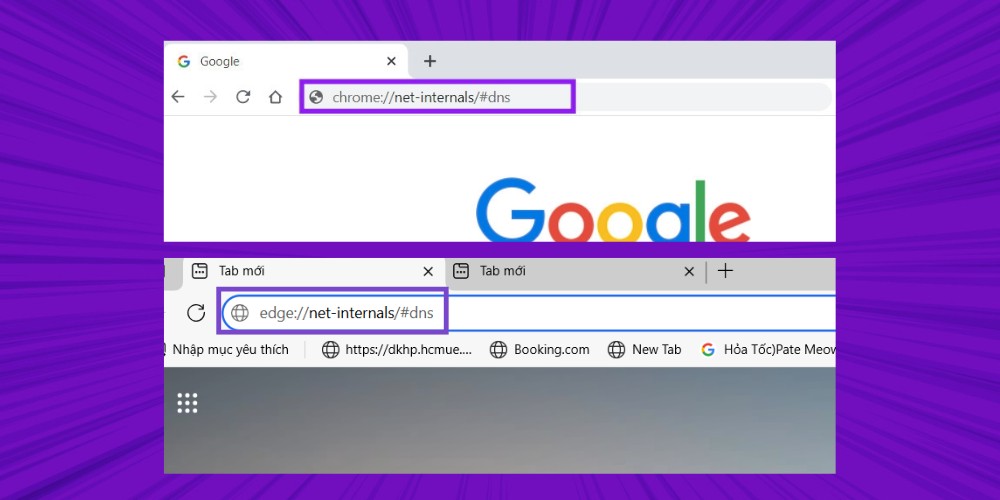
Step 1: Open Chrome or Edge, paste the matching command into the address bar, and press Enter:
You will be taken to the browser's internal network management page.
Step 2: On this page, click the “Clear host cache” to clear all saved DNS records.
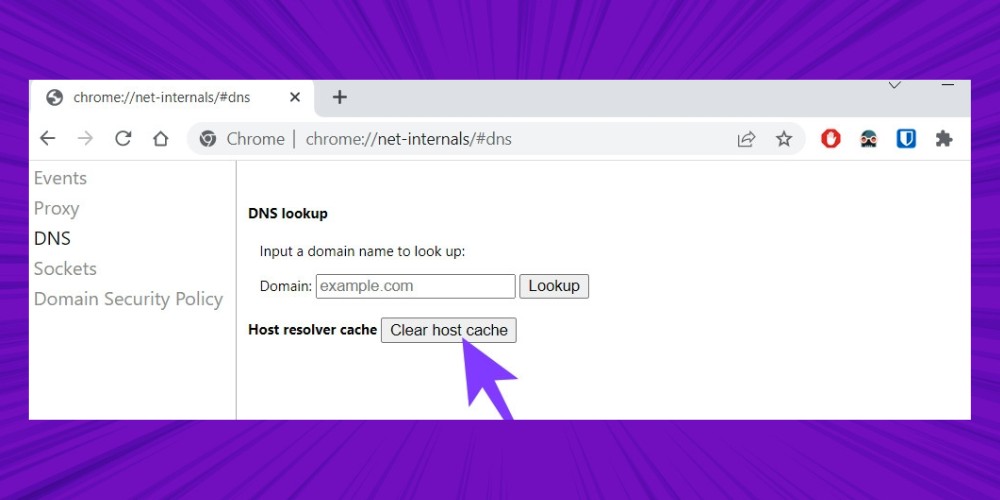
When you are done, the DNS cache in your browser is cleared. It is a simple but effective fix for browsing problems.
You may also be interested in: How to clear cache – clear cache in every browser
If you want to see the DNS records currently stored on your computer, follow these steps:
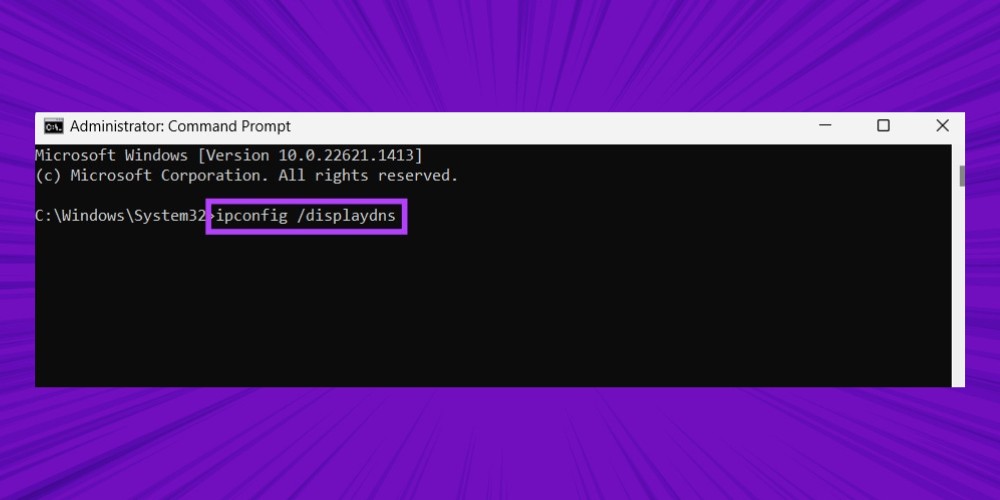
Step 1: Press the Windowskey, type Command Prompt, then choose Run as administrator in the right-hand pane.
Step 2: In the command window, type the command “ipconfig /displaydns” and press Enter to see your computer's current DNS cache.
Nothing to worry about. Clearing the DNS cache is a safe step, commonly used to fix web access problems. In rare cases, though, users may see slow access, security errors, or be unable to open certain websites.
Usually, users do not need to restart the computer after clearing the DNS cache, because the changes take effect immediately. If you want to make sure all network processes run stably, you can still restart your Windows computer.
Clearing the DNS cache is a simple step that clearly improves your network connection and computer performance. With the 7 simple ways to clear the DNS cache shared above, you can do it yourself at home without calling a technician. Save this article for whenever your computer slows down or cannot reach a website!
See related articles: what DNS 1.1.1.1 is? How to change DNS to 1.1.1.1 to speed up your internet

CEO & Founder · The MONA
The founder of The MONA built a service company of 60+ staff with 14,000+ projects delivered. Khánh Hùng shares his thinking on building self-running systems, automating a business, and the real lessons behind MONA's projects.
 1,5K




Professional website
design services
Own a website with a beautiful, 100% exclusive design and a lifetime warranty, with the ability
to expand features flexibly as your business grows, starting today!






 MONA will never sell your information or send you spam


 MONA will never sell your information or send you spam
