
 MONA OS 2.0
 Partner with MONA


 Tự động hoá doanh nghiệp
 Cẩm nang SEO
 Digital Marketing
 Kinh nghiệm thiết kế website
 Hạ Tầng Server
 Giáo dục


 VI
 EN















Message us on
Zalo Official


 ProductsNew

 ProductsProducts
 Mới ra mắtKHA AI 2027App tự edit video, tự đăng mọi mạng xã hội, 2 phút mỗi ngày










 Website designLooks good and wins customers over.
SEO servicesBrings in customers searching for exactly what you sell.
 Tư vấn digital marketingKéo khách từ nhiều kênh, đo bằng số thật.
Corporate video productionVideos introducing your company, factory and team.
 NewAI video productionCompany story films made with AI.
 Custom software developmentCRM, ERP and HRM built for your business.
 Viết AI Agent theo yêu cầuĐặt riêng một trợ lý AI cho đúng việc của mình.
 Tư vấn chuyển đổi AIĐưa AI vào vận hành của cả công ty.
NewMONA LMSManagement for centers and schools.
MONA SkillHubInternal training for company staff.
 NHTQ systemEnd-to-end China–Vietnam shipping operations.
MONA JMSManagement for gold, diamond and pawn shops.
 MONA E-LearningA website with every feature you need to sell courses.
 How to sell online courses (course)More than 30 free lessons on selling courses on autopilot.
 MONA Cloudmonacloud.vnServers to get your apps and websites running.
 MONA Basemonabase.vnPostgres database, sign-in and file storage.
 MONA Mailmonamail.vnSend OTP, order and invoice emails from your software.
 MONA Paymonapay.vnAccept bank transfers via VietQR and notify your software when the money arrives.
 MONA eInvoiceComing soonIssue e-invoices that meet tax standards.
Gấu CườiTrả lời khách 24/7 trên web, Fanpage, Zalo và thu lead cho sale.
 Gấu TeleSalesGọi điện tư vấn, chăm khách như tổng đài viên thật.
Dê CườiTư vấn và chốt đơn cho shop ngay trong khung chat.
Gấu WebmasterNhắn nhóm Zalo là website được sửa xong.
 Gấu Pháp ChếSoạn hợp đồng, rà điều khoản trong vài phút.
 Gấu Báo GiáLên báo giá đúng mẫu và gửi khách ngay.
 AI chăm sóc khách hàngTheo dõi và giữ chân khách hàng cũ.
 Gấu Tuyển DụngLọc hồ sơ, hẹn lịch, phỏng vấn ứng viên.
 Mới ra mắt
KHA AI 2027
Xây kênh chuyên gia 2 phút mỗi ngày
Quay bằng điện thoại, AI tự edit video, tự đăng lên 16 nền tảng và tự trả lời bình luận, tin nhắn.
886.120lượt xem trên kênh CEO MONA sau 36 ngày
 Anh Khánh HùngCEO MONA đang dùng mỗi ngày
Xem app làm được gì
 AI
Gấu Cười MONA ĐANG TỰ XÀITrả lời khách 24/7 trên website, Zalo OA, Messenger và thu lead về cho sale.
Dê CườiChốt đơn bán lẻ và sàn: Shopee, TikTok Shop, web. Chăm cả khách sỉ, đại lý.
Gấu WebmasterCập nhật nội dung, tối ưu SEO website mỗi ngày.
Gấu TeleSalesGọi điện tư vấn, chăm khách như tổng đài viên thật.
Gấu Tuyển DụngLọc hồ sơ, hẹn lịch, phỏng vấn ứng viên tự động.
AI chăm sóc khách hàngGiữ khách cũ, cứu lead đã rớt cho phòng kinh doanh.
Gấu Pháp ChếSoạn hợp đồng, rà điều khoản trong vài phút.
Gấu Báo GiáLên báo giá đúng mẫu, gửi khách ngay khi có yêu cầu.
 Chuyển đổi AI toàn phầnGiải pháp tổng cho doanh nghiệp, 3 lớp triển khai.
 Viết AI Agent theo yêu cầuĐặt riêng một con AI gánh đúng nghiệp vụ của bạn.
 Custom softwareCRM, ERP and HRM with built-in AI automation.
 SEO & AEO thời đại AIĐược Google lẫn AI trích dẫn, không chỉ xếp hạng.
 Kiến thức AI cho doanh nghiệpBài phân tích, hướng dẫn ứng dụng AI vào vận hành.
 Free AI courses
 AI tools at work
App mới · KHA AI 2027
Xây kênh 2 phút mỗi ngày
AI tự edit video, tự đăng mọi mạng xã hội
Free consultation, 8am–10pm every day

18 March, 2023

Zalo is one of the biggest social networks in Vietnam. It is popular not only for being easy and quick to use, but also for its relatively strong security. Some people use it for starting an online business, while others use it to stay in touch… So why not integrate Zalo chat into a website and turn them into a way to connect you with your website visitors? If you don't know how to do it yet, follow the guide below.
As mentioned above, Zalo is a very easy-to-use social network, simple enough for older people and the "tech-challenged" alike. That is why it has become so popular and is used more than any other app. Choosing to integrate Zalo chat into a website gives webmasters one more chat channel to support customers better.
The reason the extra chat channel on your website is Zalo, and not some other app, comes down to the outstanding advantages Zalo gives its users:
The website chat tools such as LiveChat or GoChat need a lot of steps and outside help to add to a site, whereas with Zalo the process is much simpler.
In addition, visitors who chat through Zalo can keep the conversation going and stay in touch with the site's admins even after they leave the website. This works thanks to the message history stored in the customer's own Zalo app.
Finally, another plus for the website management team is that the Zalo chat box lets customers like and share your fanpage without needing a separate link to it.
In short, integrate Zalo chat into a website is a smart and economical move. It's free, so why not take advantage of it?
See more: A guide to selling effectively on Zalo
A Zalo chat box on your website only opens the door for customers to message you. Who answers, and how fast, is another matter. If your team can't cover every hour of the day, you can add an AI chatbot for your website and Zalo so that repeated questions are handled by the machine and your people only take the cases that really need advice.
Buying integrate Zalo chat into a website There are many guides out there, but they generally come down to two methods. The first is to paste the Zalo code directly into the WordPress widgets. The second is to install the OT Zalo plugin, which works much like Zalo chat. The second may sound long-winded, but the steps are actually very simple.
Whichever method you choose, you will need a guide. Each has its own pros and cons. Pasting the code takes more time and steps, while downloading and unpacking the OT Zalo plugin involves quite a bit of technical jargon. Look at the two methods below and pick the simplest one for you.
Step 1: Open a Zalo OA account
A Zalo OA (Official Account) is required if you want to use Zalo chat.
Go to https://oa.Zalo.me/home to register an account. The steps are simple, with notes and detailed instructions along the way.

Visit the website to open a Zalo OA account.
Step 2: Choose an account type
To register an Official Account, you need to choose an account type as shown below. Under each type there is a short description of what it is for. Think carefully and pick the right type, because each one has its own strengths.
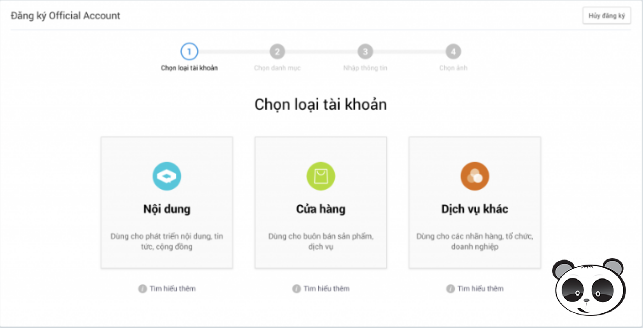
Choose the account type that fits your purpose.
Step 3: Choose a category
This is the most important step, because it helps search bots understand what field your website operates in. As a result, advertising and reaching your target customers become more accurate. For example, if your website sells fashion products, choose "Store – Services" as the main category and enter "Fashion" as the subcategory, as in the image below.
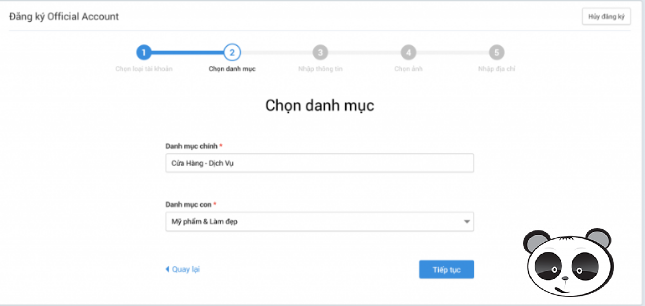
Choose the category that matches your business.
Step 4: Enter your information
You need to fill in the required information. These steps are also very simple:
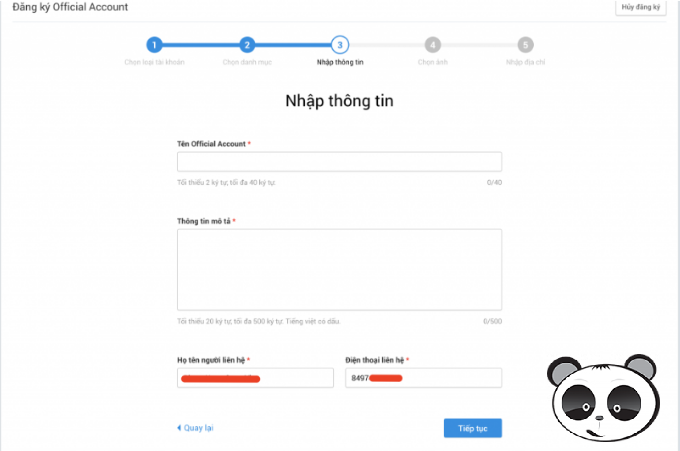
Enter the basic information for the app.
Account name: choose an easy-to-remember name, or use your website's name
Short description of the account: at least 20 and at most 500 characters, any content you like.
Contact person's full name:
Phone number: usually a number that already has a personal Zalo account. Webmasters typically use the company's general phone number or hotline.
Step 5: Choose images for your OA account
Just as when you register a Facebook or Zalo account, choosing a cover photo and a profile picture makes it easier for people to recognize you. Using original images for your OA account is also a way to avoid drawing unwanted attention from Google's bots to your website's account.
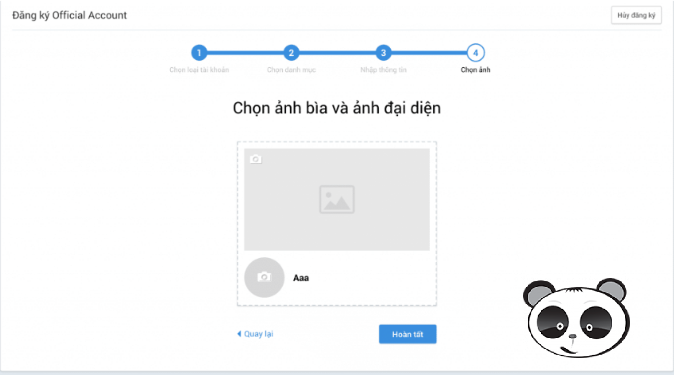
Choose a profile picture for your account.
Step 6: Verification
After filling in all the required information and images, you need to scan the verification documents for the reviewers. These can be a business license, a tax code certificate, or other related documents. All uploaded documents must be clear and legible, showing the company or business name and the red stamp, and must still be valid. You complete this verification at: https://oa.Zalo.me/manage/cert
Because this step matters so much, in step 2 (choosing an account type) you need to pick the type that exactly matches your website. This makes the review go much more smoothly.
Normally you wait about 24 hours (excluding days off) for the Zalo team to review the information. If anything is missing or incorrect, Zalo will tell you so you can add or correct it.
Step 1: Get the code
Once the review is approved, your OA account is activated. Now it's time to integrate it into your website.
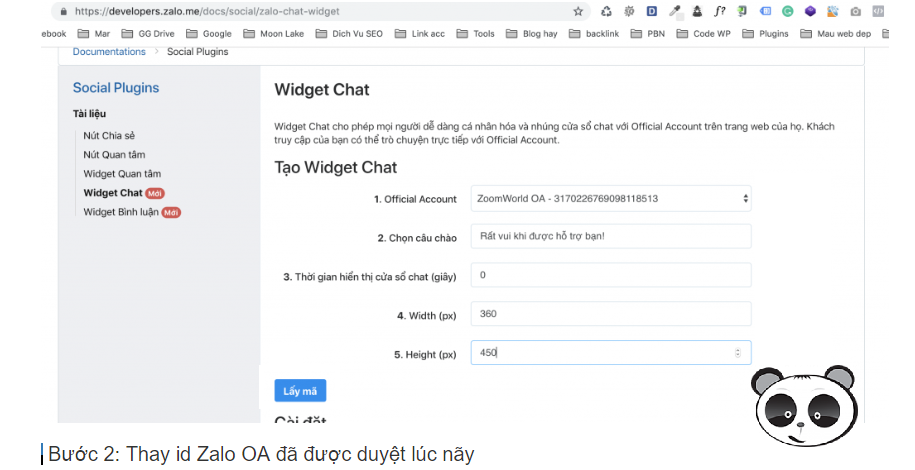
Once the review is approved, go ahead and get the code.
Go to: https://developers.Zalo.me/docs/social/Zalo-chat-widget
Here you create a Chat Widget with the 5 options provided, as shown below. Adjust the values to suit you:
1, Official Account: your official account
2, Choose a greeting: the default greeting shown when customers use Zalo chat on your website.
3, Chat window display time:
4, Width: the width of the chat box shown on your website
5, Height: the height of the chat box shown on your website
After filling in this information, click "Get code". A dialog box will appear with the code. Copy the code that includes the numbers.
Step 2: Embed the code in the chat widget
From the main screen of wordpress, go to Dashboard -> Appearance > Customize > Widgets > Primary Sidebar > Add Widgets.
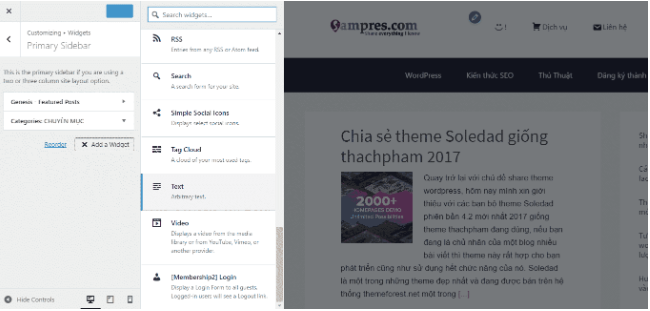
Embed the code in the chat widget.
Here, choose the "Text" widget and paste in the code you just copied in the previous step.
Click "Save & Publish" to finish.
Step 3: Website checks has been updated yet?
Go back to your website's main screen. If you see the Zalo icon, you have integrate Zalo chat into a website succeeded. To view and reply to customer messages, go to: https://oa.Zalo.me/chatv2 or download the Zalo OA Admin app from app stores such as Google Play or the App Store.
Adding Zalo chat by getting the code takes quite a lot of time and steps. To save time and effort, many webmasters choose to add Zalo chat to their website by installing the OT Zalo chat plugin. Do you know how to install this tool?
Step 1: Go to the link: Download OT Zalo and install it as usual. The plugin itself explains the installation steps in detail, so you just need to follow along.
Step 2: Fill in the information in the "Setting" section
Go to Setting > OT Zalo. A dialog box will appear with the information to fill in, as shown below:
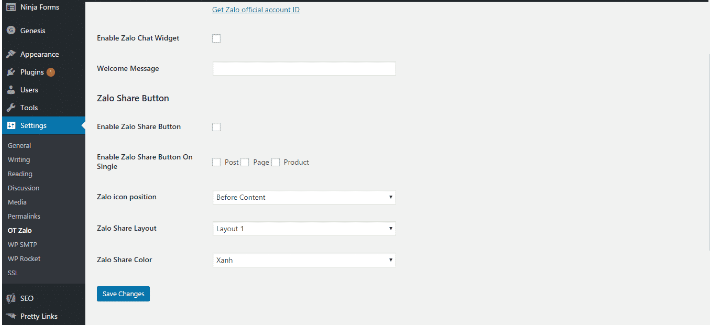
Fill in the plugin information in the settings section of your website.
That completes adding Zalo to your website with the plugin. Click "Save Changes" to finish.
Above is a guide to integrate Zalo chat into a website. These steps were carried out on website WordPress. We hope this article gives readers plenty of useful information.
You know what your website is missing, but … you is never are not a website management expert and lack the skills for:
MONA Media offers website optimization and upgrade plans tailored to your needs so your website turns out exactly the way you want.


CEO & Founder · The MONA
Founder of The MONA, who built a services company of 60+ staff with 14,000+ projects delivered. Khánh Hùng shares how he thinks about building systems that run themselves, automating a business, and the real lessons from delivering projects at MONA.
 1,6K




Professional website
design services
Own a website with a beautiful, 100% exclusive design and a lifetime warranty, with the ability
to expand features flexibly as your business grows, starting today!



NHẬN TƯ VẤN SEO MIỄN PHÍ !






 MONA will never sell your information or send you spam


 MONA will never sell your information or send you spam
